# luis
> List-of-uis book and testing of uis
Latest version **3.2.13** (published 2019-04-11) · MIT license · 0 weekly downloads
## Install
```sh
npm install luis
pnpm add luis
yarn add luis
bun add luis
```
Provides the command `luis`.
## Health
**Score 20/100 (F)** — status: abandoned.
Positive: has types; no vulnerabilities.
Warnings: low downloads; no esm support.
Negative: abandoned; low maintenance score.
## Facts
| | |
|---|---|
| Version | 3.2.13 |
| Published | 2019-04-11 |
| First published | 2017-02-17 |
| Weekly downloads | 0 |
| License | MIT |
| TypeScript types | bundled |
| Module format | CommonJS |
| Dependencies | 10 |
| Unpacked size | 192.2 KB |
| Known vulnerabilities | 0 |
| Install scripts | no |
| GitHub stars | 27 |
| Author | tomi.trescak@gmail.com |
| Maintainers | tomitrescak |
| Keywords | ui, react |
## Links
- npm: https://www.npmjs.com/package/luis
- Repository: https://github.com/tomitrescak/luis
- Homepage: https://github.com/tomitrescak/luis#readme
- Issues: https://github.com/tomitrescak/luis/issues
- npm.io page: https://npm.io/package/luis
## Dependencies (10)
- [glob](https://npm.io/package/glob.md) ^7.1.3
- [mobx](https://npm.io/package/mobx.md) *
- [tslib](https://npm.io/package/tslib.md) *
- [diff-view](https://npm.io/package/diff-view.md) ^1.0.12
- [mobx-react](https://npm.io/package/mobx-react.md) *
- [typescript](https://npm.io/package/typescript.md) *
- [react-highlight](https://npm.io/package/react-highlight.md) ^0.12.0
- [@tomino/toolbelt](https://npm.io/package/@tomino/toolbelt.md) ^1.1.3
- [react-split-pane](https://npm.io/package/react-split-pane.md) ^0.1.85
- [semantic-ui-react](https://npm.io/package/semantic-ui-react.md) *
## Alternatives
- [mobx-react](https://npm.io/package/mobx-react.md) — 2.8M weekly downloads
- [rc-tree](https://npm.io/package/rc-tree.md) — 2.6M weekly downloads
- [@react-oauth/google](https://npm.io/package/@react-oauth/google.md) — 1.3M weekly downloads
- [@wagmi/connectors](https://npm.io/package/@wagmi/connectors.md) — 877.0K weekly downloads
- [vee-validate](https://npm.io/package/vee-validate.md) — 836.4K weekly downloads
## Recent versions
- 3.2.13 (latest) — 2019-04-11
- 3.2.11 — 2019-03-10
- 3.2.10 — 2019-03-01
- 3.2.9 — 2019-02-28
- 3.2.8 — 2019-02-25
- 3.2.4-rc.1 — 2019-02-21
- 3.2.3 — 2019-02-19
- 3.2.2 — 2019-02-17
- 3.2.1 — 2019-02-17
- 3.2.0 — 2019-02-17
- 3.1.14 — 2019-02-15
- 3.1.12 — 2019-02-15
- 3.1.11 — 2019-02-15
- 3.1.10 — 2019-02-15
- 3.1.9 — 2019-02-15
- … 221 more at https://npm.io/package/luis/versions
## README

LUIS: Component development and testing framework
# TL; DR;
Luis brings:
* React component development
* Seamless snapshot-based testing
* Snapshot management
* Web component catalogue
* Integration with VS Code and Wallaby.js
... and much more!
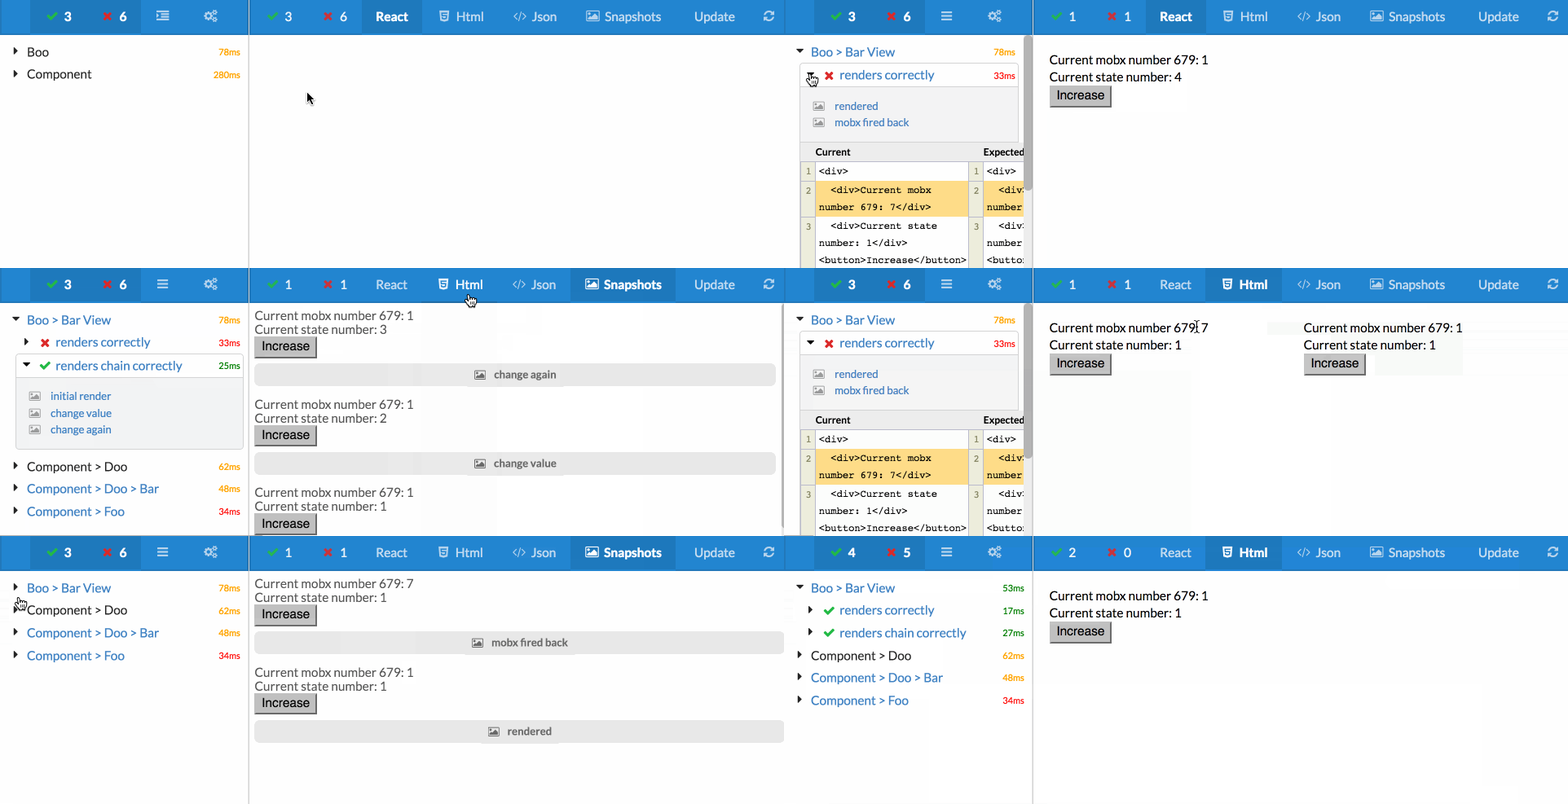
# Introduction
LUIS (**L**ist of **U**ser **I**nterface**s**) is framework for collaborative building and testing React web components. It harnesses the power of [FuseBox](https://github.com/fuse-box/fuse-box) for **fastest** bundling, hot reloads, and out-of-the-box Typescript support. Following are stats for application with 976 typescript sources and 56 imported packages:
* **StoryBook** — Start `36 seconds`, Hot Module Reload with sourcemaps `9 seconds`.
* **LUIS** — Start `400 ms`, Hot Module Reload with sourcemaps `750 ms`. Now that's what I call a significant difference.
Luis is using well known technologies ([Jest](https://facebook.github.io/jest/), [Mocha](https://mochajs.org), [React](https://reactjs.org), optionally [Wallaby](https://wallabyjs.com)) and methodologies (TDD, BDD, Snapshot testing), so there is almost nothing new to learn (apart from two new functions, **storyOf** and **itMountsAnd**).
To facilitate your component development, testing, and collaboration LUIS supports four different modes. Each mode is described in detail further below.
# Quick Start
If you wish to run Luis only as component catalogue, similar to StoryBook, all you need to do is:
1. Import package
2. Import stories
3. Render Luis UI
Start with the standard:
```
yarn add luis --dev
```
Next add your luis in package.json. You can either use only a `luis` command that estimates your config file be located at `src/luis.ts`, or you can provide your `root` and `path/to/luis.ts` as your parameters.
```json
{
"scripts": {
"luis": "luis",
"luis-custom-path": "luis root-dir path/to/luis.ts"
}
}
```
If you are ok with a [standard luis config](https://github.com/tomitrescak/luis/blob/master/luis.fuse.js) all you need to do is to set up Luis and import all your stories.
```ts
// luis.ts
import { renderLuis, setupTestBridge } from 'luis';
// this needs to be there to set up custom global function that luis uses
// such as: storyOf
setupTestBridge();
// import all your stories and tests
import './client/modules/home/tests/example.test';
// render luis ui to '#react-root'
renderLuis();
```
And here is an example story:
```ts
import * as React from 'react';
storyOf('Component With Test', {
get component() {
return My Component
;
}
});
```
If you want to know the full API os storyOf command, go to the [API section](#API).
## Custom FuseBox Configuration
If you need a custom FuseBox config to package Luis, all you need to do is to define a `luis.fuse.js` in your project root. **WARNING**: You need to define your `homeDir` in fuse config with `'../../'` prefix (e.g.`homeDir: ../../src`. *I could not figure out how to convince `require` to change root and start from a different directory. **PRs welcome!***.
## Importing Luis to an existing application
You can easily use Luis in your exisiting application under its own route (e.g. `/louis`). Following is the tutorial to set this in the application with react-router.
```ts
// router
import { LuisView } from '../modules/luis';
...
...
```
And now the `LuisView` component, where we import all our stories
```ts
// LuisView.tsx
import * as React from 'react';
import { Luis, setupTestBridge } from 'luis';
// this allows us to read storyOf commands
setupTestBridge();
// function makes sure the content hot-reloads
export function LuisView() {
// import all your stories
require('../home/tests/home_view.test');
return Luis;
}
```
# Adding Tests
Luis works also as a sophisticated test result viewer. In this example, we will be working with Jest. Note that Luis also works with mocha with a [related reporter](https://github.com/tomitrescak/luis-mocha-reporter). To allow Luis to display test results, we will export a test report after each test run. Therefore, in your `jest.config.js` add:
```js
module.exports = {
testResultsProcessor: 'luis/dist/bridges/jest/reporter',
...
}
```
The processor will save a test report after each test run and save it in your `/src/` folder. Both, summary (e.g. summary.json) and a list of detected snapshots (snapshots.js) is saved. If you want to enable snapshots and test reports in luis, you need to tell FuseBox to pack them into your bundle. This is done via SnapshotPlugin and JSONPlugin. Therefore, in your `fuse.js`:
```js
// fuse.js
const { FuseBox, ..., JSONPlugin } = require('fuse-box');
const { SnapshotPlugin } = require('luis/dist/bridges/jest/snapshot_plugin');
const fuse = FuseBox.init({
...
plugins: [
JSONPlugin(),
SnapshotPlugin()
],
sourceMaps: true
});
```
Now, we need to tell FuseBox, to pack them into our bundle. A good space for this is in the `LuisView.tsx` file:
```js
// LuisView.tsx (see above)
// adjust paths as necessary
const summary = require('../../../summary.json');
const snapshots = require('../../../snapshots');
setupTestBridge(summary, snapshots);
```
Now you are ready to visualise your tests in Luis. Make sure you run jest on server in watch mode. Yet, there he problem is, that Jest does not recognise `storyOf` command. Therefore we create a new file `jest.setup.js` and then modify the `jest.config.js` to execute this file before each test run. Also, we need to tell jest to ignore the jest generated files.
```js
// jest.setup.js
global.storyOf = function(name, props, impl) {
describe(name, () => impl && impl(props));
};
```
and
```js
// jest.config.js
module.exports = {
...
"setupTestFrameworkScriptFile": "/jest.setup.js",
"watchPathIgnorePatterns": ['/src/summary.json', '/src/snapshots.js'],
}
```
If you are using wallaby, make sure to run `jest.setup.js` as well
THAT'S IT! ENJOY!
# Luis Interface

The main buttons of Luis interface perform following actions:
1. Tree mode / flat mode changes the way the list of tests are displayed
2. Configuration allows you to enable / disable specific tests and more
3. Update button updates current snapshot to the new version and saves it on your drive
4. Auto-update toggle allows to update snapshot automatically when tests are run. This is very useful during component development and writing of tests.
Luis has four view modes:
1. _React_: Displays a "live" React components, used mostly during component development
2. _Html_: Displays a HTML version of the snapshot and shows side-by-side comparison if snapshots differ.
3. _Json_: Displays _raw_ source of the snapshot and compares the differences
4. _Snapshots_: Show all saved snapshots for a current test
_Tree view_ shows all tests and snapshots. It also shows all test results, and if possible, it shows side-by-side comparison of actual vs. expected value. The number next to the test item represent the execution time of the test. When number is:
* Green - all tests pass
* Orange - some tests pass
* Red - all tests fail
The exact functionality of each button is shown below:

# API
The API of Luis is dead simple. It uses classic testing methodology using `describe, it, before, beforeEach, beforeAll, after, afterEach, afterAll` and `xit` for skipping tests.
The specific significance has `describe` function, which represents a `folder` in luis and it is rendered accordingly in the test tree. The new functions are `storyOf` and `itMountsAnd` and matcher `matchSnapshot`.
## storyOf
We have borrowed the naming from the very popular [Storybook](https://storybook.js.org) package. The `storyOf` function is an extension of the `describe` and its purpose is to define a React component and all the tests with snapshots. Followiong is a definition of `storyOf`:
```typescript
interface StoryConfig {
[index: string]: any;
component: JSX.Element;
info?: string;
cssClassName?: string;
componentWithData?(
...props: any[]
):
| JSX.Element
| {
[index: string]: any;
component: JSX.Element;
afterMount?(wrapper: ReactWrapper): void;
};
}
function storyOf(
name: string,
config: T,
implementation: (params: T) => void
): void;
```
The only compulsory parameter of the `config` part of the `storyOf` is `component`, which needs to return a `JSX.Element`, for example `Luis
`. The `info` stores the description of the story, and `cssClassName` adds a css class to the element which will wrap your rendered React component. `componentWithData` is a very versatile function that allows you to define variations of your component (examples below) and modify the component after it has been mounted. Following is an example of the `storyOf` function:
```jsx
storyOf(
'My Component',
{
someData: 1,
get component() {
return My component
;
}
},
function({ someData, component }) {
it('mounts component', function() {
const wrapper = mount(component); // now do some tests
});
it('tests', function() {
expect(someData).toEqual('1');
});
}
);
```
# Adding Test Files
If you add a new test file, you need to import to `src/example/luis`. This is the start file of Luis project. This can be changed in `fuse.js` file.
```js
import { renderLuis } from '../client/components/index';
import './tests/foo.test';
import './tests/bar.test';
import './tests/boo.test';
renderLuis();
```
# [Visual Studio Extension: Luis](https://marketplace.visualstudio.com/items?itemName=Tomas.luis-snapshot-preview)
[The Extension for Visual Studio Code](https://marketplace.visualstudio.com/items?itemName=Tomas.luis-snapshot-preview) comes with two awesome functionalities:
1. You can visualise current snapshot directly in Code environment. Just press `CMD + P` and search from `Luis: Snapshot Preview`. The snapshot will automatically load snapshots from the current test. This functionality works really well with automated test runner such as _wallabyjs_, or _mocha_ or _jest_ in watch test mode, and with snapshot delivery over TCP, since snapshots automatically change as you type.

2. You can work directly with a React component which is hot reloaded into your envirnment. Just press `CMD + P` and search from `Luis: Component Preview`. For this to work, you need to first run Luis (`npm start luis`). If you need to access the development console of the previewed component press `CMD + P` and search for `Luis: Show Componnt Dev Tools`. The previewed component automatically changes based on your selected test. The simplified interface provides following functionality:
* See test result and test run time
* Visualise the React component and manually test its functionality (great for development)
* Visualise the difference between current component state and saved snapshot
* Visualise the code difference between current component and snapshot
* Update snapshot
* Set automatic snapshot update with each hot reload

# Troubleshooting
If at any point things start to go sideways, try deleting the .fusebox folder in the root of your project and restart Luis.
---
_Source: https://npm.io/package/luis · Machine-readable twin of the npm.io package page. Health data is recomputed on every publish._