# node-rfid
> A node module to interface rc522 rfid reader with raspberry pi via node js!!!
Latest version **1.0.7** (published 2018-02-27) · ISC license · 0 weekly downloads
## Install
```sh
npm install node-rfid
pnpm add node-rfid
yarn add node-rfid
bun add node-rfid
```
## Health
**Score 15/100 (F)** — status: abandoned.
Positive: no vulnerabilities.
Warnings: low downloads; no types; no esm support.
Negative: abandoned; low maintenance score.
## Facts
| | |
|---|---|
| Version | 1.0.7 |
| Published | 2018-02-27 |
| First published | 2018-02-27 |
| Weekly downloads | 0 |
| License | ISC |
| TypeScript types | none |
| Module format | CommonJS |
| Dependencies | 0 |
| Unpacked size | 53.8 KB |
| Known vulnerabilities | 0 |
| Install scripts | no |
| GitHub stars | 19 |
| Author | Electrocoders |
| Maintainers | beeplove1, electro_coders |
| Keywords | rfid, node-rfid, rfid-reader, rfid-node, rc522-reader, rc522 |
## Links
- npm: https://www.npmjs.com/package/node-rfid
- Repository: https://github.com/BeepLoveKarki/node-rfid
- Homepage: https://github.com/BeepLoveKarki/node-rfid#readme
- Issues: https://github.com/BeepLoveKarki/node-rfid/issues
- npm.io page: https://npm.io/package/node-rfid
## Alternatives
- [@sindresorhus/slugify](https://npm.io/package/@sindresorhus/slugify.md) — 3.7M weekly downloads
- [solid-js](https://npm.io/package/solid-js.md) — 2.7M weekly downloads
- [expo-glass-effect](https://npm.io/package/expo-glass-effect.md) — 2.5M weekly downloads
- [nanoassert](https://npm.io/package/nanoassert.md) — 780.8K weekly downloads
- [@ffmpeg/ffmpeg](https://npm.io/package/@ffmpeg/ffmpeg.md) — 529.5K weekly downloads
## Recent versions
- 1.0.7 (latest) — 2018-02-27
- 1.0.6 — 2018-02-27
- 1.0.5 — 2018-02-27
- 1.0.4 — 2018-02-27
- 1.0.3 — 2018-02-27
- 1.0.2 — 2018-02-27
- 1.0.1 — 2018-02-27
- 1.0.0 — 2018-02-27
## README
# node-rfid
This module supports both Raspberry Pi (RPi) and BeagleBone Black development boards.
It requires your RPi (or BeagleBone Black) SPI interface to be enabled for being used. For that:
a) Go the terminal and type:
```
sudo raspi-config
```
b) This will open your raspi-config interface. Choose Advanced Options if no Interfacing Options is found else choose Interfacing Options.
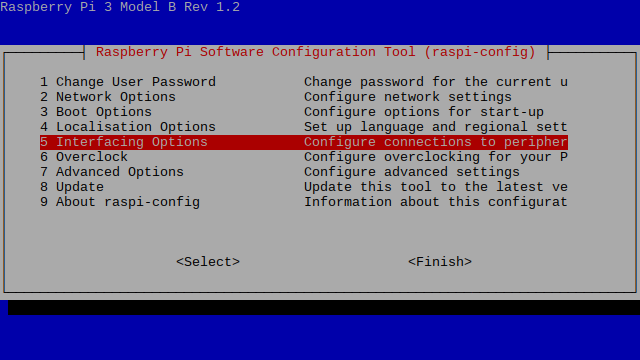 c) This will redirect you to next interface with various interfaces options. From those options choose the option SPI.
 After following these procedures, just hook up your rc522 rfid reader to the RPi (or BeagleBone Black) with the following datasheet:
| RC522 pin name |
RC522 pin number |
RPi pin number |
RPi pin name |
Beaglebone Black pin name |
| SDA |
1 |
24 |
GPIO8,CEO |
P9_17, SPI0_CS0 |
| SCK |
2 |
23 |
GPIO11,SCKL |
P9_22, SPI0_SCLK |
| MOSI |
3 |
19 |
GPIO10,MOSI |
P9_18, SPI0_D1 |
| MISO |
4 |
21 |
GPIO9,MISO |
P9_21, SPI0_D0 |
| IRQ |
5 |
18 |
GPIO24 |
P9_15, GPIO_48 |
| GND |
6 |
6 or 9 or 20 or 25 |
Ground |
Ground |
| RST |
7 |
22 |
GPIO25 |
P9_23, GPIO_49 |
| 3.3V |
8 |
1 or 17 |
3V3 |
VDD_3V3 |
The schematic image for raspberry pi is:
 Note: The image is for RPi2, but the same works for RPi3 too!!!
After this, just browse to your node working directory through terminal via the command:
```
cd /folder_path
```
Then just install this node module as:
```
npm install node-rfid
```
This will add the node-rfid module to your node_modules folder
Now in your working nodejs code (or by creating a new file) just following the below guideline example:
Note: The image is for RPi2, but the same works for RPi3 too!!!
After this, just browse to your node working directory through terminal via the command:
```
cd /folder_path
```
Then just install this node module as:
```
npm install node-rfid
```
This will add the node-rfid module to your node_modules folder
Now in your working nodejs code (or by creating a new file) just following the below guideline example:
Simple reading
This code waits the until the rfid tag is shown to the rfid reader
```javascript
var rfid=require('node-rfid');
rfid.read(function(err,result){
if(err) console.log("Sorry, some hardware error occurred"); //some kind of hardware/wire error
console.log(result); //print rfid tag UID
});
```
Reading with time limit
This code waits thr rfid tag to be shown to the rfid reader within a time linit, else displays timeout message. The following sample waits for 5000 ms (5 s) for the rfid reader to get rfid tag shown to it. On reaching or exceeding the time limit, the timeout message is displayed. You may change the time limit by passing the time in millisecond as the first parameter in the function "readintime".
For example: for 1 second time limit, just pass 1000.
```javascript
var rfid=require('node-rfid');
rfid.readintime(5000,function(err,result){
if(err) console.log("Sorry, some hardware error occurred"); //some kind of hardware/wire error
if(result=="timeout"){
console.log("Sorry, You timed out"); //check if time exceeded the time you passed as argument and print timeout message
}else{
console.log(result); //print rfid tag UID
}
});
```
Now just run your js file as below and see the output in the terminal:
```
node /file_name
```
---
_Source: https://npm.io/package/node-rfid · Machine-readable twin of the npm.io package page. Health data is recomputed on every publish._