# pigpio
> Fast GPIO, PWM, servo control, state change notification, and interrupt handling on the Raspberry Pi
Latest version **3.3.1** (published 2021-04-30) · MIT license · 0 weekly downloads
## Install
```sh
npm install pigpio
pnpm add pigpio
yarn add pigpio
bun add pigpio
```
## Health
**Score 25/100 (F)** — status: abandoned.
Positive: has types; no vulnerabilities; high quality score.
Warnings: low downloads; no esm support.
Negative: abandoned; low maintenance score.
## Facts
| | |
|---|---|
| Version | 3.3.1 |
| Published | 2021-04-30 |
| First published | 2015-10-13 |
| Weekly downloads | 0 |
| License | MIT |
| TypeScript types | bundled |
| Module format | CommonJS |
| Node | >=10.0.0 |
| Dependencies | 2 |
| Unpacked size | 1 MB |
| Known vulnerabilities | 0 |
| Install scripts | yes |
| GitHub stars | 967 |
| Author | fivdi |
| Maintainers | fivdi |
| Keywords | gpio, pwm, servo, iot, interrupt, raspberry, raspi, rpi, pi |
## Links
- npm: https://www.npmjs.com/package/pigpio
- Repository: https://github.com/fivdi/pigpio
- Homepage: https://github.com/fivdi/pigpio#readme
- Issues: https://github.com/fivdi/pigpio/issues
- npm.io page: https://npm.io/package/pigpio
## Dependencies (2)
- [nan](https://npm.io/package/nan.md) ^2.14.2
- [bindings](https://npm.io/package/bindings.md) ^1.5.0
## Alternatives
- [@openai/codex-sdk](https://npm.io/package/@openai/codex-sdk.md) — 731.4K weekly downloads
- [babel-plugin-transform-react-jsx](https://npm.io/package/babel-plugin-transform-react-jsx.md) — 565.0K weekly downloads
- [babel-helper-remove-or-void](https://npm.io/package/babel-helper-remove-or-void.md) — 508.5K weekly downloads
- [@pnpm/store-controller-types](https://npm.io/package/@pnpm/store-controller-types.md) — 186.9K weekly downloads
- [react-native-signature-canvas](https://npm.io/package/react-native-signature-canvas.md) — 155.6K weekly downloads
## Recent versions
- 3.3.1 (latest) — 2021-04-30
- 3.3.0 — 2021-01-06
- 3.2.4 — 2020-09-26
- 3.2.3 — 2020-05-11
- 3.2.2 — 2020-05-08
- 3.2.1 — 2020-05-02
- 3.2.0 — 2020-05-02
- 3.1.1 — 2020-04-24
- 3.1.0 — 2020-04-08
- 3.0.0 — 2020-01-12
- 2.0.1 — 2019-09-22
- 2.0.0 — 2019-09-07
- 1.3.0 — 2019-09-06
- 1.2.3 — 2019-06-16
- 1.2.2 — 2019-03-16
- … 34 more at https://npm.io/package/pigpio/versions
## README
[](https://www.npmjs.com/package/pigpio)
[](https://www.npmjs.com/package/pigpio)
[](https://github.com/sindresorhus/awesome-nodejs)
# pigpio
A wrapper for the [pigpio C library](https://github.com/joan2937/pigpio) to
enable fast GPIO, PWM, servo control, state change notification and interrupt
handling with **Node.js** on the Raspberry Pi Zero, 1, 2, 3 or 4.
pigpio supports Node.js versions 10, 12, 14, 15 and 16.
## Contents
* [Features](#features)
* [Installation](#installation)
* [Usage](#usage)
* [Pulse an LED with PWM](#pulse-an-led-with-pwm)
* [Buttons and Interrupt Handling](#buttons-and-interrupt-handling)
* [Servo Control](#servo-control)
* [Measure Distance with a HC-SR04 Ultrasonic Sensor](#measure-distance-with-a-hc-sr04-ultrasonic-sensor)
* [Determine the Width of a Pulse with Alerts](#determine-the-width-of-a-pulse-with-alerts)
* [Debounce a Button](#debounce-a-button)
* [Generate a waveform](#generate-a-waveform)
* [Sending a wavechain](#sending-a-wavechain)
* [API Documentation](#api-documentation)
* [Limitations](#limitations)
* [Troubleshooting](#troubleshooting)
* [Related Packages](#related-packages)
## Features
* Digital IO
* Up to 3.5 million digital reads per second *)
* Up to 2.5 million digital writes per second *)
* PWM on any of GPIOs 0 through 31
* Multiple frequencies and duty cycle ranges supported
* Servo control on any of GPIOs 0 through 31
* Jitter free
* Alerts when any of GPIOs 0 through 31 change state
* The time of the state change is available accurate to a few microseconds
* Notification streams for monitoring state changes on any of GPIOs 0 through 31 concurrently
* The time of the state changes are available accurate to a few microseconds
* Low latency interrupt handlers
* Handle up to 20000 interrupts per second *)
* Read or write up to 32 GPIOs as one operation with banked GPIO
* Trigger pulse generation
* Pull up/down resistor configuration
* Waveforms to generate GPIO level changes (time accurate to a few µs)
*) On a Raspberry Pi 4 Model B running Raspberry Pi OS 2021-03-04 (Buster
10.8) with pigpio v3.3.1, Node.js v16.0.0 and V79 of the pigpio C library.
## Installation
#### Step 1 - Install the pigpio C library
The [pigpio C library](https://github.com/joan2937/pigpio) is a prerequisite
for the pigpio Node.js module.
Run the following command to determine which version of the pigpio C library
is installed:
```
pigpiod -v
```
For the Raspberry Pi Zero, 1, 2 and 3 V41 or higher of the pigpio C library is
required. For the Raspberry Pi 4 V69 or higher is required.
If the pigpio C library is not installed or if the installed version is too
old, the latest version can be installed with the following commands:
```
sudo apt-get update
sudo apt-get install pigpio
```
Alternative installation instructions for the pigpio C library can be found
[here](http://abyz.me.uk/rpi/pigpio/download.html).
**Warning:** The pigpio C library contains a number of utilities. One of these
utilities is pigpiod which launches the pigpio C library as a daemon. This
utility should not be used as the pigpio Node.js package uses the C library
directly.
#### Step 2 - Install the pigpio Node.js package
```
npm install pigpio
```
## Usage
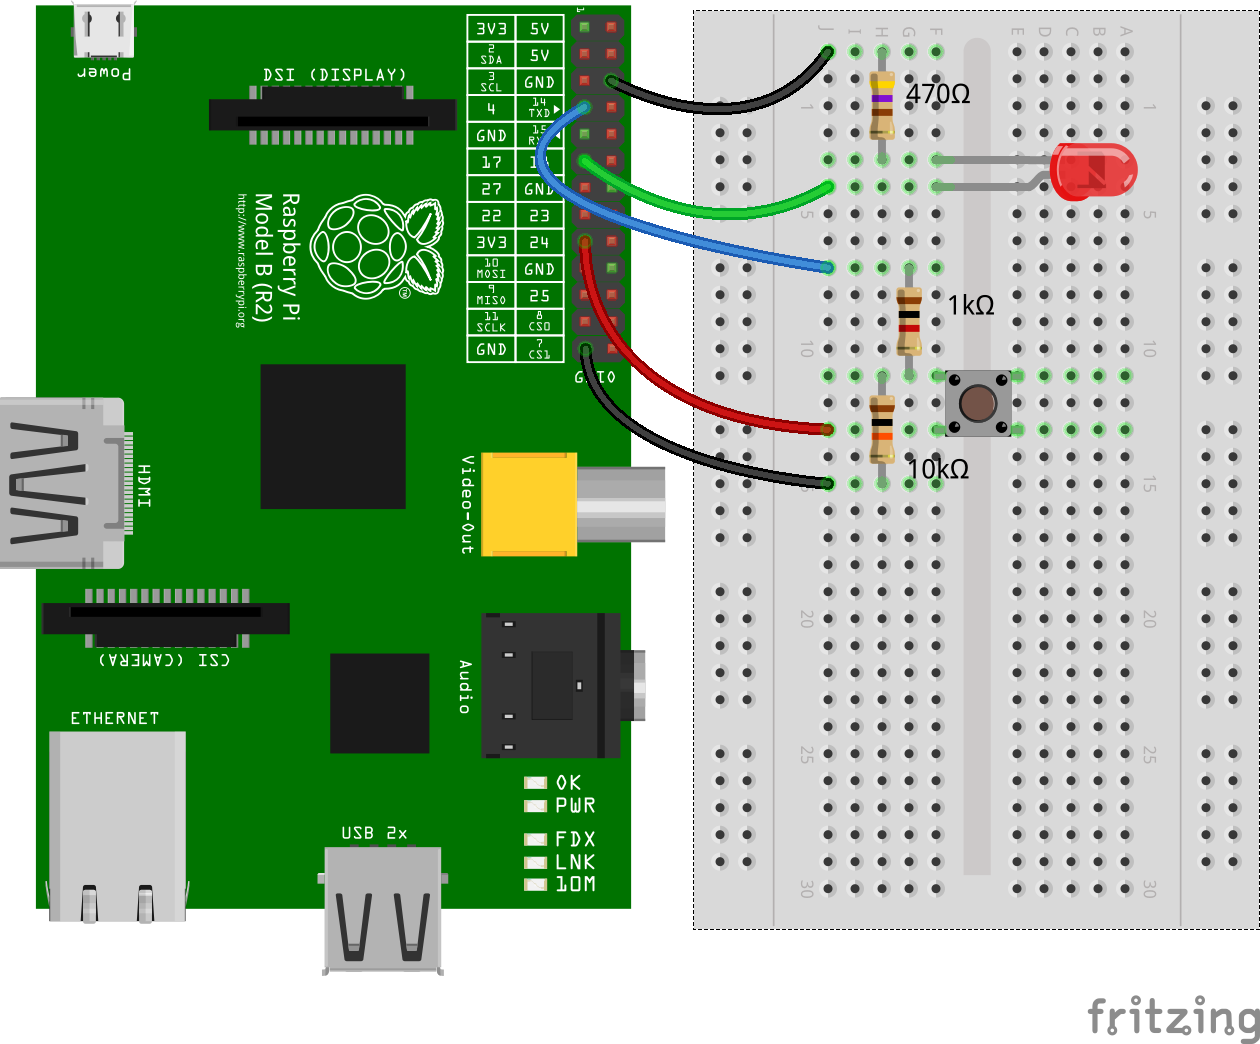
Assume there's an LED connected to GPIO17 (pin 11) and a momentary push button
connected to GPIO4 (pin 7).
 #### Pulse an LED with PWM
Use PWM to pulse the LED connected to GPIO17 from fully off to fully on
continuously.
```js
const Gpio = require('pigpio').Gpio;
const led = new Gpio(17, {mode: Gpio.OUTPUT});
let dutyCycle = 0;
setInterval(() => {
led.pwmWrite(dutyCycle);
dutyCycle += 5;
if (dutyCycle > 255) {
dutyCycle = 0;
}
}, 20);
```
#### Buttons and Interrupt Handling
Turn the LED connected to GPIO17 on when the momentary push button connected to
GPIO4 is pressed. Turn the LED off when the button is released.
```js
const Gpio = require('pigpio').Gpio;
const led = new Gpio(17, {mode: Gpio.OUTPUT});
const button = new Gpio(4, {
mode: Gpio.INPUT,
pullUpDown: Gpio.PUD_DOWN,
edge: Gpio.EITHER_EDGE
});
button.on('interrupt', (level) => {
led.digitalWrite(level);
});
```
#### Servo Control
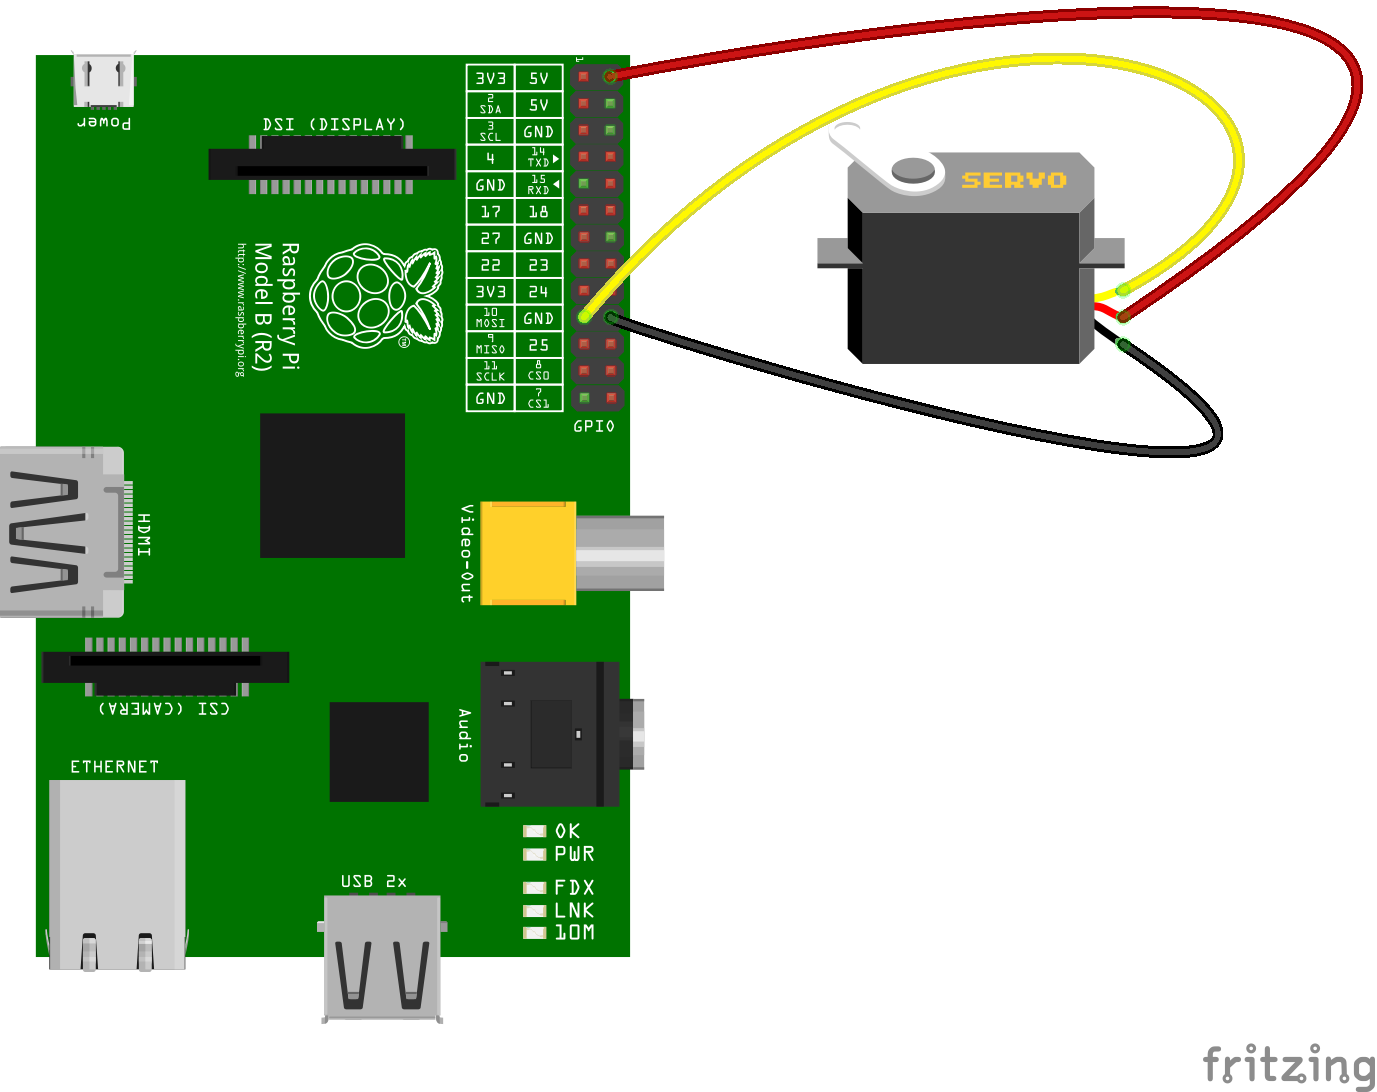
Continuously move a servo connected to GPIO10 clockwise and anti-clockwise.
#### Pulse an LED with PWM
Use PWM to pulse the LED connected to GPIO17 from fully off to fully on
continuously.
```js
const Gpio = require('pigpio').Gpio;
const led = new Gpio(17, {mode: Gpio.OUTPUT});
let dutyCycle = 0;
setInterval(() => {
led.pwmWrite(dutyCycle);
dutyCycle += 5;
if (dutyCycle > 255) {
dutyCycle = 0;
}
}, 20);
```
#### Buttons and Interrupt Handling
Turn the LED connected to GPIO17 on when the momentary push button connected to
GPIO4 is pressed. Turn the LED off when the button is released.
```js
const Gpio = require('pigpio').Gpio;
const led = new Gpio(17, {mode: Gpio.OUTPUT});
const button = new Gpio(4, {
mode: Gpio.INPUT,
pullUpDown: Gpio.PUD_DOWN,
edge: Gpio.EITHER_EDGE
});
button.on('interrupt', (level) => {
led.digitalWrite(level);
});
```
#### Servo Control
Continuously move a servo connected to GPIO10 clockwise and anti-clockwise.
 ```js
const Gpio = require('pigpio').Gpio;
const motor = new Gpio(10, {mode: Gpio.OUTPUT});
let pulseWidth = 1000;
let increment = 100;
setInterval(() => {
motor.servoWrite(pulseWidth);
pulseWidth += increment;
if (pulseWidth >= 2000) {
increment = -100;
} else if (pulseWidth <= 1000) {
increment = 100;
}
}, 1000);
```
#### Measure Distance with a HC-SR04 Ultrasonic Sensor
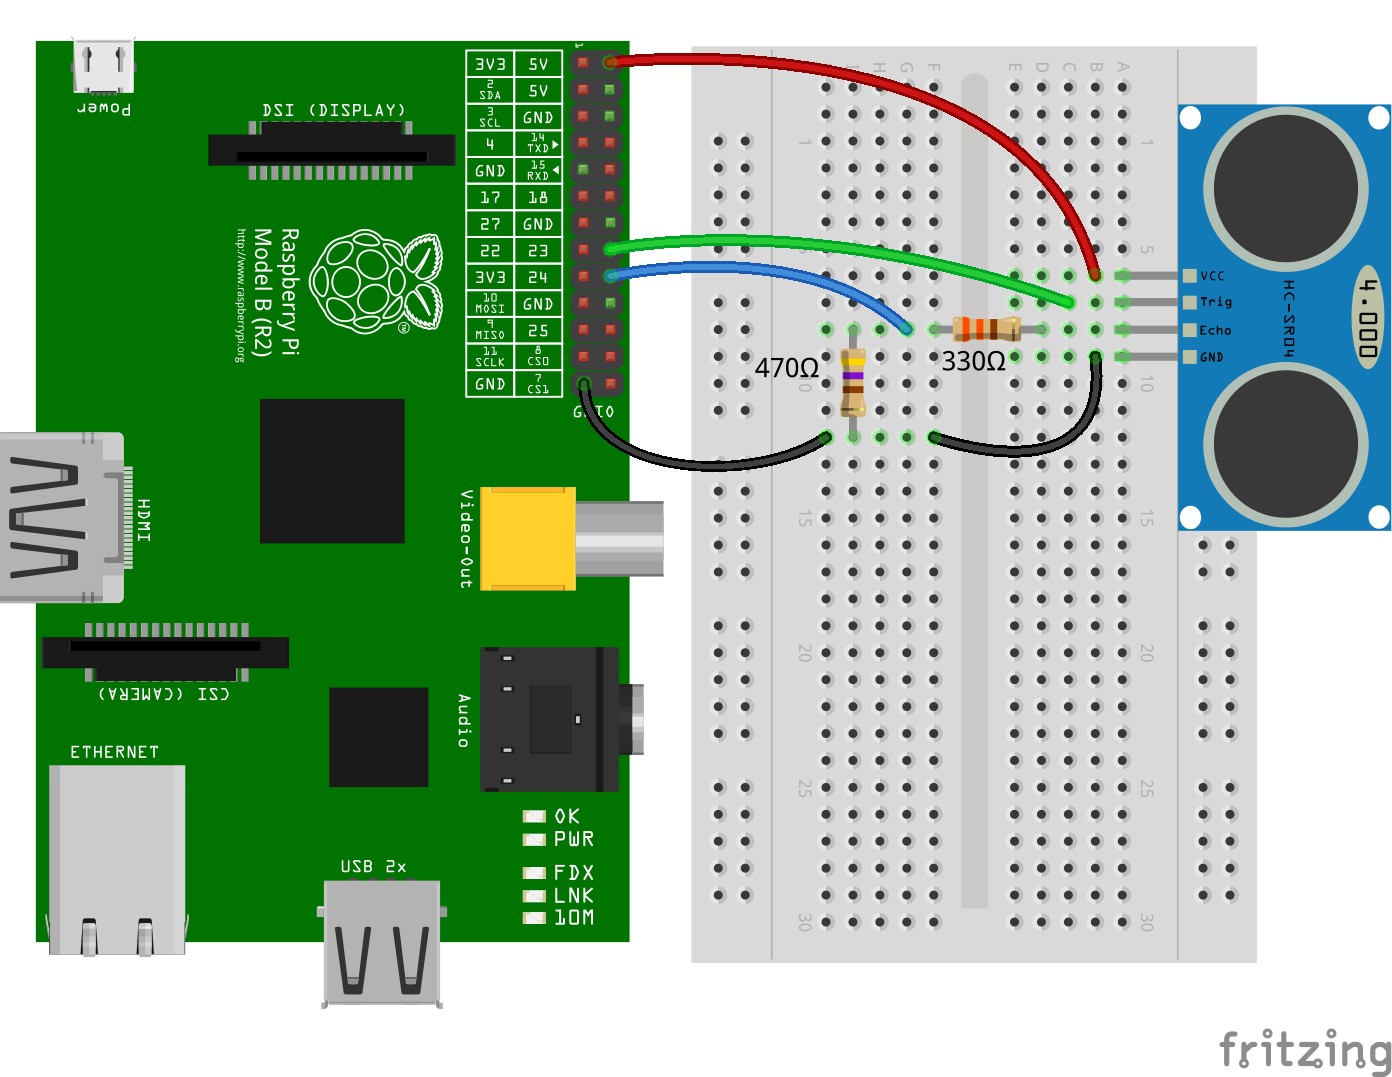
The `trigger` function can be used to generate a pulse on a GPIO and alerts can
be used to determine the time of a GPIO state change accurate to a few
microseconds. These two features can be combined to measure distance using a
HC-SR04 ultrasonic sensor.
```js
const Gpio = require('pigpio').Gpio;
const motor = new Gpio(10, {mode: Gpio.OUTPUT});
let pulseWidth = 1000;
let increment = 100;
setInterval(() => {
motor.servoWrite(pulseWidth);
pulseWidth += increment;
if (pulseWidth >= 2000) {
increment = -100;
} else if (pulseWidth <= 1000) {
increment = 100;
}
}, 1000);
```
#### Measure Distance with a HC-SR04 Ultrasonic Sensor
The `trigger` function can be used to generate a pulse on a GPIO and alerts can
be used to determine the time of a GPIO state change accurate to a few
microseconds. These two features can be combined to measure distance using a
HC-SR04 ultrasonic sensor.
 ```js
const Gpio = require('pigpio').Gpio;
// The number of microseconds it takes sound to travel 1cm at 20 degrees celcius
const MICROSECDONDS_PER_CM = 1e6/34321;
const trigger = new Gpio(23, {mode: Gpio.OUTPUT});
const echo = new Gpio(24, {mode: Gpio.INPUT, alert: true});
trigger.digitalWrite(0); // Make sure trigger is low
const watchHCSR04 = () => {
let startTick;
echo.on('alert', (level, tick) => {
if (level == 1) {
startTick = tick;
} else {
const endTick = tick;
const diff = (endTick >> 0) - (startTick >> 0); // Unsigned 32 bit arithmetic
console.log(diff / 2 / MICROSECDONDS_PER_CM);
}
});
};
watchHCSR04();
// Trigger a distance measurement once per second
setInterval(() => {
trigger.trigger(10, 1); // Set trigger high for 10 microseconds
}, 1000);
```
#### Determine the Width of a Pulse with Alerts
Alerts can be used to determine the time of a GPIO state change accurate to a
few microseconds. Typically, alerts will be used for GPIO inputs but they can
also be used for outputs. In this example, the `trigger` method is used to
pulse the LED connected to GPIO17 on for 15 microseconds once per second.
Alerts are used to measure the length of the pulse.
```js
// Assumption: the LED is off when the program is started
const Gpio = require('pigpio').Gpio;
const led = new Gpio(17, {
mode: Gpio.OUTPUT,
alert: true
});
const watchLed = () => {
let startTick;
// Use alerts to determine how long the LED was turned on
led.on('alert', (level, tick) => {
if (level == 1) {
startTick = tick;
} else {
const endTick = tick;
const diff = (endTick >> 0) - (startTick >> 0); // Unsigned 32 bit arithmetic
console.log(diff);
}
});
};
watchLed();
// Turn the LED on for 15 microseconds once per second
setInterval(() => {
led.trigger(15, 1);
}, 1000);
```
Here's an example of the typical output to the console:
```
15
15
15
15
15
15
20
15
15
15
15
```
#### Debounce a Button
The GPIO glitch filter will prevent alert events from being emitted if the
corresponding level change is not stable for at least a specified number of
microseconds. This can be used to filter out unwanted noise from an input
signal. In this example, a glitch filter is applied to filter out the contact
bounce of a push button.

```js
const Gpio = require('pigpio').Gpio;
const button = new Gpio(23, {
mode: Gpio.INPUT,
pullUpDown: Gpio.PUD_UP,
alert: true
});
let count = 0;
// Level must be stable for 10 ms before an alert event is emitted.
button.glitchFilter(10000);
button.on('alert', (level, tick) => {
if (level === 0) {
console.log(++count);
}
});
```
#### Generate a waveform
Waveforms can be used to time and execute Gpio level changes with an accuracy up to 1 microsecond. The following example generates a waveform that starts with a 1µs pulse, then has a 2µs pause, followed by a 3µs pulse and so on.
The waveform definition is a simple Array where each entry is an object with the properties gpioOn, gpioOff and usDelay.
The basic workflow to generate and execute waveforms is as follows:
First, we usually clear previous wave entries with the `waveClear` method.
Then we can add pulses with the `waveAddGeneric` method to the cleared waveform.
We then create a waveId by calling the `waveCreate` method.
To execute the waveform, we call the `waveTxSend` method.
Once the wave is sent, we can delete the wave by calling the `waveDelete` method.
```js
const pigpio = require('pigpio');
const Gpio = pigpio.Gpio;
const outPin = 17;
const output = new Gpio(outPin, {mode: Gpio.OUTPUT});
output.digitalWrite(0);
pigpio.waveClear();
let waveform = [];
for (let x = 0; x < 20; x++) {
if (x % 2 === 1) {
waveform.push({ gpioOn: outPin, gpioOff: 0, usDelay: x + 1 });
} else {
waveform.push({ gpioOn: 0, gpioOff: outPin, usDelay: x + 1 });
}
}
pigpio.waveAddGeneric(waveform);
let waveId = pigpio.waveCreate();
if (waveId >= 0) {
pigpio.waveTxSend(waveId, pigpio.WAVE_MODE_ONE_SHOT);
}
while (pigpio.waveTxBusy()) {}
pigpio.waveDelete(waveId);
```
#### Sending a wavechain
The `waveChain` method allows you to chain multiple waveforms together.
A chain is basically just an array with several waveId's. However you can insert different modifiers as described [here](https://github.com/fivdi/pigpio/blob/master/doc/global.md#wavechainchain).
In the example the `chain` consists of two waves. The first waveform is transmitted normally, then the second waveform is repeated 3 times.
```js
const pigpio = require('pigpio');
const Gpio = pigpio.Gpio;
const outPin = 17;
const output = new Gpio(outPin, {mode: Gpio.OUTPUT});
output.digitalWrite(0);
pigpio.waveClear();
let firstWaveForm = [];
let secondWaveForm = [];
for (let x = 0; x < 10; x++) {
if (x % 2 === 0) {
firstWaveForm.push({ gpioOn: outPin, gpioOff: 0, usDelay: 10 });
} else {
firstWaveForm.push({ gpioOn: 0, gpioOff: outPin, usDelay: 10 });
}
}
pigpio.waveAddGeneric(firstWaveForm);
let firstWaveId = pigpio.waveCreate();
for (let x = 0; x < 10; x++) {
if (x % 2 === 0) {
secondWaveForm.push({ gpioOn: outPin, gpioOff: 0, usDelay: 20 });
} else {
secondWaveForm.push({ gpioOn: 0, gpioOff: outPin, usDelay: 20 });
}
}
pigpio.waveAddGeneric(secondWaveForm);
let secondWaveId = pigpio.waveCreate();
if (firstWaveId >= 0 && secondWaveId >= 0) {
let chain = [firstWaveId, 255, 0, secondWaveId, 255, 1, 3, 0];
pigpio.waveChain(chain);
}
while (pigpio.waveTxBusy()) {}
pigpio.waveDelete(firstWaveId);
pigpio.waveDelete(secondWaveId);
```
## API Documentation
### Classes
- [Gpio](https://github.com/fivdi/pigpio/blob/master/doc/gpio.md) - General Purpose Input Output
- [GpioBank](https://github.com/fivdi/pigpio/blob/master/doc/gpiobank.md) - Banked General Purpose Input Output
- [Notifier](https://github.com/fivdi/pigpio/blob/master/doc/notifier.md) - Notification Stream
### pigpio Module
- [Global](https://github.com/fivdi/pigpio/blob/master/doc/global.md) - Module Globals
### Configuring pigpio
- [Configuration](https://github.com/fivdi/pigpio/blob/master/doc/configuration.md) - pigpio configuration
## Limitations
* The pigpio Node.js package is a wrapper for the
[pigpio C library](https://github.com/joan2937/pigpio). A limitation of the
pigpio C library is that it can only be used by a single running process.
* The pigpio C library and therefore the pigpio Node.js package requires
root/sudo privileges to access hardware peripherals.
## Troubleshooting
If you have a problem with the library, before you remove it from your code and start trying something else, please check the [troubleshooting page](https://github.com/fivdi/pigpio/blob/master/doc/troubleshooting.md) first. Some problems are solvable and documented.
## Related Packages
Here are a few links to other hardware specific Node.js packages that may be of interest.
- [onoff](https://github.com/fivdi/onoff) - GPIO access and interrupt detection
- [i2c-bus](https://github.com/fivdi/i2c-bus) - I2C serial bus access
- [spi-device](https://github.com/fivdi/spi-device) - SPI serial bus access
- [mcp-spi-adc](https://github.com/fivdi/mcp-spi-adc) - Analog to digital conversion with the MCP3002/4/8, MCP3202/4/8 and MCP3304
- [pigpio-dht](https://github.com/depuits/pigpio-dht) - Implements logic to read DHT11 or DHT22/AM2302 temperature and relative humidity sensor
- [pigpio-mock](https://github.com/deepsyx/pigpio-mock) - A pigpio mock library for development on your local machine
---
_Source: https://npm.io/package/pigpio · Machine-readable twin of the npm.io package page. Health data is recomputed on every publish._
```js
const Gpio = require('pigpio').Gpio;
// The number of microseconds it takes sound to travel 1cm at 20 degrees celcius
const MICROSECDONDS_PER_CM = 1e6/34321;
const trigger = new Gpio(23, {mode: Gpio.OUTPUT});
const echo = new Gpio(24, {mode: Gpio.INPUT, alert: true});
trigger.digitalWrite(0); // Make sure trigger is low
const watchHCSR04 = () => {
let startTick;
echo.on('alert', (level, tick) => {
if (level == 1) {
startTick = tick;
} else {
const endTick = tick;
const diff = (endTick >> 0) - (startTick >> 0); // Unsigned 32 bit arithmetic
console.log(diff / 2 / MICROSECDONDS_PER_CM);
}
});
};
watchHCSR04();
// Trigger a distance measurement once per second
setInterval(() => {
trigger.trigger(10, 1); // Set trigger high for 10 microseconds
}, 1000);
```
#### Determine the Width of a Pulse with Alerts
Alerts can be used to determine the time of a GPIO state change accurate to a
few microseconds. Typically, alerts will be used for GPIO inputs but they can
also be used for outputs. In this example, the `trigger` method is used to
pulse the LED connected to GPIO17 on for 15 microseconds once per second.
Alerts are used to measure the length of the pulse.
```js
// Assumption: the LED is off when the program is started
const Gpio = require('pigpio').Gpio;
const led = new Gpio(17, {
mode: Gpio.OUTPUT,
alert: true
});
const watchLed = () => {
let startTick;
// Use alerts to determine how long the LED was turned on
led.on('alert', (level, tick) => {
if (level == 1) {
startTick = tick;
} else {
const endTick = tick;
const diff = (endTick >> 0) - (startTick >> 0); // Unsigned 32 bit arithmetic
console.log(diff);
}
});
};
watchLed();
// Turn the LED on for 15 microseconds once per second
setInterval(() => {
led.trigger(15, 1);
}, 1000);
```
Here's an example of the typical output to the console:
```
15
15
15
15
15
15
20
15
15
15
15
```
#### Debounce a Button
The GPIO glitch filter will prevent alert events from being emitted if the
corresponding level change is not stable for at least a specified number of
microseconds. This can be used to filter out unwanted noise from an input
signal. In this example, a glitch filter is applied to filter out the contact
bounce of a push button.

```js
const Gpio = require('pigpio').Gpio;
const button = new Gpio(23, {
mode: Gpio.INPUT,
pullUpDown: Gpio.PUD_UP,
alert: true
});
let count = 0;
// Level must be stable for 10 ms before an alert event is emitted.
button.glitchFilter(10000);
button.on('alert', (level, tick) => {
if (level === 0) {
console.log(++count);
}
});
```
#### Generate a waveform
Waveforms can be used to time and execute Gpio level changes with an accuracy up to 1 microsecond. The following example generates a waveform that starts with a 1µs pulse, then has a 2µs pause, followed by a 3µs pulse and so on.
The waveform definition is a simple Array where each entry is an object with the properties gpioOn, gpioOff and usDelay.
The basic workflow to generate and execute waveforms is as follows:
First, we usually clear previous wave entries with the `waveClear` method.
Then we can add pulses with the `waveAddGeneric` method to the cleared waveform.
We then create a waveId by calling the `waveCreate` method.
To execute the waveform, we call the `waveTxSend` method.
Once the wave is sent, we can delete the wave by calling the `waveDelete` method.
```js
const pigpio = require('pigpio');
const Gpio = pigpio.Gpio;
const outPin = 17;
const output = new Gpio(outPin, {mode: Gpio.OUTPUT});
output.digitalWrite(0);
pigpio.waveClear();
let waveform = [];
for (let x = 0; x < 20; x++) {
if (x % 2 === 1) {
waveform.push({ gpioOn: outPin, gpioOff: 0, usDelay: x + 1 });
} else {
waveform.push({ gpioOn: 0, gpioOff: outPin, usDelay: x + 1 });
}
}
pigpio.waveAddGeneric(waveform);
let waveId = pigpio.waveCreate();
if (waveId >= 0) {
pigpio.waveTxSend(waveId, pigpio.WAVE_MODE_ONE_SHOT);
}
while (pigpio.waveTxBusy()) {}
pigpio.waveDelete(waveId);
```
#### Sending a wavechain
The `waveChain` method allows you to chain multiple waveforms together.
A chain is basically just an array with several waveId's. However you can insert different modifiers as described [here](https://github.com/fivdi/pigpio/blob/master/doc/global.md#wavechainchain).
In the example the `chain` consists of two waves. The first waveform is transmitted normally, then the second waveform is repeated 3 times.
```js
const pigpio = require('pigpio');
const Gpio = pigpio.Gpio;
const outPin = 17;
const output = new Gpio(outPin, {mode: Gpio.OUTPUT});
output.digitalWrite(0);
pigpio.waveClear();
let firstWaveForm = [];
let secondWaveForm = [];
for (let x = 0; x < 10; x++) {
if (x % 2 === 0) {
firstWaveForm.push({ gpioOn: outPin, gpioOff: 0, usDelay: 10 });
} else {
firstWaveForm.push({ gpioOn: 0, gpioOff: outPin, usDelay: 10 });
}
}
pigpio.waveAddGeneric(firstWaveForm);
let firstWaveId = pigpio.waveCreate();
for (let x = 0; x < 10; x++) {
if (x % 2 === 0) {
secondWaveForm.push({ gpioOn: outPin, gpioOff: 0, usDelay: 20 });
} else {
secondWaveForm.push({ gpioOn: 0, gpioOff: outPin, usDelay: 20 });
}
}
pigpio.waveAddGeneric(secondWaveForm);
let secondWaveId = pigpio.waveCreate();
if (firstWaveId >= 0 && secondWaveId >= 0) {
let chain = [firstWaveId, 255, 0, secondWaveId, 255, 1, 3, 0];
pigpio.waveChain(chain);
}
while (pigpio.waveTxBusy()) {}
pigpio.waveDelete(firstWaveId);
pigpio.waveDelete(secondWaveId);
```
## API Documentation
### Classes
- [Gpio](https://github.com/fivdi/pigpio/blob/master/doc/gpio.md) - General Purpose Input Output
- [GpioBank](https://github.com/fivdi/pigpio/blob/master/doc/gpiobank.md) - Banked General Purpose Input Output
- [Notifier](https://github.com/fivdi/pigpio/blob/master/doc/notifier.md) - Notification Stream
### pigpio Module
- [Global](https://github.com/fivdi/pigpio/blob/master/doc/global.md) - Module Globals
### Configuring pigpio
- [Configuration](https://github.com/fivdi/pigpio/blob/master/doc/configuration.md) - pigpio configuration
## Limitations
* The pigpio Node.js package is a wrapper for the
[pigpio C library](https://github.com/joan2937/pigpio). A limitation of the
pigpio C library is that it can only be used by a single running process.
* The pigpio C library and therefore the pigpio Node.js package requires
root/sudo privileges to access hardware peripherals.
## Troubleshooting
If you have a problem with the library, before you remove it from your code and start trying something else, please check the [troubleshooting page](https://github.com/fivdi/pigpio/blob/master/doc/troubleshooting.md) first. Some problems are solvable and documented.
## Related Packages
Here are a few links to other hardware specific Node.js packages that may be of interest.
- [onoff](https://github.com/fivdi/onoff) - GPIO access and interrupt detection
- [i2c-bus](https://github.com/fivdi/i2c-bus) - I2C serial bus access
- [spi-device](https://github.com/fivdi/spi-device) - SPI serial bus access
- [mcp-spi-adc](https://github.com/fivdi/mcp-spi-adc) - Analog to digital conversion with the MCP3002/4/8, MCP3202/4/8 and MCP3304
- [pigpio-dht](https://github.com/depuits/pigpio-dht) - Implements logic to read DHT11 or DHT22/AM2302 temperature and relative humidity sensor
- [pigpio-mock](https://github.com/deepsyx/pigpio-mock) - A pigpio mock library for development on your local machine
---
_Source: https://npm.io/package/pigpio · Machine-readable twin of the npm.io package page. Health data is recomputed on every publish._