@azure/web-pubsub-socket.io v1.2.0
Introduction
This package is the extension library to the Socket.IO Server SDK. Using this library together with the Web PubSub For Socket.IO Service enables the Azure service to manage clients at scale and keep Socket.IO's programming experience.
Web PubSub For Socket.IO works as a broker between clients and the Socket.IO server. It handles connection management and broadcasting messages at scale and provide scalability and reliability experience. With this library, you don't need to introduce and manage an extra Adapter to support multi-server environment.
Get Started
The following steps show you how to create a Web PubSub for Socket.IO resource and use this library to enable your Socket.IO server to work together with the service. For more details step of how to get started with Web PubSub for Socket.IO, please refer to Get started with Web PubSub for Socket.IO.
Create a Web PubSub for Socket.IO resource
Use following button to create a Web PubSub for Socket.IO resource in Azure.
Initialize a Node project and install required packages
mkdir quickstart
cd quickstart
npm init
npm install @azure/web-pubsub-socket.io socket.io-client
Write server code
Create a server.js file and add following code to create a Socket.IO server and integrate with Web PubSub for Socket.IO.
/*server.js*/
const { Server } = require("socket.io");
const { useAzureSocketIO } = require("@azure/web-pubsub-socket.io");

let io = new Server(3000);

// Use the following line to integrate with Web PubSub for Socket.IO
useAzureSocketIO(io, {
    hub: "Hub", // The hub name can be any valid string.
    connectionString: process.argv[2]
});

io.on("connection", (socket) => {
    // Sends a message to the client
    socket.emit("hello", "world");

    // Receives a message from the client
    socket.on("howdy", (arg) => {
        console.log(arg);   // Prints "stranger"
    })
});
Write client code
Create a client.js file and add following code to connect the client with Web PubSub for Socket.IO.
/*client.js*/
const io = require("socket.io-client");

const socket = io("<web-pubsub-socketio-endpoint>", {
    path: "/clients/socketio/hubs/Hub",
});

// Receives a message from the server
socket.on("hello", (arg) => {
    console.log(arg);
});

// Sends a message to the server
socket.emit("howdy", "stranger")
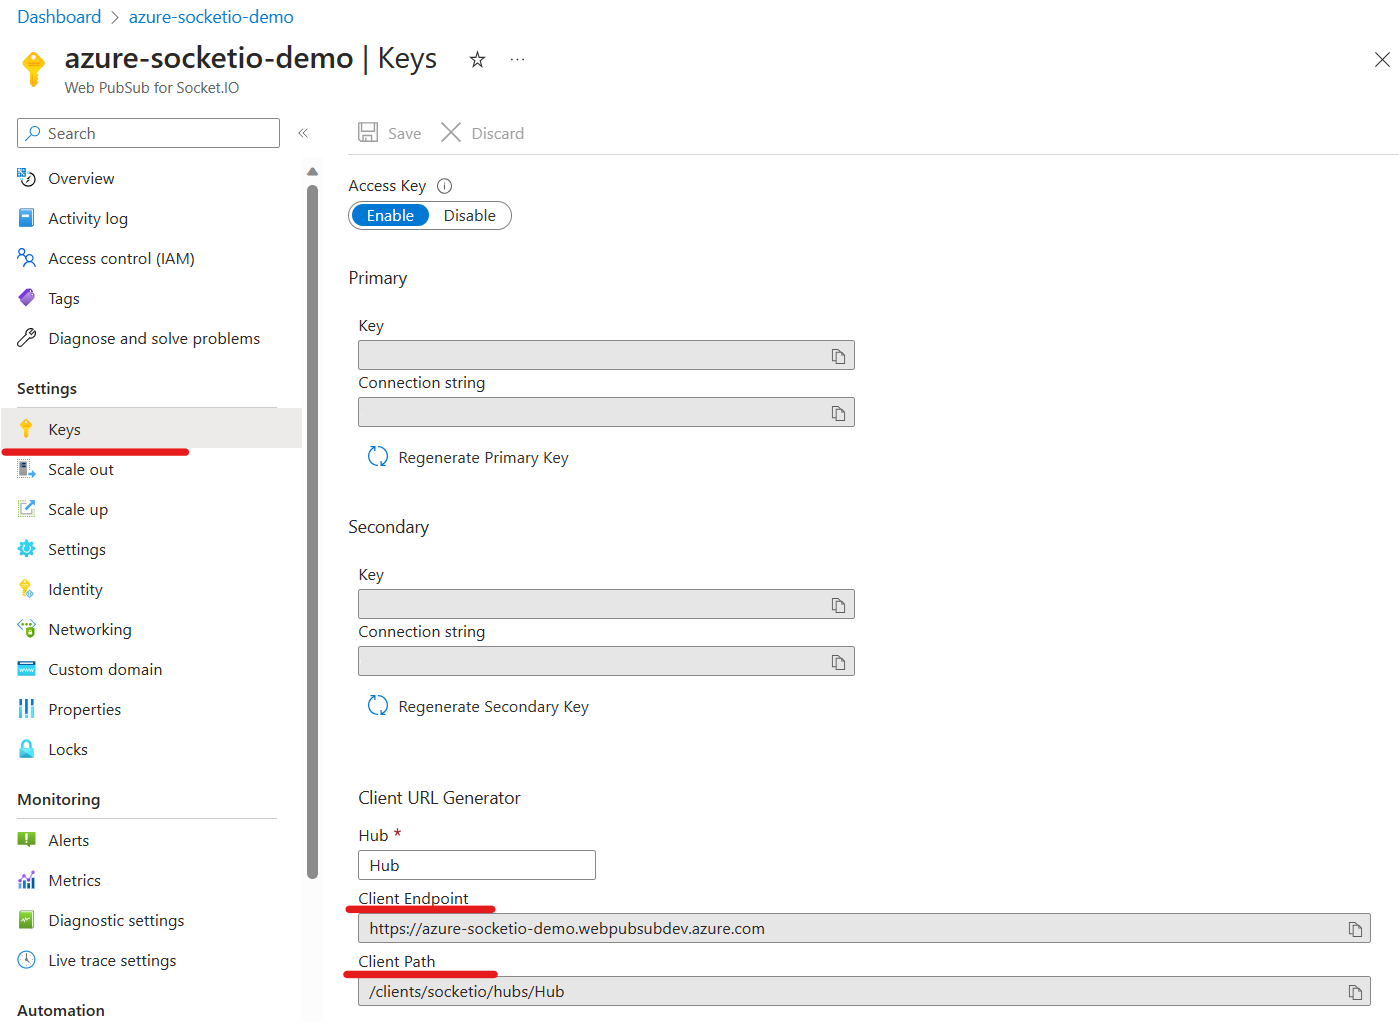
When you use Web PubSub for Socket.IO, <web-pubsub-socketio-endpoint> and path are required for the client to connect to the service. The <web-pubsub-socketio-endpoint> and path can be found in Azure portal.
Go to the key blade of Web PubSub for Socket.IO
Type in your hub name and copy the Client Endpoint and Client Path

Run the app
Run the server app:
node server.js "<connection-string>"The
<connection-string>is the connection string that contains the endpoint and keys to access your Web PubSub for Socket.IO resource. You can also find the connection string in Azure portal
Run the client app in another terminal:
node client.js
Debug
Determine which packages' logs you want to see.
Set environmental variable
DEBUGin your shell according to your wanted packages. Here is a PowerShell examples:
# Show log from this package
$Env:DEBUG='wps-sio-ext*'

# Show log from this package + Engine.IO
$Env:DEBUG='wps-sio-ext*,engine*'

# Show log from this package + Engine.IO + Socket.IO
$Env:DEBUG='wps-sio-ext*,engine*,socket.io:*'

# Show logs from all packages
$Env:DEBUG='*'
Building library from source
The @azure/web-pubsub-socket.io library depends on server-proxies library, so you need to build server-proxies first.
Build server-proxies:
cd ../server-proxies
yarn install
yarn build
Build @azure/web-pubsub-socket.io
# navigate into webpubsub-socketio-extension folder
yarn install
yarn run build
Unit Test
- Rename
.env.test.exampleto.env.test. And update the WebPubSubConnectionString inside:
WebPubSubConnectionString="<web-pubsub-connection-string>"
WebPubSubHub="eio_hub"
SocketIoPort=3000- Run command
yarn test:unitContributing
This project welcomes contributions and suggestions. Most contributions require you to agree to a Contributor License Agreement (CLA) declaring that you have the right to, and actually do, grant us the rights to use your contribution. For details, visit https://cla.microsoft.com.
When you submit a pull request, a CLA-bot will automatically determine whether you need to provide a CLA and decorate the PR appropriately (e.g., label, comment). Simply follow the instructions provided by the bot. You will only need to do this once across all repos using our CLA.
This project has adopted the Microsoft Open Source Code of Conduct. For more information see the Code of Conduct FAQ or contact opencode@microsoft.com with any additional questions or comments.
7 months ago
11 months ago
1 year ago
1 year ago
1 year ago
2 years ago
2 years ago
2 years ago
2 years ago