@egdev6/component-creator v1.0.4


⚛️ Egdev Component Creator
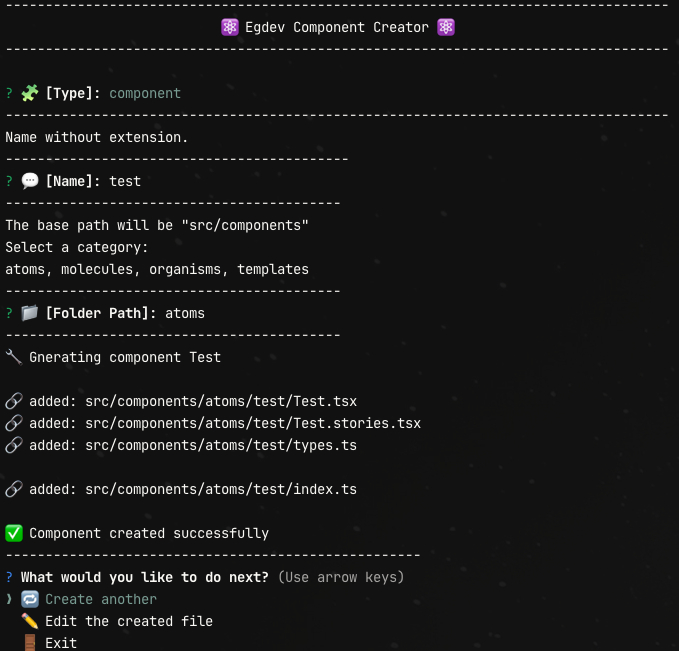
Component Creator is a tool designed to automate the creation of React components, pages, hooks, and services based on predefined templates. It streamlines the development process by generating boilerplate code, allowing developers to focus on building features rather than setting up file structures.
✨ Features
• 🧩 Component Generation: Quickly create React components with TypeScript support, including stories for Storybook.
• 📄 Page Creation: Generate pages with logic, view, and routing setup.
• 🔁 Custom Hooks: Easily create reusable hooks with Zustand store integration.
• 🔌 Service Setup: Generate services with TypeScript types, mock data, and handlers for API calls.
• 💬 Prompt-Based Interface: User-friendly prompts guide you through the creation process.
• ⚙️ Customizable Configuration: Default paths and file extensions can be overridden with a user-defined configuration file.
📦 Installation
npm i -D @egdev6/component-creator🚀 Usage
npx component-creatorFollow the prompts to select the type of component you want to create (component, page, hook, or service) and provide the necessary details.
🛠 Configuration
⚙️ Default Configuration
The package includes a default configuration file that defines the base paths and file extensions for the generated files. The default configuration looks like this:
{
	"config": {
		"extension": "ts", // ts or js
		"atomic": false // true or false
	},
	"components": "src/components",
	"hooks": "src/hooks",
	"pages": {
		"base": "src/pages",
		"routes": "src/app/Router.tsx"
	},
	"services": {
		"base": "src/services",
		"axios": "src/config/axios", // export named api
		"types": "src/models/api",
		"mocks": {
			"data": "src/mocks/data",
			"server": "src/mocks/server.ts"
		}
	}
}
🔧 Overriding the Configuration
If you want to customize the paths or file extensions, you can create a component-creator.config.json file in the root of your project. This file will override the default configuration.
Example of a Custom Configuration
{
  "config": {
    "extension": "js",
    "atomic": true
  },
  "components": "custom/components",
  "pages": {
    "base": "custom/pages"
  }
}
In this example:
- Files will be generated with the
.jsextension. - Components will be created in the
custom/componentsfolder. - Pages will be created in the
custom/pagesfolder. - The "atomic" methodology is enabled, the components will be created in atoms, molecules, organisms and templates subfolders.
🧪 How the “Atomic” Methodology Works
When the "atomic" methodology is enabled, the generated files will be organized into folders based on their atomic design category (e.g., atoms, molecules, organisms). For example:
src/components
├── atoms
│   └── button
│       ├── Button.tsx
│       ├── Button.stories.tsx
│       └── index.ts
├── molecules
│   └── form
│       ├── Form.tsx
│       ├── Form.stories.tsx
│       └── index.ts
└── organisms
    └── header
        ├── Header.tsx
        ├── Header.stories.tsx
        └── index.ts
If the "atomic" methodology is disabled, all components will be generated in a flat structure under the config components folder:
src/components
├── button
│   ├── Button.tsx
│   ├── Button.stories.tsx
│   └── index.ts
├── form
│   ├── Form.tsx
│   ├── Form.stories.tsx
│   └── index.ts
└── header
    ├── Header.tsx
    ├── Header.stories.tsx
    └── index.ts
🧪 Adding Lazy Imports and Routes for Pages
If you want the page type to automatically insert a lazy import and the route into your routes file, you need to add specific comments to the file configured in config.pages.routes. These comments act as placeholders where the tool will append the necessary code.
Required Comments in the Routes File
Add the following comments to your routes file (e.g., src/app/Router.tsx):
// -- plop hook for import -- //
{/* -- plop hook for route -- */}
Configuration
Ensure that the config.pages.routes property in your configuration file (by default it's 'src/app/Router.tsx') points to the correct routes file. For example:
{
  "pages": {
    "routes": "src/app/Router.tsx"
  }
}
By adding these comments to your routes file, the tool can seamlessly integrate new pages into your routing system.
Example
If you generate a page named Home, the tool will add the following to your routes file:
// -- plop hook for import -- //
const HomePage = lazy(() => import('./pages/home/HomePage'));

{/* -- plop hook for route -- */}
<Route path="/home" element={<HomePage />} />
🧪 Adding Mock API Call for Services
I recommend configure this package in your project: https://github.com/reinerBa/vite-plugin-mock-simple
Move all the calls in mockSimple([]) to a folder and export it for vite.
import mockSimple from 'vite-plugin-mock-simple'
import { mockServer } from 'src/mocks/mockServer.ts'

export default defineConfig({
  plugins: [
    mockSimple(mockServer)
  ]
})
Add this variable to your .env.development
VITE_ENVIROPMENT='DEV'If you want the mock type to automatically insert a mock api call into your mock server file, you need to add specific comments to the file configured in config.services.mocks.server. These comments act as placeholders where the tool will append the necessary code.
Required Comments in the Routes File
Add the following comments to your mocks server file (e.g., src/mocks/mosckServer.ts):
// -- plop hook for mocks -- //Configuration
Ensure that the config.services.mocks.server property in your configuration file (by default it's 'src/mocks/mockServer.ts') points to the correct server file. For example:
{
  "services": {
    "mocks": {
      "server": "src/mocks/mockServer.ts"
    }
  }
}
By adding these comments to your server file, the tool can seamlessly integrate new mocks into your routing system.
Example
If you generate a service named test, the tool will add the following to your mock server file:
  // -- plop hook for mocks -- //
  {
    pattern: '/mock/test',
    method: 'GET',
    delay: 100,
    handle: async (_req, res) => {
      const data = await import('./data/test.json');
      res.setHeader('Content-Type', 'application/json');
      res.end(JSON.stringify(data));
    }
  }
📌 Next steps
- Better UX for output 🔥 WIP 🔥
- Custom templates by component type
- Different templates to manage context libraries
- Select files generated by config
🤝 Contributing
Contributions are welcome! Please open an issue or submit a pull request for any enhancements or bug fixes.
📄 License
This project is licensed under the MIT License. See the LICENSE file for more details.


