4.2.0 • Published 3 years ago
@ignhycord/logger v4.2.0
Usage
const Logger = require('@ignhycord/logger');
const logger = new Logger();

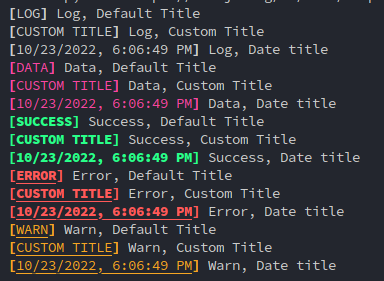
// The following code produxes the image below
logger.log('Log, Default Title');
logger.log('Log, Custom Title', 'Custom Title');
logger.log('Log, Date title', 'date');
logger.data('Data, Default Title');
logger.data('Data, Custom Title', 'Custom Title');
logger.data('Data, Date title', 'date');
logger.success('Success, Default Title');
logger.success('Success, Custom Title', 'Custom Title');
logger.success('Success, Date title', 'date');
logger.error('Error, Default Title');
logger.error('Error, Custom Title', 'Custom Title');
logger.error('Error, Date title', 'date');
logger.warn('Warn, Default Title');
logger.warn('Warn, Custom Title', 'Custom Title');
logger.warn('Warn, Date title', 'date');
Customization
You may also use logger._log() to pass a custom title and colors to the logger. The function is defined as follows, where the first array is an array of chalk style options (I.E. chalk.bold) and the first array is applied to the brackets and title, while the second is just applied to the title.:
_log(
    [color = chalk, style = chalk]: Chalk[],
    title = 'LOG',
    message: string,
  )
Setup Guide
- On your local machine, use GitHub Desktop to clone the repo, or
navigate to the parent folder where you want to keep your
local repo copy and run
git clone git@github.com:hycord/logger.git.
The hard way: All CLI, all the time
- Create a new remote repo on your host (e.g. GitHub, BitBucket, GitLab, etc.)
- Go to the local parent folder into which you want to put your new Typescript project (via your file explorer or a terminal)
- Clone this repo locally:
git clone --branch dev git@github.com:hycord/logger.git - Go to your new local repo (via a Git GUI or a terminal (with
cd logger)) - (Optional) If you don't want the git history from this template to be included in your project's history:
- 6a. Delete the
.gitfolder - 6b. Run
git init(or use a Git GUI to initialize the repo)
- Change the remote to your own remote repository:
git remote set-url origin your-remote-url(or, if you initialized a new repo, add your remote withgit remote add origin your-remote-url)
Customize the template
- Run
npm installto install all dependencies - (Optional) Run
npm outdatedto see if any dependencies have major updates. - (Optional) Run
npm updateto get those dependencies up to date with minor updates.
Begin coding!
- Your entrypoint is
./src/index.ts, so start there! - Your compiled code will appear in a git-ignored
buildfolder, with entrypointbuild/index.js. - To compile, run
npm run build - To auto-recompile while you code, run
npm run build:dev - Sample folders and files for types and your code library are placed in
src/libandsrc/types.
Testing
- Add tests to
./src/testas you go. - Place any reference data for tests into
./samples - Run tests from the terminal with
npm test(make sure your code is compiled first). - Run tests from VSCode (click the debugger on the sidebar) to use breakpoints and allow inspection:
- Use the "Tests" option to run against your compiled code.
- Console logs will appear in the Debug Console, where you can also step through your code if you set breakpoints.
- Edit
./.vscode/launch.jsonto add or change the tests.
Versioning and publishing to npm
When you are ready to increment the version of your project, which by default
is coupled to publishing to npm and merging into your main branch
(edit this behavior in the scripts section of the package.json),
use the npm version commands. For example:
npm version patchto bump the patch version, indicated a bugfixnpm version minorto bump the minor version, indicating a new feature (backwards-compatible)npm version majorto bump the major version, indicating substantial and/or breaking changes
The preversion, version, and postversion scripts in the package.json file dictate what happens
when you use an npm version command. By default, the sequence of things that happen are:
- Source is compiled into plain JavaScript.
- Tests are run against the compiled JavaScript. If any fail, the process aborts.
- Increment the version number in the
package.jsonfile. - Update
CHANGELOG.mdto reflect the new version. git addall file changes.- Commit changes and create a version tag.
- Push changes to remote
- Publish package to
npm.