@jamropl/nodepad v1.6.0
NodePad
NodePad is a simple tool to manage life cycle of your NodeJs apps. It allow to easily deploy, start/stop and monitor multiple apps via web interface or REST API.

Main Features:
- Application Bundle Upload
- Install NPM dependencies
- Static files hosting
- Manage application life cycle
- Routing
- Preview logs
- Authorization to NodePad API/UI
- Basic app monitoring
- REST API
- Web User Interface
- Command Line Interface
Under the hood, NodePad runs PM2 as a process manager.
Installation
Github
Clone Git Repository
git clone https://github.com/jamro/nodepad.git
cd nodepad
Install all node packages
npm installLaunch NodePad
npm startOpen NodePad in your Browser:
- User Interface: http://localhost:3333/
- REST API: http://localhost:3333/api
Getting Started
Create the app
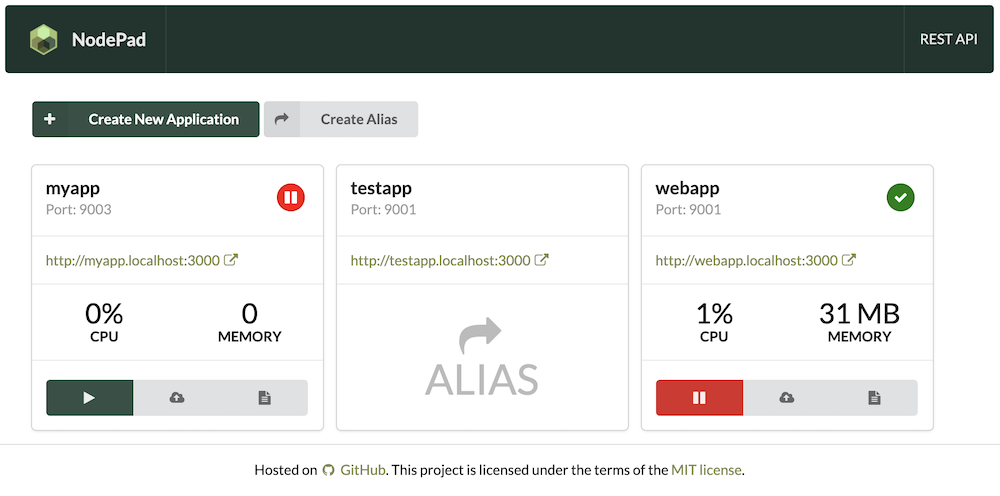
- Open NodePad in your Browser (e.g. http://localhost:3333/). The port is configured in
config.jsunderdashboardPort. - Click Create New Application and provide necessary details: -- App ID: helloworld -- App Port: 3335 -- Click Create to add your new app
- helloworld app should be listed on the screen with status off-line
- Launch the app by clicking Play button. The status should change to on-line
- Go to your app URL: http://helloworld.localhost:3000/. The subdomain is the App ID provided before. The port is configured in
config.jsunderproxyPort. It should return a default hello message from your app.
Deploy the app
Create app
index.jssource file anywhere on your disk:#!/usr/bin/env node const http = require('http'); const port = process?.env?.port; console.log('Starting application helloworld (port: ' + port + ')...'); http.createServer(function (request, response) { console.log(`Request ${request.method} ${request.url}`); const content = '<h1>Hello World</h1>' + '<p>This is a message from your new app. Congrats! It seems to work :)</p>'; response.end(content, 'utf-8'); }).listen(port);Compress
index.jsintoapp.zipfile- Open NodePad in your Browser (e.g. http://localhost:3333/).
- Click Upload next to helloworld app
- Choose
app.zipand upload it. - Go to your app URL: http://helloworld.localhost:3000/. It should return the new content
Main Features
REST API
All features are available through REST API. See http://localhost:3333/api for more details
Web User Interface
The UI is available at http://localhost:3333/ and it could be an alternative to the REST API

Application Upload
You can upload application bundles via REST API or User Interface. The bundle is a ZIP file containing all application files. After upload, NodePad will extract all files from the bundle, and will launch the application. Several application bundles are supported:
Simple NodeJs Application
The bundle must contain /index.js file that will act as a runner. After upload, NodePad will launch execute it.
NPM Application
The bundle must contain /index.js and package.json file that will act as a runner. After upload, all dependencies will be installed by calling npm install. NodePad will launch the app by executing /index.js
Static Application
The bundle must contain /index.html. All files from the bindle will be served as static content by the server.
Routing
NodePad acts as a reverse proxy and route traffic to applications basing on domain names. It follows a pattern of [appId].[rootDomain]. For example, NodePad will redirect all requests to webapp.example.com to an application with ID webapp. Routing work for both: HTTP requests and WebSockets.
Testing locally
To test routing locally, add proper entries to your /etc/hosts. For example
127.0.0.1 webapp.localhostAfter that configuration, webapp application will be available at http://webapp.localhost:3000 (assuming that you run NodePad Proxy on default port 3000).
NodePad offers app aliases, allowing accessing the same app via multiple domains (appIds). Let's assume that an app with ID webapp exists and it runs at port 8888. Creating an alias with ID webapp-v2 and assigned to port 8888 will result in having the app accessible at two URLs: http://webapp.localhost:3000 and http://webapp-v2.localhost:3000 (assuming that you run NodePad Proxy on default port 3000).
Running NodePad behind a proxy
You can run NodePad behind a proxy. To make routing work, add X-Forwarded-For headers to requests on the proxy level.
Sample Nginx configuration
events {
  worker_connections  1024;
}

http {
  server {
    listen 81;
    server_name ndoepad_dashboard;

    location / {
      proxy_http_version 1.1;
      proxy_pass http://localhost:3333;
      proxy_set_header Upgrade $http_upgrade;
      proxy_set_header Connection "Upgrade";
      proxy_set_header X-Forwarded-For $proxy_add_x_forwarded_for;
      proxy_set_header Host $http_host;
      proxy_cache_bypass $http_upgrade;
      proxy_redirect off;
    }
  }

  server {
    listen 80;
    server_name ndoepad_proxy;

    location / {
      proxy_http_version 1.1;
      proxy_pass http://localhost:3000;
      proxy_set_header Upgrade $http_upgrade;
      proxy_set_header Connection "Upgrade";
      proxy_set_header X-Forwarded-For $proxy_add_x_forwarded_for;
      proxy_set_header Host $http_host;
      proxy_cache_bypass $http_upgrade;
      proxy_redirect off;
    }
  }
}
Sample HAProxy configuration
global
defaults
	timeout client          30s
	timeout server          30s
	timeout connect         30s

frontend frontend_dashboard
	bind 0.0.0.0:81
  mode http
	default_backend backend_dashboard

frontend frontend_proxy
	bind 0.0.0.0:80
  mode http
	default_backend backend_proxy

backend backend_dashboard
	mode http
  option forwardfor
	server upstream nodepad:3333

backend backend_proxy
	mode http
  option forwardfor
	server upstream nodepad:3000
Authorization
NodePad supports Basic Auth. You can configure it in ./config.js by uncommenting auth section:
module.exports = {
  // ...
  auth: {
    user: 'admin',
    pass: 'mysecretpass'
  }
};
It will secure both: the UI and the API.
Additional security measures could be applied on a firewall level since the dashboard of NodePad is available at a dedicated port. See dashboardPort parameter in ./config.js.
Command Line Interface
Nodepad can be controlled over command line. The simplest way to start it is:
./bin/nodepadThe configuration file can be altered by:
./bin/nodepad --config /path/to/your/config.jsIt is possible to run the dashboard and the proxy in separate processes by:
  ./bin/nodepad --module=dashboard
  ./bin/nodepad --module=proxy
Architecture

Troubleshooting
How to manually deploy an app?
All app files are kept in /repo by default The path can be changed in config.js by setting appRepoPath parameter. To manually change the app copy all files (including index.js) to /repo/[AppId].[AppPort]/bin. Remember to restart the application to apply changes.
How to manually the check status of running apps?
Run npm run pm2 -- ls
How to manually stop an app?
Run npm run pm2 -- stop [AppId]
How to manually read logs?
All logs are kept in [appRepoPath]/[AppId].[AppPort]/log-[AppId].log file. To get logs directly from PM2 call npm run pm2 -- logs [AppId]
PM2 is not responding.
You can kill PM2 daemon by running npm run pm2 -- kill. Please notice that it will stop all running apps.
How to manually run PM2 command?
NPM scripts expose PM2 CLI: npm run pm2 -- [arguments...]
For example npm run pm2 -- ls is an equivalent of pm2 ls.
How to manually remove an app?
Remove application directory located at [appRepoPath]/[AppId].[AppPort]. Keep in mind that the NodePad proxy may keep it cached after removal for some time.
How to manually create an alias?
Create an empty alias file [appRepoPath]/[AppId].[AppPort].alias.
How to manually remove an alias?
Delete the alias file located at[appRepoPath]/[AppId].[AppPort].alias. Keep in mind that the NodePad proxy may keep it cached after removal for some time.