@lijixuan/vue-customdirectives v2.2.3
vue-directives
vue 自定义指令
main.js
import Vue from 'vue';
import Directives from '@lijixuan/vue-customdirectives';
Vue.use(Directives);v-copy需求:
实现一键复制文本内容,用于鼠标右键粘贴。
<template>
  <button v-copy="copyText">复制按钮</button>
</template>

<script> export default {
    data() {
      return {
        copyText: '我是李大玄!',
      }
    },
  }
</script>v-longpress需求: 实现长按,用户需要按下并按住按钮几秒钟,触发相应的事件 思路: 创建一个计时器, 2 秒后执行函数 当用户按下按钮时触发 mousedown 事件,启动计时器;用户松开按钮时调用 mouseout 事件。 如果 mouseup 事件 2 秒内被触发,就清除计时器,当作一个普通的点击事件 如果计时器没有在 2 秒内清除,则判定为一次长按,可以执行关联的函数。 在移动端要考虑 touchstart,touchend 事件
新增长按时间, 不传默认是 2000 毫秒
<template>
  <button v-longpress="longpress" lp-time="2000">长按</button>
</template>

<script>
export default {
  methods: {
    longpress () {
      alert('长按指令生效!')
    }
  }
}
</script>v-debounce背景: 在开发中,有些提交保存按钮有时候会在短时间内被点击多次,这样就会多次重复请求后端接口,造成数据的混乱,比如新增表单的提交按钮,多次点击就会新增多条重复的数据。
需求: 防止按钮在短时间内被多次点击,使用防抖函数限制规定时间内只能点击一次。 时间可以自定义 不传默认是 1000 毫秒
<template>
  <button v-debounce="debounceClick" debounceTime="2000">防抖</button>
</template>

<script>
export default {
  methods: {
    debounceClick () {
      console.log('只触发一次')
    }
  }
}
</script>v-testIpt背景: 开发中遇到的表单输入,往往会有对输入内容的限制,比如不能输入表情和特殊字符,只能输入数字或字母等。
我们常规方法是在每一个表单的 on-change 事件上做处理。
<template>
  <input type="text" v-model="note" @change="vaidateEmoji" />
</template>
<script>
export default {
  methods: {
    vaidateEmoji() {
      var reg = /[^u4E00-u9FA5|d|a-zA-Z|rns,.?!,。?!…—&$=()-+/*{}[]]|s/g
      this.note = this.note.replace(reg, '')
    },
  },
}
</script>
现在使用此指令 v-testIpt 内置正则
<el-input v-model="ipt" v-testIpt.time="callback"></el-input>
<!-- callback 返回一个 true, false -->
以下是内置方法, 会定期更新
const map = {
  emoji: '',      // 表情,
  email: '',      // 邮政编码
  prot: '',       // 端口号
  video: '',      // 视频
  time: '',       // 时间 // 12:12:12
  fraction: '',   // 小数
  floatingPointNumber: '', // 浮点数 例如 1.5
  integer: '',    // 整数 -213 123
  positiveInteger: '', // 正整数 不含0
  url: '',        // 例如: www.aa.com || https://aa.com || http://aa.com || https://aa.com/search/name/a
  version: '',    // 例如: x:y:z
  strAndNumber:   // 中文和数字
}v-lazyLoad背景:在类电商类项目,往往存在大量的图片,如 banner 广告图,菜单导航图,美团等商家列表头图等。图片众多以及图片体积过大往往会影响页面加载速度,造成不良的用户体验,所以进行图片懒加载优化势在必行。
需求:实现一个图片懒加载指令,只加载浏览器可见区域的图片。
思路: 图片懒加载的原理主要是判断当前图片是否到了可视区域这一核心逻辑实现的 拿到所有的图片 Dom ,遍历每个图片判断当前图片是否到了可视区范围内 如果到了就设置图片的 src 属性,否则显示默认图片 图片懒加载有两种方式可以实现,一是绑定 srcoll 事件进行监听,二是使用 IntersectionObserver 判断图片是否到了可视区域,但是有浏览器兼容性问题。 下面封装一个懒加载指令兼容两种方法,判断浏览器是否支持 IntersectionObserver API,如果支持就使用 IntersectionObserver 实现懒加载,否则则使用 srcoll 事件监听 + 节流的方法实现
<template>
  <img v-lazyLoad="xxx.jpg" />
</templat>v-waterMarker需求:给整个页面添加背景水印 思路: 使用 canvas 特性生成 base64 格式的图片文件,设置其字体大小,颜色等。 将其设置为背景图片,从而实现页面或组件水印效果
<template>
  <div v-waterMarker="{text:'ldx版权所有',textColor:'rgba(180, 180, 180, 0.4)'}"></div>
</template>v-draggable需求: 实现一个拖拽指令,可在页面可视区域任意拖拽元素。
思路: 设置需要拖拽的元素为相对定位,其父元素为绝对定位。 鼠标按下(onmousedown)时记录目标元素当前的 left 和 top 值。 鼠标移动(onmousemove)时计算每次移动的横向距离和纵向距离的变化值,并改变元素的 left 和 top 值 鼠标松开(onmouseup)时完成一次拖拽
<template>
  <div class="el-dialog" v-draggable></div>
</template>v-int需求: 实现一个 input 只能输入正整数 0 除外
<el-input v-model="input" v-int></el-input>v-focus需求: 实现一个 input 自动获取焦点
<el-input v-model="input" v-focus></el-input>

<input type="text" class="h100 w300" v-focus placeholder="nihao" />

<el-input placeholder="123123" v-focus></el-input>

<div v-focus>
  sad
  <div>123123</div>
</div>

<div>
  <template v-for="item in 10">
    <el-input :placeholder="`asdd${item}`" :key="item" v-focus></el-input>
  </template>
</div>

<div v-focus>
  <template v-for="item in 10">
    <el-input :placeholder="`asdd${item}`" :key="item"></el-input>
  </template>
</div>v-waves点击一个按钮 或者 一个 div 要实现水波纹效果
// 三个配置项 也可以什么都不传 { color: '效果颜色', type: 'center' || 'hit', duration: '时间' // 单位: ms }
<div class="mb10 w700 h100 ml100 button-lg" style="background: pink" v-waves="{ color: 'yellow', type: 'hit', duration: 500 }"></div>
<div class="mb10 w700 h100 ml100 button-lg" style="background: pink" v-waves></div>
v-resize
一个容器 可以拖拽 放大,缩小 的指令,
| 参数 | 说明 | 必传 | 类型 | 默认 |
|---|---|---|---|---|
| min | 最小尺寸 | 否 | Object, | {width: 0, height: 0} 两个参数的类型是 Number |
| max | 最大尺寸 | 否 | Object, | {width: 0, height: 0} 两个参数的类型是 Number |
| move | 边是否可以拖拽,可传一个到全部 | 否 | Object, | { "t": true, // top "l": true, // left "r": true, // right "b": true, // bottom "tl": true, // top left "tr": true, // top right "bl": true, // bottom left "br": true // bottom right} |
| speed | 步长 单位 px | 否 | Number | 1px |
| disabled | 禁用 | 否 | Boolean | false |
使用
1.
<div v-resize="resizeObj" style="background: pink; width: 300px; height: 200px" class="mr20 ml30">
  起源于西周时期的宗法制对我国社会的发展产生了深远影响,尤其是对当今家族式企业的发展影响更不可忽视。随着国内创一代的逐渐老去,当年创一代所辛苦打下来的基业面前遇到后续如何传承的问题。这其中有以严介和之子严昊为代表的子承父业,也有以美的董事长何享健之子何剑锋另起炉灶。
</div>
resizeObj: {
max: {
width: 0,
height: 0,
},
min: {
width: 0,
height: 0,
},
speed: 1,
disabled: false,
move: {
t: true, // top
l: true, // left
r: false, // right
b: true, // bottom
tl: true, // top left
tr: true, // top right
bl: true, // bottom left
br: true, // bottom right<br />}
},
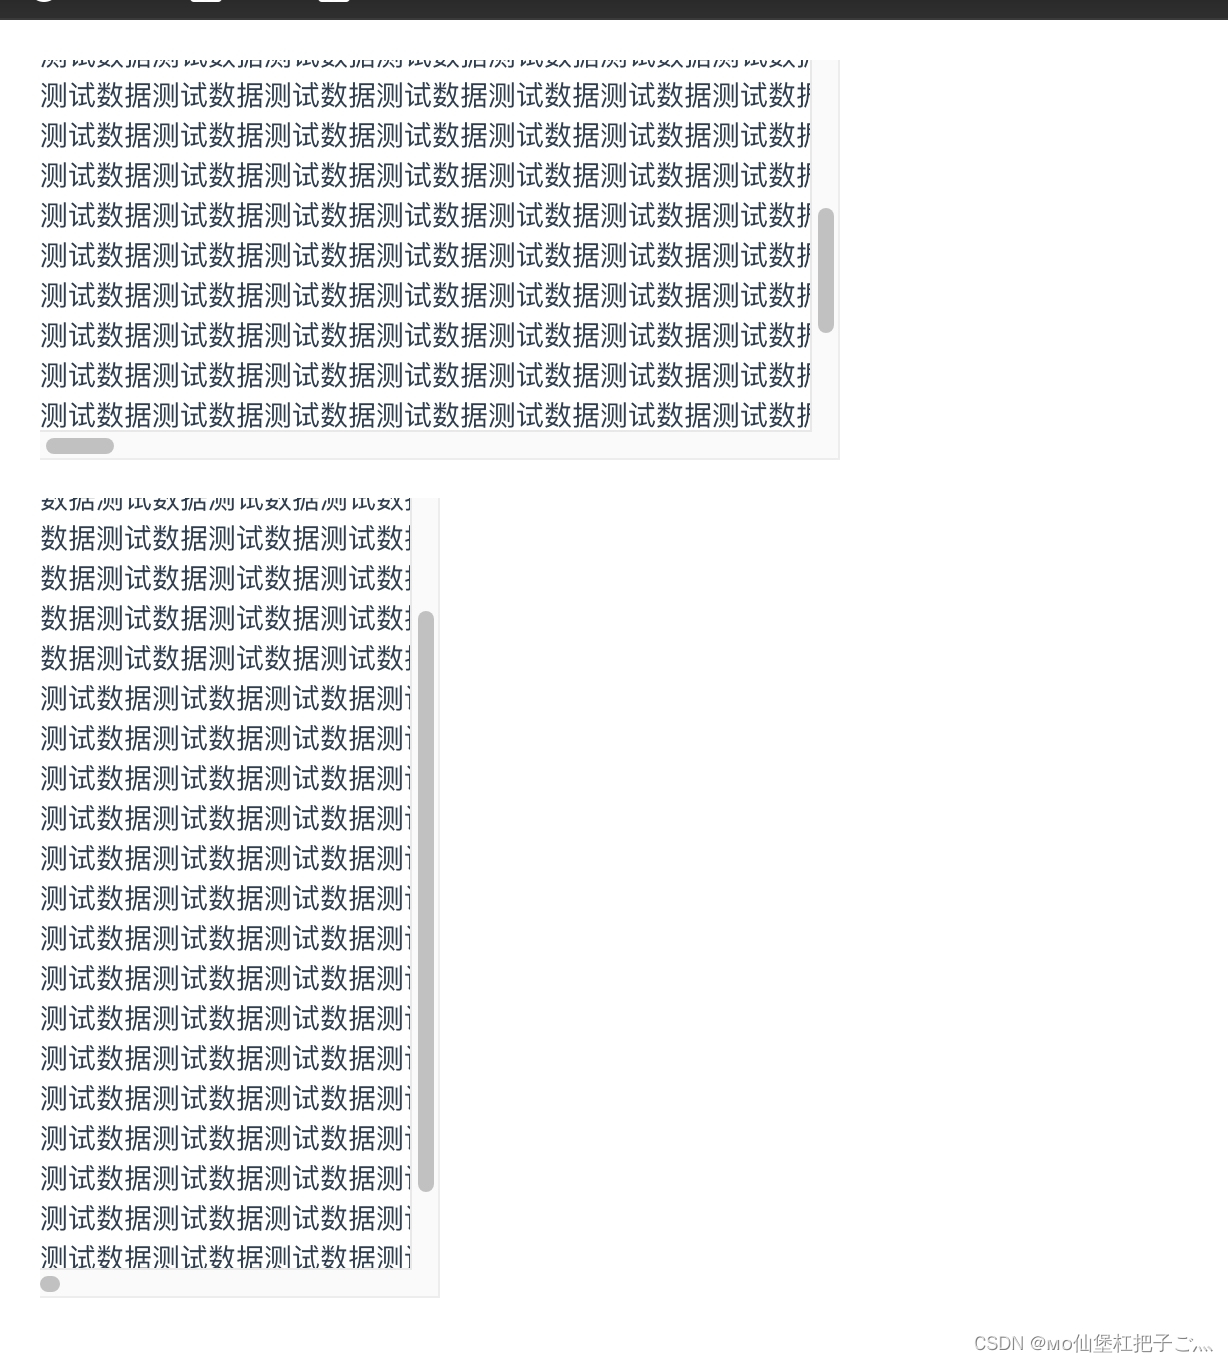
},v-separator
做一个数字的千分位,用法在下面
使用:
<div v-separator="12312"></div>
<div font="28" v-separator="num"></div>
<div font="28" v-separator="11111112312.234"></div>
<div font="28" v-separator="{ num: 234633.234 }"></div>
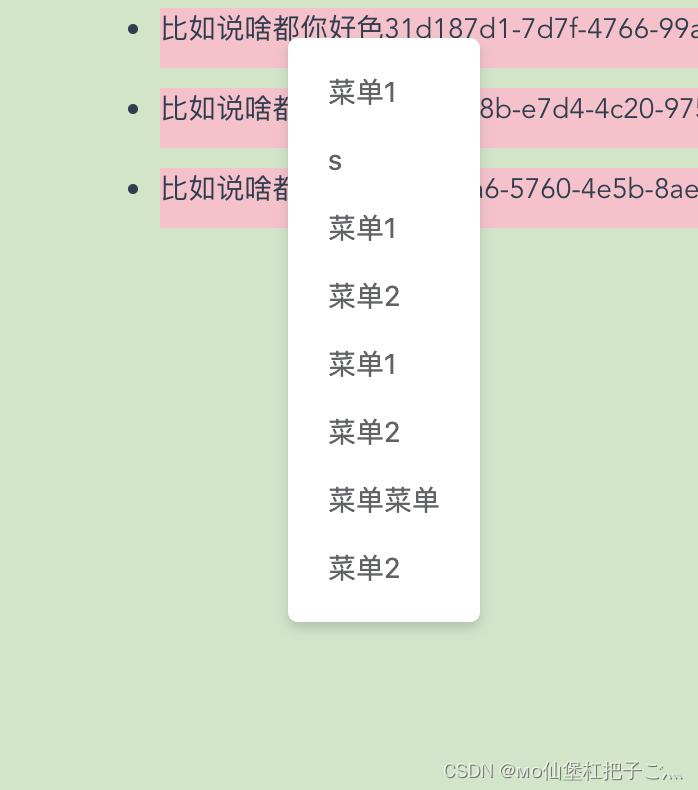
<div font="28" v-separator="{ num: 11111112312.234, separator: '我才' }"></div>v-rightKey鼠标右键事件的一个指令

<template> <div class="demo"> <div class="wmax flex flex-aic flex-ccc"> <ul class="mt50"> <li class="h30 mb10" style="background: pink" v-for="item in list" :key="item.id" v-rightKey="{ menuList, clickclick, data: item }"> <div>{{ item.name }}1</div> </li> </ul> </div> <button v-rightKey="{ menuList: menuList2 }">子菜单</button> </div> </template> <script> import uuid from 'uuid'; let arr = []; for (let i = 0; i < 10; i++) { arr.push({ name: `比如说啥都你好色${uuid()}`, id: uuid() }); } export default { name: '', components: {}, computed: {}, data() { return { list: arr, menuList: [{ text: '菜单1' }, { text: 's' }, { text: '菜单1' }, { text: '菜单菜单' }, { text: '菜单2' }], menuList2: [{ text: 'asdadsad阿达' }, { text: '阿萨达全微分我个人' }] }; }, mounted() {}, methods: { clickclick(e, a) { console.log(e, a); } } }; </script> <style lang="scss" scoped> .demo { position: relative; width: 100%; height: 200%; background: rgb(205, 230, 198); } .box { width: 100px; height: 200px; position: absolute; } </style>v-syncScroll实现滚动条同步滚动的指令无论宽高是否一样 都可以

| 参数 | 可选值 | 默认值 | 说明 |
|---|---|---|---|
| type | x, y, xy 或者 yx | xy ( yx ) | 监听 overflow 的 x y |
| target | DOM 元素 ID | - | 双向滚动元素的 ID |
demo
<template>
  <div class="p20">
    <div class="diffCont left" ref="leftCont" v-syncScroll="{ type: 'yx', target: 'right' }">
      测试数据测试数据测试数据测试据测试数据测试数据测试数据测试数据测试数据测试数据测试数据测试数据测试数据测试数据测试数据测试数据测试数据测试数据测试数据测试数据测试数据测试数据测试数据测试数据测试数据测试数据测试数据测试数据测试数据测试数据测试数据测试数据测试数据测试数据测试数据测试数据测试数据测试数据测试数据<br />
    </div>
    <br />
    <div class="diffCont right" id="right" ref="rightCont">
      数据测试数据测试数据测试数据测试数据测试数据测试数据测试数据测试数据<br />
      数据测试数据测试数据测试数据测试数据测试数据测试数据测试数据测试数据<br />
      数据测试数据测试数据测试数据测试数据测试数据测试数据测试数据测试数据<br />
      测试数据测试数据测试数据测试数据测试数据测试数据测试数据测试数据测试数据测试数据测试数据测试数据测试数据测试数据测试数据测试数据测试数据测试数据测试数据测试数据测试数据测试数据测试数据测试数据测试数据测试数据测试数据测试数据测试数据测试数据测试数据测试数据测试数据测试数据测试数据测试数据测试数据测试数据测试数据测试数据测试数据测试数据测试数据测试数据测试数据测试数据测试数据测试数据测试数据测试数据测试数据测试数据测试数据测试数据测试数据测试数据测试数据测试数据测试数据测试数据测试数据测试数据测试数据测试数据测试数据测试数据<br />
    </div>
  </div>
</template>

<script>
  export default {
    name: '',
    props: [],
    data() {
      return {};
    },
    components: {},
    computed: {},
    beforeMount() {},
    mounted() {
      //  scrollWidth:对象的实际内容的宽度,不包边线宽度,会随对象中内容超过可视区后⽽变⼤。
      //  clientWidth:对象内容的可视区的宽度,不包滚动条等边线,会随对象显⽰⼤⼩的变化⽽改变。
      //  offsetWidth:对象整体的实际宽度,包滚动条等边线,会随对象显⽰⼤⼩的变化⽽改变。
      //  innerWidth:
      //  window.innerHeight=浏览器窗⼝的内部⾼度
      //  window.innerWidth=浏览器窗⼝的内部宽度
    },
    methods: {},
    watch: {}
  };
</script>
<style scoped>
  .flex {
    border: 1px solid #ccc;
  }
  .diffCont {
    height: 200px;
    overflow-y: scroll;
    white-space: nowrap;
  }
  .left {
    width: 400px;
    height: 200px;
  }
  .right {
    width: 200px;
    height: 400px;
  }
</style>v-stickyelement table 数据量大的时候 滚动表头吸顶参数 可选值 默认值 说明 top number 0 表格表头距顶距离 parent '' document.body 必传 要在那个容器内滚动,并在这个容器表头吸顶 <template> <div class="permission-setting overauto"> <table v-sticky="{ top: 0, parent: '.permission-setting' }" height="200%" :data="tableData" :tableColumnData="tableColumnData" :isPage="true" :pageNumber="pageForm.page" :pageSize="pageForm.size" :totalNumber="totalNumber" @pageSizeChange="pageSizeChange" @pageNumberChange="pageNumberChange" v-loading="tableLoading" > <template #industries="scope"> <span>{{ getTableDataName(scope.row.industries) }}</span> </template> </table> </div> </template>使用方式

效果图 滚动页面 表头吸附到顶部

v-watchResize监听任意盒子的宽高变化 并且会将改变的数据传递回去 , 默认时间是300毫秒<template> <div class="f"> <el-switch active-value="300px" inactive-value="500px" v-model="sw"></el-switch> <div class="flex"> <div class="box1" :style="{ width: sw }"></div> <div v-watchResize="asdasd" class="flex-item box2"></div> </div> </div> </template> <script> export default { data() { return { sw: "300px" }; }, methods: { asdasd(val) { console.log(val); } }, }; </script> <style lang="scss" scoped> .f { height: 100%; border: 10px solid red; .box1 { height: 300px; background: #000; } .box2 { height: 300px; background: pink; } } </style>