@starefossen/sanity-plugin-inline-svg-input v1.3.2
Sanity Plugin Inline SVG Input 

Sanity Studio v3 plugin to upload and preview inline SVGs.
- Simple and easy to use
- Safe SVG sanitization with dompurify
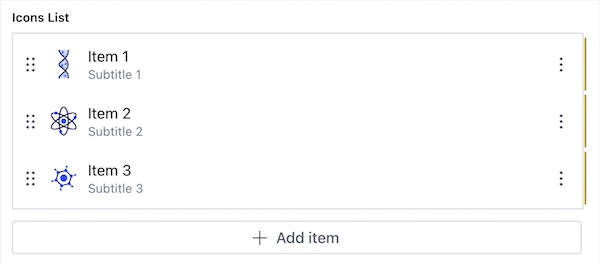
- SVG preview in arrays
- Customizable preview component

Installation
npm install @starefossen/sanity-plugin-inline-svg-inputyarn add @starefossen/sanity-plugin-inline-svg-inputpnpm add @starefossen/sanity-plugin-inline-svg-inputUsage
- Add it as a plugin in
sanity.config.ts(or .js):
import { defineConfig } from 'sanity'
import { inlineSvgInput } from '@starefossen/sanity-plugin-inline-svg-input'

export default defineConfig({
  // ...
  plugins: [inlineSvgInput()],
})- Use the
inlineSvgtype in your schema types:
// ...
{
  fields: [
    // ...
    {
      name: 'svgIcon',
      title: 'SVG Icon',
      type: 'inlineSvg',
    },
  ]
}
That's it! Now you can use this field to upload SVG images and see the preview in your Sanity Studio.
Preview
The sections below describe how to preview your SVG within arrays, objects or your own custom preview component.
Within arrays
Sanity offers a convenient way to preview arrays out of the box, but it only allows the use of the image type in media.
To provide same functionality for SVGs, we provide a ready-to-use preview component that mimics the default array preview.

To preview your SVG in arrays, use the InlineSvgPreviewItem component.\
It accepts the following props:
iconstring - inline SVGtitlestring - the title of the itemsubtitlestring - the subtitle of the item
iconsList in the example below is an array of objects with icon, title and subtitle fields.
To use them in preview the same way as the default array preview,
only what you need is to replace default preview component with InlineSvgPreviewItem.
import { defineType } from 'sanity'
import { InlineSvgPreviewItem } from '@starefossen/sanity-plugin-inline-svg-input'

const IconsListItem = defineType({
  type: 'object',
  name: 'iconsListItem',
  fields: [
    {
      name: 'icon',
      type: 'inlineSvg',
    },
    {
      name: 'title',
      type: 'string',
    },
    {
      name: 'subtitle',
      type: 'string',
    },
  ],
  preview: {
    select: {
      icon: 'icon',
      title: 'title',
      subtitle: 'subtitle',
    },
  },
  components: {
    preview: ({ icon, title, subtitle }) => {
      return <InlineSvgPreviewItem icon={icon} title={title} subtitle={subtitle} />
    },
  },
})

const IconsList = defineType({
  name: 'iconsList',
  type: 'array',
  of: [{ type: IconsListItem.name }],
})
Custom preview component
If you need more customization or want to build your own preview component using SVG icons,
you can use the InlineSvgPreviewComponent.
InlineSvgPreviewComponent is the smallest building block of the plugin the only purpose of which is to sanitize and render SVG.\
It accepts the following props:
valuestring - inline SVG
import { InlineSvgPreviewComponent } from '@starefossen/sanity-plugin-inline-svg-input'

export const PreviewComponent = ({ value }) => {
  return (
    // ...
    <InlineSvgPreviewComponent value={value} />
    // ...
  )
}
To customize the preview component, you can either:
- Pass
classNameorstyleprops - Extend default styles with
styled-components
import { InlineSvgPreviewComponent } from '@starefossen/sanity-plugin-inline-svg-input'
import styled from 'styled-components'

const StyledInlineSvg = styled(InlineSvgPreviewComponent)`
  // ...
`
Development, testing and publishing
This plugin uses @sanity/plugin-kit with default configuration for build & watch scripts.
npm run build - creates a ready to publish plugin in /dist folder.
npm run link-watch - creates a symlink from the plugin repo to the local sanity repo and watches for changes.
After running this command, you will see the instructions on how to add this plugin to your Sanity Studio in the terminal.
npm publish - there is pre-publish script that prepares the plugin for publishing, you don't need to build it manually.
Please run npm publish --dry-run to make sure that everything is ok before publishing. When publishing, make sure to set access=public.
See Testing a plugin in Sanity Studio for additional information.
Setting up NPM_TOKEN secret
To publish the package to the npm registry using GitHub Actions, you need to set up the NPM_TOKEN secret in your GitHub repository settings. Follow these steps:
- Go to your repository on GitHub.
- Click on the
Settingstab. - In the left sidebar, click on
Secretsand thenActions. - Click the
New repository secretbutton. - In the
Namefield, enterNPM_TOKEN. - In the
Valuefield, enter your npm token. You can generate a new token from your npm account settings. - Click the
Add secretbutton.
Once the NPM_TOKEN secret is set up, the GitHub Actions workflow will be able to use it to authenticate and publish the package to the npm registry.
Credits
This project was created at FocusReactive - the Sanity Partner Agency. We specialize in helping clients beat the competition and accelerate business growth. With a deep expertise in headless CMS, NextJS, and eCommerce, we deliver cutting-edge solutions that prioritize your business goals.
Our Expertise
- Content-Centric Websites: We have a deep experience building extendable, SEO optimized content and marketing websites with advanced CMS integrations and analytics.
- Headless eCommerce: Our next-generation, content-rich, and performant online eCommerce websites come with end-to-end integrations to power your digital business.
- Headless CMS Consulting: We offer multi-channel CMS development, modeling, customization, and support to help you manage your content seamlessly across various platforms.
- Web Performance: Our experts can audit, transform the architecture, and optimize your website to meet the 100 SCORE Core Web Vitals for exceptional web performance.
If you're looking for expertise in headless CMS, NextJS, or eCommerce, get in touch with FocusReactive today. Visit our website at focusreactive.com to learn more about how we can help you accelerate your business growth.
This project is licensed under the MIT License. © 2023 FocusReactive.
