@umuthopeyildirim/react-chatbot v0.0.2
React-Chatbot
React-Chatbot is a UI widget for adding Vectara-powered chatbot to your React apps with a few lines of code.
Looking for something else? Try another open-source project:
- React-Search: Add Vectara semantic search to your React apps with a few lines of code.
- Create-UI: The fastest way to generate a working React codebase for a range of generative and semantic search UIs.
- Vectara Answer: Demo app for Summarized Semantic Search with advanced configuration options.
- Vectara Ingest: Sample templates and crawlers for pulling data from many popular data sources.
Demo
UI
Screenshots coming soon!
Use it in your application
Install React-Chatbot:
npm install --save @vectara/react-chatbotThen use it in your application like this:
import { ReactChatbot } from "@vectara/react-chatbot";

/* snip */

<ReactChatbot
  customerId="CUSTOMER_ID"
  corpusId="CORPUS_ID"
  apiKey="API_KEY"
  title="My Chatbot"
  placeholder="Chat with your AI assistant"
  inputSize="large"
  emptyStateDisplay={<MyEmptyStateDisplayComponent />}
  isInitiallyOpen={false}
/>;
Configuration options
customerId (required)
Every Vectara account is associated with a customer ID. You can find your customer ID by logging into the Vectara Console and opening your account dropdown in the top-right corner.
corpusIds (required)
After you create a corpus, you can find its ID by navigating to the corpus and looking in the top-left corner, next to the corpus name.
apiKey (required)
API keys enable applications to access data inside of corpora. Learn how to create a QueryService API key.
title (optional)
Configure the title in the header of the chatbot window.
placeholder (optional)
Configure the placeholder text in the chatbot's input.
emptyStateDisplay (optional)
Configure JSX content to render in the messages window when there are no messages to display.
isInitiallyOpen (optional)
Set the chat window to be opened on initial render.
inputSize (optional)
Used to control the size of the input - either "large" (18px) or "medium" (14px)
Set up your data
React-Chat uses the data in your Vectara corpus to provide factual responses. To set this up:
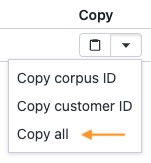
Pro-tip: After you create an API key, navigate to your corpus and click on the "Access control" tab. Find your API key on the bottom and select the "Copy all" option to copy your customer ID, corpus ID, and API key. This gives you all the data you need to configure your <ReactChat /> instance.

Maintenance
This codebase comes with a development environment to facilitate enhancements and bug fixes. It allows maintainers to quickly iterate on the code and verify changes instantly.
Running the development environment
From the root directory, run:
npm installThis will install all dependencies necessary for building the component and running the dev environment. Once this completes, run:
npm run docsThis spins up an application running at http://localhost:8080/. Your latest changes will be reflected here.
Making changes to the component
Once the development environment is running, any changes made to .ts and .tsx files in the /src directory will trigger a rebuild of the component and a reload of the webpage.
Additionally, any changes to the development app source code at /docs/index.tsx will also trigger a rebuild + reload.
License
Vectara React-Chatbot is an open-sourced software licensed under the Apache 2.0 license.