adaptive-streamlines v1.1.0
Variable-density streamlines generator
Working demo here [source], here [source], and here [source].
This library produces aesthetically pleasing streamline visualizations of flow fields. Think of this like a wind map. We know the wind's direction at every point on a grid, and we want to overlay that data on a map using lines that always follow the wind's direction.
The tricky part in doing this is to create streamlines that are evenly spaced and preferably long. A good method to do this comes from Jobard and Lefer, who published it in their 1997 paper Creating Evenly-Spaced Streamlines of Arbitrary Density. It was implemented in Javascript by Andrei Kashcha as the streamlines library; my library is derived directly from Andrei's work.
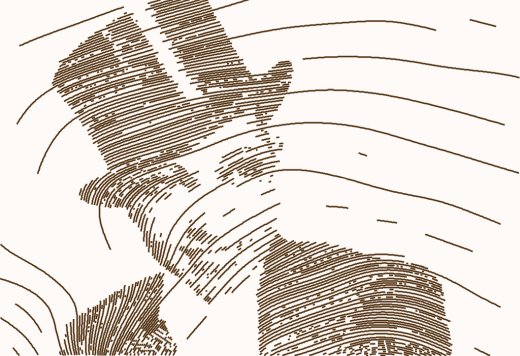
In the original Jobard-Lefer algorithm the density of streamlines is configurable, but it is uniform over the entire area. My derived algorithm lets you to control the streamlines' density through a second, arbitrary function. If the density is the brightness of pixels in an image, then this allows visualizing photos like this:

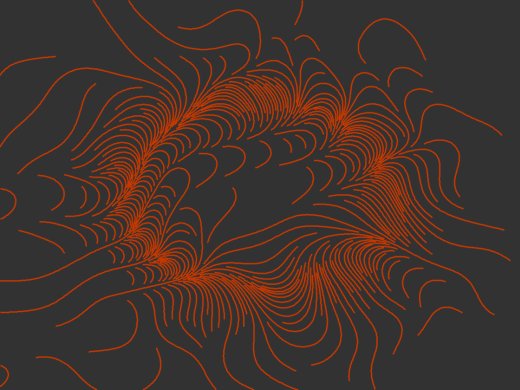
My focus with this library is not on data visualization but on generative art. Think of explorations like this image, which shows a Perlin noise field that is denser along a ring and sparser in the center and at the edges.

Including the library
Using from NPM
If your code has a package.json file, then the simplest way is the add the NPM package as a dependency and import the library as a module, like this:
package.json
{
  "dependencies": {
    "adaptive-streamlines": "^1.0.0"
  }
}
Top of Javascript source file
import {createStreamlineGenerator, Vector} from "adaptive-streamlines";The field-module example illustrates this.
As a script
If you prefer to include the library as a <script> tag in your HTML file, you can download the bundle from the project's latest release and include it the usual way. The bundle adds its exports to the global window object.
<script defer src="adaptive-streamlines.js" type="module"></script>The field-include example illustrates this.
Simple usage
The examples folder contains several workig demos. Here's what you need to do to start generating your own streamlines:
- Define your flow field and density functions
- Define a callback that will receive the generated streamlines
- Create a streamline generator instance and provide the desired parameters
- Run the generator, either asynchronously or synchronously.
import {createStreamlineGenerator, Vector} from "adaptive-streamlines";

function flowFun(pt) { ... return new Vector(vx, vy); }
function densityFun(pt) { ... return val; }
function lineAdded(points) { ... }

const slGen = createStreamlineGenerator({
  field: flowFun,
  density: densityFun,
  width: 1024,
  height: 768,
  minStartDist: 4,
  maxStartDist: 192,
  endRatio: 0.9,
  minPointsPerLine: 3,
  stepLength: 2,
  onStreamlineAdded: lineAdded,
});

await slGen.runAsync();
Details
- The size of the illustrated area is defined by the
widthandheightparameters. The functions provided throughfieldanddensityreceive a two-dimensional vector as an argument; the coordinates are 0 <= x < width and 0 <= y < height. - There are no strict limits on the width and height you can choose, but in the background the algorithm uses a mask with a unit resolution. I.e., you cannot have streamlines that are closer than 1 to each other. If you use a size that makes sense as a pixel resolution you will be fine.
- The flow field function you provide must return either a normlized vector (whose length is 1), or a zero vector, or null. The latter two indicate a singularity in the flow field. Any streamline that reaches a singularity will simply stop there.
- The density function must return a value between 0 and 1. Think of this as the darkness of an area on a photo. 0 means black, and this will result in streamlines crowded densely together. 1 means white. Where the value is 1 there will be no streamlines at all. Values just under 1 will result in streamlines not getting very close to each other.
minStartDistandmaxStartDistcorrespond to the Jobard-Lefer algorithm's dSep (separation distance) parameter. When a new streamline is seeded off an existing one, the starting point will be this distance away from it. In adaptive-streamlines the distance of the new seed depends on the value of the density function at the examined location of the existing streamline. If the density there is 0,minStartDistwill be used. If the density there is close to 1,maxStartDistwill be used.endRatiois related to the original algorithm's dTest (test distance) parameter. There it means how close streamlines are allowed to get to each other as they grow; this is smaller than the minimum distance of their seed point. In adaptive-streamlines this is not defined by an explicit value, but as a fraction of the starting distance derived from the density value,minStartDistandmaxStartDist.- The expected range is 0 <
endRatio< 1 - If
endRatiois close to 1, streamlines are not allowed to get very close to each other. This would correspond to a situation in Jobard-Lefer where dSep is, say, 1 and dTest is 0.9. - If
endRatiois close to 0, streamlines can get close to each other before they are terminated. This would correspond to a situation in Jobard-Lefer where dSep is, say, 1 and dTest is 0.3.
- The expected range is 0 <
minPointsPerLineis a simple filter. The algorithm will discard streamlines that are shorter than this.stepLengthis the amount by which streamlines are grown at a time. Streamlines are grown in such a way that the length of their path is (approximately)stepLengthbetween consecutive points.stepLengthshould be less thatminStartDist.
onStreamlineAddedgets called every time a new streamline has been fully generated. The function receives an array of points that you can draw immediately, or just collect for later.
Asynchronous and synchronous usage
Depending on your data, the algorithm can take several seconds to complete. It is definitely too slow to make your page unresponsive if you are developing an interactive application or a website. runAsync returns a Promise that you can await or follow up with .then(). If you don't want to wait for the process to complete, you can call cancel to terminate it:
import {createStreamlineGenerator, Vector} from "adaptive-streamlines";

// ...
const slGen = createStreamlineGenerator({...});
await slGen.runAsync();

// ...
function onUserClickedStop() {
  slGen.cancel();
}
All this can make using adaptive-streamlines a little complicated. If you're working on an illustration locally and don't mind freezing up your browser for a few seconds in exchange for simplicity, you can also call the synchronous, blocking version. You'll still need to provide a callback in onStreamlineAdded, however, because the streamline generator itself does not collect the finished streamlines. Your code could look a little like this:
import {createStreamlineGenerator, Vector} from "adaptive-streamlines";

const streamLines = [];

const slGen = createStreamlineGenerator({
  // ...
  onStreamlineAdded: points => streamLines.push(points),
});

slGen.run();

// Now streamLines has all the generated results