ai-challenges v1.0.1
AI Challenges Portal
 |
| 
 |
| 


Getting Started
Folder Structure
The project is a monolith that includes backend and frontend side. All the things that you need to run the project is self contained.
Although you can see the folder structure on GitHub or your file system, we annotated the most relevant folder of the project:
.
├── README.md           # ← Hey, hello 👋
├── backend
│   ├── Dockerfile
│   ├── src             # Backend source code entry point
│   │   ├── config      # Environment configuration
│   │   │   ├── environments
│   │   │   │   ├── development.ts
│   │   │   │   ├── production.ts
│   │   │   │   ├── stage.ts
│   │   │   │   └── test.ts
│   │   └── tests       # backend only tests
├── docker-compose.yml
├── docs
├── frontend            # amazing frontend stuff
│   └── public          # static assets files
├── serverless          # maintanance scripts
├── tests               # e2e integration tests
└── travis              # Continous Integration configuration
First Run
Code Dependencies
Just install it using npm.
$ npm installAt the root of the project it will be install all the dependencies necessaries.
Alternatively you can install just a concrete folder entering in it and running the command, e.g.
$ cd backend && npm installData Containers
The services used by this project are:
- Postgres 9.6.
- Redis 3.2.
- Elasticsearch 6.2.2.
We use docker with docker-compose for services isolation, so you don't need to install this service in your local machine and pollute your file system.
Instead, we use docker-compose for run the services inside containers.
If you don't have it, first run $ brew install docker docker-compose
Then you need to initialize the data containers:
$ docker-compose up db redis elasticsearchCheck docker-compose --help to know more and the configuration file docker-compose.yml.
After your database connection is stablished, you need to run the following script at backend to hydratate your data containers:
- Load initial data to the database:
npm run fixtures:restore - Project Build:
npm run build - Run Database migration:
npm run migrations:dev:run - ElasticSearch synchronization:
npm run elastic:sync - Start the backend:
npm run start - Start the frontend: Open a new tab on the terminal, go to the
frontendand runnpm run dev - Login: Open a new tab on the terminal go to the
backendfolder and runnpm run token. Click on the url to automatically sign in as the admin user.
Development Workflow
The frontend or backend side can be bootstrapped in development environment with the following scripts:
Main Process
$ npm run dev # Start the main processTesting Suite
$ npm run test # Run the entire test suite
$ npm run test:watch # Run the entire test suite with live reloading
$ npm run test:run src/tests/integration/challenges.test.ts # Execute a particular testing file
Scripts
$ npm run script src/scripts/token/getToken.ts # execute a particular scriptWorkflow

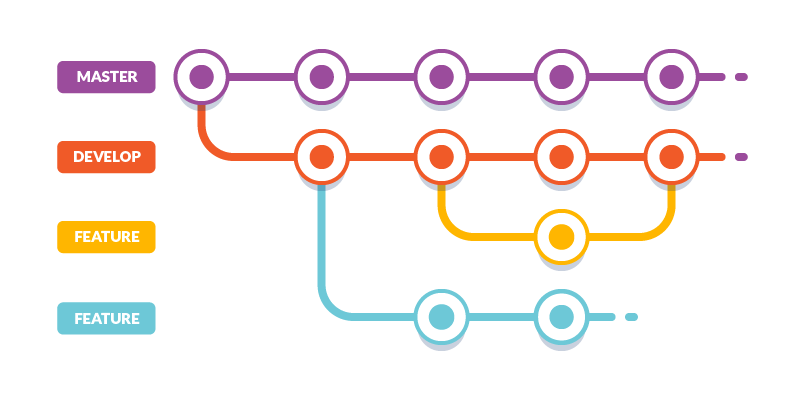
The project follows git-flow approach, and you can find two main branches:
develop
Represent Latest delivered development changes or also called integration branch.
master
Represent production-ready state of source code.
Development Workflow
It mandatory follow this flow steps in order to run the correct Continous Integration services involved.
A common develop workflow has the following steps:
Create a fork from
developbranch. It's not mandatory, but start the branch name with the issue number is a good practice. e.g.1337-panel-option.Do your things. Do as many commits as you need. Consider write good commit messages.
When you thing it's ready, create a New pull request petition. It will be run a Travis build for passing al test and create a production ready docker image.
Assign the PR to a reviewer, After the reviewer approach, the branch can be merged.
Now that the PR is integrated, the source code will be deployed at develop endpoint.
If all looks good, then you can create a New pull request integration to merge develop to master.
Documentation
You can find the rest on docs.
6 years ago