avrcooling v0.0.5
avrcooling
PC cooling controller for rotary cooling devices (fans/pumps). It has the following features:
- Supports 4 cooling devices.
- Can disable devices that still run on minimal PWM.
- Monitors devices RPM.
- RPM measurement supports pulse stretching.
- Supports 2 thermal sensors.
- Error signal output.
- Can be controlled/queried over RS-232 interface.
- Command-line client to query/debug/control the device.
- Hardware design and source code is MIT-licensed.
Control algorithm
The control algorithm uses 2 decision tables, one per thermal sensor. Table rows contain the following information:
- enabled - whether the control row is enable.
- min_temp - lower bound for activating the control row.
- max_temp - upper bound for activating the control row.
- affect_fan0 - whether to apply the row to fan 0.
- affect_fan1 - whether to apply the row to fan 1.
- affect_fan2 - whether to apply the row to fan 2.
- affect_fan3 - whether to apply the row to fan 3.
- fan0_pwm - PWM value to apply for fan 0.
- fan1_pwm - PWM value to apply for fan 1.
- fan2_pwm - PWM value to apply for fan 2.
- fan3_pwm - PWM value to apply for fan 3.
There are 5 rows in each table. The first row with min_temp...max_temp range including the current temperature is used for applying the control values.
All cooling fans start initially in disabled state and with 0 PWM. When a fan PWM is set to a value greater than 0 then the fan power is enabled. When PWM is set to 0 then the fan is also powered down.
Control table rows are checked periodically. The rows can be read and updated using the command-line PC app described below.
Project structure
The project is divided into 3 subdirectories:
avr- source for microcontroller binary.hw- physical hardware design.pc- NodeJS command-line app for communication.
Hardware
Pin allocation

- pin 1: reset, connected to VCC and protected by zener diode
- pin 2: USART RX line (pullup?)
- pin 3: USART TX line
- pin 4: PD2, Error signal output
- pin 5: PD3, OC2B, fan 4 PWM output
- pin 6: PD4, not connected
- pin 7: VCC
- pin 8: GND
- pin 9: XTAL 1
- pin 10: XTAL 2
- pin 11: PD5, OC0B, fan 2 PWM output
- pin 12: PD6, OC0A, fan 1 PWM output
- pin 13: PD7, not connected
- pin 14: PB0, fan 1 enable
- pin 15: PB1, fan 2 enable
- pin 16: PB2, fan 3 enable
- pin 17: PB3, fan 3 PWM output
- pin 18: PB4, fan 4 enable
- pin 19: PB5, not connected
- pin 20: AVCC, connected to VCC through low-pass filter L1/C13
- pin 21: AREF, analog reference, decoupled with 100nF cap C10
- pin 22: GND
- pin 23: PC0, ADC0, temperature sensor 1 input, low-pass filter R5/C7
- pin 24: PC1, ADC1, temperature sensor 2 input, low-pass filter R3/C8
- pin 25: PC2, fan 1 RPM input, pull-up, low-pass filter R10/C9
- pin 26: PC3, fan 2 RPM input, pull-up, low-pass filter R9/C11
- pin 27: PC4, fan 3 RPM input, pull-up, low-pass filter R8/C12
- pin 28: PC5, fan 4 RPM input, pull-up, low-pass filter R7/C14
Port directions
Port B
- PB0 - output (fan 1 enable)
- PB1 - output (fan 2 enable)
- PB2 - output (fan 3 enable)
- PB3 - output (fan 3 PWM)
- PB4 - output (fan 4 enable)
- PB5 - output (not connected)
- PB6 - output (overriden by xtal)
- PB7 - output (overriden by xtal)
Port C
- PC0 - input (ADC)
- PC1 - input (ADC)
- PC2 - input (fan 1 RPM, pull-up)
- PC3 - input (fan 2 RPM, pull-up)
- PC4 - input (fan 3 RPM, pull-up)
- PC5 - input (fan 4 RPM, pull-up)
- PC6 - input (default reset config)
- PC7 - not in circuit/registry
Port D
- PD0 - output (overriden by USART)
- PD1 - output (overriden by USART)
- PD2 - output (error)
- PD3 - output (fan 4 PWM)
- PD4 - output (not connected)
- PD5 - output (fan 2 PWM)
- PD6 - output (fan 1 PWM)
- PD7 - output (not connected)
Full schematics
Full schematics in Eagle format can be found in the file hw/schematics.sch.

Part list
- C1 10uF/16V
- C2 100nF/63V 5mm
- C3, C4 22pF/63V 2.54mm
- C5 100nF/63V 5mm
- C6 10uF/16V 5mm
- C7, C8 10nF/100V 5mm
- C9, C11, C12, C14 10nF/63V 5mm
- C10 100nF/63V 5mm
- C13 100nF/63V 5mm
- D1 5.1V zener 7.62mm
- D2, D3, D4, D5 2N4007
- IC1 Atmega88 DIP28
- R1, R2, R3, R4, R5, R6, R7, R8, R9, R10, R11 10k
- Q1 12MHz
- Q2, Q4, Q6, Q8 2N7000
- Q3, Q5, Q7, Q9 IRF9530
- L1 10uH
- X3 molex power connector, Farnell product page
- X6, X7, X8, X9 molex 47053-1000 headers, Farnell product page
Board layout
Board layout in Eagle format can be found in the file hw/board.brd. Layout
suitable for tone-transfer can be found in the PDF file hw/board.pdf.

Photo of 2 completed units:

Fan connectors
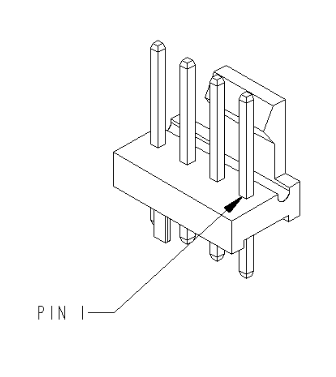
4-wire connectors are standardized in the specification. Connector pinout with typical wire colors is:
- 1 - GND - black
- 2 - 12V - yellow
- 3 - RPM - green
- 4 - PWM - blue
The max fan current is limited by switch MOSFET channel resistance in ON mode. This is about 0.3 Ohms. Max dissipation of 1W gives the max current of about 1.9A.

3-wire connectors
3-wire connectors lack PWM signal but are otherwise compatible with 4-wire headers. Pinout:
- 1 - GND - black
- 2 - 12V - red
- 3 - RPM - yellow
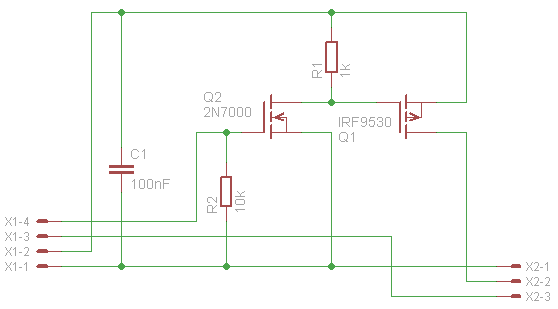
While a 3-wire fan lacks PWM control, it can still be made variable-speed by modulating the supply voltage. This can be implemented with the following circuit:

Temp. sensor connectors
These connect MCP9700 to the board. There can be up to 2 sensors connected. The system assumes 0.5V offset and 10mv per °C. This can be changed by recompiling the firmware.
- 1 - sensor output
- 2 - sensor power (5V)
- 3 - GND
Error signal connector
Error signal is set high whenever an enabled fan's RPM reads 0. The signal comes directly from MCU and cannot be directly loaded with higher current than 40mA.
- 1 - error signal
- 2 - GND
RS-232 interface
The RS-232 interface is used for updating the control line tables and for debugging the device. The connector is denoted as X1 on schematics and board and has the following pinout:
- 1 - TX line
- 2 - RX line
- 3 - GND
A level translator has to be used for connecting the device to PC. PC uses signal levels -12V/+12V while the device uses normal TTL levels 0V/5V.
A level translator can be built using the MAX232 chip or using a prebuilt module/cable/converter. There are various circuits and building instructions on the Internet.
Compiling firmware
The project contains a Makefile that includes build targets with avr-gcc compiler.
To build the HEX binary for the controller:
cd avr
make
If avrdude is installed then the hex file can be burned into the device with the command:
make burnFuses
- Clock: Full-swing crystal, BOD enabled
- BOD 4.3V
Low fuse
- CKDIV8 1 (unprogrammed)
- CKOUT 1 (unprogrammed)
- SUT1 0 (crystal, BOD enabled)
- SUT0 1 (crystal, BOD enabled)
- CKSEL3 0
- CKSEL2 1
- CKSEL1 1
- CKSEL0 1
CKSEL is for full-swing crystal osc. lfuse total 11010111 = 0xd7.
High fuse
- RSTDISBL 1 (unprogrammed)
- DWEN 1 (unprogrammed)
- SPIEN 0 (programmed)
- WDTON 1 (unprogrammed)
- EESAVE 1 (unprogrammed)
- BODLEVEL2 1
- BODLEVEL1 0
- BODLEVEL0 0
hfuse total 11011100 = 0xdc.
If avrdude is installed then correct fuses can be burned using the command:
make burn-fuseClient
The client application is used for updating the control table lines and for debugging the device.
Client options and supported commands:
Usage: avrcooling --port <port> --command <command> [arguments]
Recognized commands:
  disable0       disable fan 0
  disable1       disable fan 1
  disable2       disable fan 2
  disable3       disable fan 3
  echo           sends and receives the given byte
  enable0        enable fan 0
  enable1        enable fan 1
  enable2        enable fan 2
  enable3        enable fan 3
  nostretch0     disable pulse stretch for fan 0
  nostretch1     disable pulse stretch for fan 1
  nostretch2     disable pulse stretch for fan 2
  nostretch3     disable pulse stretch for fan 3
  pwm0_get       query fan 0 PWM level (0-255)
  pwm0_set       set fan 0 PWM (0-255)
  pwm1_get       query fan 1 PWM level (0-255)
  pwm1_set       set fan 1 PWM (0-255)
  pwm2_get       query fan 2 PWM level (0-255)
  pwm2_set       set fan 2 PWM (0-255)
  pwm3_get       query fan 3 PWM level (0-255)
  pwm3_set       set fan 3 PWM (0-255)
  rpm0           query fan 0 RPM
  rpm1           query fan 1 RPM
  rpm2           query fan 2 RPM
  rpm3           query fan 3 RPM
  stretch0       enable pulse stretch for fan 0
  stretch1       enable pulse stretch for fan 1
  stretch2       enable pulse stretch for fan 2
  stretch3       enable pulse stretch for fan 3
  stretch_info   query pulse stretch settings
  temp0          query sensor 0 temperature
  temp0_line_get get control table line (0-4) for sensor 0
  temp0_line_set set control table line (0-4) for sensor 0
  temp1          query sensor 1 temperature
  temp1_line_get get control table line (0-4) for sensor 1
  temp1_line_set set control table line (0-4) for sensor 1
Debugging
Set environment variable DEBUG=* and run the command.
DEBUG=* avrcooling ...Installation
Assuming that you have NodeJS installed:
npm install -g avrcoolingProtocol
The client-device communication protocol terminates messages with line ends. Data on individual lines is encoded in the hex encoding.
Decoded commands have the following format:
[command_byte, arguments..., checksum_byte]Responses have the following format:
[response_ok, response arguments..., checksum_byte]or
[response_fail, checksum_byte]or
[command_checksum_fail, checksum_byte]Multibyte integers are sent in big-endian format. Maximum decoded message length is 10 bytes. The detailed description of the protocol is found in pc/lib/commands.js.
The checksum computation uses the Pearson hash algorithm: http://en.wikipedia.org/wiki/Pearson_hashing. The constants table can be found in avr/src/pearson.c.
Changelog
- 2018-11-11 Do not reset PWM on disable. Implement missing get-pwm command. Reset RPM only on timeout preventing sporadic 0 RPM responses. Update RPM atomically preventing potentially corrupted responses due to data race.
- 2016-01-31 BOD (brown-out detection) enabled.
- 2015-03-24 Pulse stretching is implemented. Client code is finished.
- 2014-07-27 Client code is mostly working.
- 2014-07-17 AVR code is mostly working.
- 2014-02-01 Physical hardware design is ready.
Known issues
- Max ADC input voltage is 1.1V when the internal reference is selected (by default).
- Temperature sensor MCP9700 needs 100nF decoupling cap at the sensor to ensure stable operation.
License
The MIT License. See the LICENSE file.