boo-ui-react v0.1.0
Boo UI React组件库
作者: Bruski aka Boo
更新时间: 2020/10/18
项目初步分析
需要思考的问题
- 代码结构
- 需求分析和编码
- 样式解决方案
- 组件测试用例分析和编码
- 代码打包输出和发布
- CI/CD,文档生成
化繁为简,从简单入手,在需求中慢慢复杂
项目结构设计
boo-ui-react/
	README.md
	node_modules/
	package.json
	tsconfig.json
	src/
		components/
			Button/
				button.tsx
				button.test.tsx
				style.scss
        styles/
            ...
       	index.tsx
代码规范
create-react-app 集成了 react-app
vs code 配置 .vscode/setting.json
{
  "eslint.validate": {
    "javascript",
    "javascriptreact",
    {"language": "typescript", "autoFix": true},
    {"language": "typescriptreact", "autoFix": true},
  }
}
样式解决方案分析
inline-css
css in js
- styled component
- sass / less (Picked!)
文件结构
styles/
	_variables.scss  // 变量和可配置项
	_mixins.scss  // 全局 mixins
	_functions.scss  // 全局 functions
components/
	Button/
		style.scss // 组件单独的样式
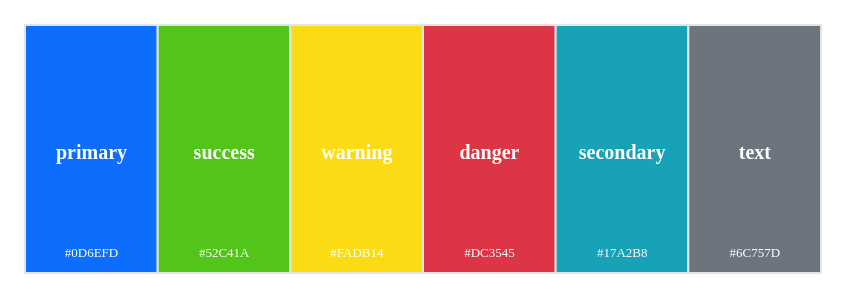
创建组件库的色彩体系
系统色板:
- 基础色板
- 中性色板
产品色板
- 功能色
色彩体系

组件库样式变量分类
- 基础色彩系统
- 字体系统
- 表单
- 按钮
- 边框和阴影
- 可配置开关
构建sass全局styles
定义色彩系统
src/styles/_variables.scss
/* 系统色板 */
/* ========================== */
/* 中性色 Neutral colors */
$white:   #ffffff   !default;
$black:   #000000   !default;
$gray-100:#f8f9fa   !default;
$gray-200:#e9ecef   !default;
$gray-300:#dee2e6   !default;
$gray-400:#ced4da   !default;
$gray-500:#adb5bd   !default;
$gray-600:#6c757d   !default;
$gray-700:#495057   !default;
$gray-800:#343a40   !default;
$gray-900:#212529   !default;

/* 基础色板 Basic colors */
$red:     #dc3545   !default; // 红
$pink:    #d63384   !default; // 粉
$orange:  #fd7e14   !default; // 橙
$yellow:  #fadb14   !default; // 黄
$green:   #52c41a   !default; // 绿
$teal:    #20c997   !default; // 青
$cyan:    #17a2b8   !default; // 蓝绿
$blue:    #0d6efd   !default; // 蓝
$indigo:  #6610f2   !default; // 靛青
$purple:  #6f42c1   !default; // 紫

/* 产品色板 */
/* ========================== */
/* 功能色 */
$primary:   $blue       !default;
$secondary: $gray-600   !default;
$success:   $green      !default;
$info:      $cyan       !default;
$warning:   $yellow     !default;
$danger:    $red        !default;
$light:     $gray-100   !default;
$dark:      $gray-800   !default;
!default 关键字是sass提供,说明该变量可以被覆盖。
跨浏览器样式统一
引入 normalize.css https://github.com/necolas/normalize.css
在其基础上, 混入预定好的 sass 变量.
Sass知识
Partial module
_开头的文件在sass看来是 partial 模块,只能被导入,不可以单独的编译导出(结果为空)。
使用@import不会额外发请求,引入的时候不需要加_
例子
// 假设同层级有 _variables.scss 文件
@import "variables"
组件
Button组件
不同的 Button Type
- Primary
- Default
- Danger
- Link Button
不同的 Button Size
- normal
- small
- large
Disabled状态
- button disable
- link 需要做单独处理
<Button
	size="lg"
	type="primary"
	disabled
	href?=""
	className?=""
	autoFocus?=""
	...
>
	prop children
</Button>
disabled 状态的 css
&.disabled,
&[disabled] {
    cursor: not-allowed;
    opacity: $btn-disabled-opacity;
    box-shadow: none;
    > * {
        pointer-events: none;
    }
}
如何导入button, a 标签 原生属性?
使用 typescript Intersection Types 交叉类型, 即
type NewType = Type1 & Type2将 React.ButtonHTMLAttributes 类型与 自定义props 结合起来.
又由于 button 和 anchor 存在不同的必选参数, 所以要使用 ts 的 Util type Partial 将必选变为可选.
结果如下:
type NativeButtonProps = BaseButtonProps & React.ButtonHTMLAttributes<HTMLElement>
type AnchorButtonProps = BaseButtonProps & React.AnchorHTMLAttributes<HTMLElement>
type ButtonProps = Partial<NativeButtonProps & AnchorButtonProps>
支持用户自定义class
将props的 className 透传到 class 即可
支持事件, 其他属性
通过解构 props + 透传 实现.
Alert组件
用于页面中展示重要的提示信息, 页面中的非浮层元素, 不会自动消失
功能点
- 点击关闭 整个元素消失
- 支持四种主题颜色: success, default, danger, warning
- 可以包含标题和内容,解释更详细的警告
- 右侧是否显示关闭按钮可配置
设计
<Alert
	title=""
	content=""
	alertType=""
	closable={true}
	onClose={}
/>
Menu 组件
功能
- 横向
- 纵向
- 下拉菜单
- disabled
设计
<Menu defaultIndex="1" onSelect={} mode="vertical">
	<Menu.Item index="1">
		title one
	</Menu.Item>
	<Menu.Item index="2" disabled>
		diabled link
	</Menu.Item>
	<Menu.SubMenu index="3" title="dropdown">
        <Menu.Item index="3-1">
            sub item
        </Menu.Item>
        <Menu.Item index="3-2">
            sub item
        </Menu.Item>
	</Menu.Item>
</Menu>

interface MenuProps {
    activeIndex: string;
    mode: string;
    onSelect: (selectInedx: number) => void;
    className: string;
}

interface MenuItemProps {
    index: string;
    disabled: boolean;
    className: string;
}
传递 selectedIndex 等数据
使用 context 与 useContext Hook 进行透传
限制 children 类型
使用 React.Children.map 循环 chilren prop, 对属性名进行过滤
判断 child 是否为 React 组件: React.FunctionComponentElement
子组件也许添加标识,如 displayName 让父组件好做判断`
如果不是指定类型,抛出警告,无返回
const renderChildren = () => {
  return React.Children.map(children, (child, index) => {
    const childElement = child as React.FunctionComponentElement<MenuItemProps>
    const { displayName } = childElement.type
    if (displayName === 'MenuItem') {
      return child
    } else {
      console.error('Warning: Menu only recognizes children of MenuItem type')
   	  return
    }
  })
}
下拉菜单
添加 submenu 组件,
在 Menu 组件的children中增加该类型的支持
水平模式下悬浮弹出子菜单
垂直模式下点击弹出子菜单
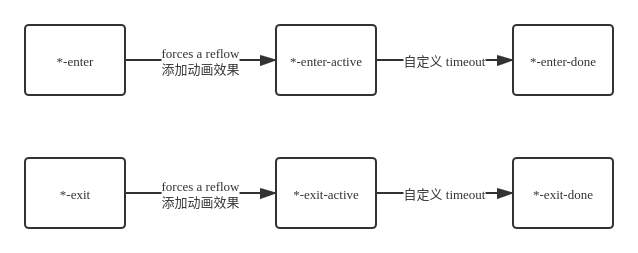
下拉菜单动画
使用 react-transition-group 库的 CSSTransition 组件实现
 <CSSTransition
     in={menuOpen}
     timeout={300}
     classNames="zoom-in-top"
     appear
 >
     <ul className={subMenuClasses}>
     	{childrenComponent}
     </ul>
 </CSSTransition>
使用 animate.css 的 zoom-in 效果
.zoom-in-top {
  &-enter {
    opacity: 0;
    transform: scaleY(0);
  }


  &-enter-active {
    opacity: 1;
    transform: scaleY(1);
    transition: transform 300ms cubic-bezier(0.23, 1, 0.32, 1) 100ms, opacity 300ms cubic-bezier(0.23, 1, 0.32, 1) 100ms;
    transform-origin: center top;
  }

  &-exit {
    opacity: 1;
  }

  &-exit-active {
    opacity: 0;
    transform: scaleY(0);
    transition: transform 300ms cubic-bezier(0.23, 1, 0.32, 1) 100ms, opacity 300ms cubic-bezier(0.23, 1, 0.32, 1) 100ms;
    transform-origin: center top;
  }
}
坑点:
1 - display 与 opacity 同时设置,使得 opacity 的动画效果失效: 解决办法见 opacity 与 display 同时设置, 动画不生效?
2 - 下拉菜单消失时, 无动画效果. 原因: display: none 先生效, 同问题1; 解决办法: 使用 CSSTransition 的 unmountOnExit 特性, 并移除原来的 css display 控制
图标ICON组件
历史
- 上古时代 - 雪碧图(CSS Sprite)
- 近代 - Font icon
- 现代和未来 - SVG
SVG优势
- 完全可控 CSS 属性
- SVG 即取即用, Font icon 要下载全部字体文件
- Font Icon 还有奇怪的 Bug
技术选型
react-fontawesome: Font Awesome 5 React component using SVG with JS
yarn add @fortawesome/fontawesome-svg-core \
         @fortawesome/free-solid-svg-icons \
         @fortawesome/react-fontawesome
实现
包裹 fontawesome 组件, 扩展 theme 赋予颜色的功能
通过 theme 添加 css 类名, 通过 sass 生成对应的 类名与 color 属性值, 即可实现.
Transition 动效组件
基于 react-transition-group 的 CSSTransition 实现, 扩展了两个字段
- animation: 封装动画class
- wrapper: 给传入组件添加 div 包裹, 避免 css transition 属性与原节点冲突
组件测试
测试库选型
Jest: https://jestjs.io/ 通用测试工具
react testing library: React3.3.0后官方推荐的测试库 npm @testing-library/react
jest-dom: 为 jest matcher 新增了对于 DOM 的断言matcher
获取当前节点下的一层节点
使用 :scope 选择器 https://developer.mozilla.org/en-US/docs/Web/CSS/:scope
配合 > 直接子节点, 获取当前节点下的第一层节点
ul.querySelectorAll(':scope > li')异步断言
tesing library/react提供wait工具函数,搭配 await 使用,将异步断言放进 waitFor 的回调参数中.
import { fireEvent, wait } from '@testing-library/react'

fireEvent.mouseLeave(dropdownElement)
await wait(() => {
	expect(expect(wrapper.queryByText('drop 1')).not.toBeVisible())
})
动态添加样式文件
使用 @testing-library/react 提供的 matcher toBeVisible 可以判断css的 display 样式是否生效
由于 Jest 沙箱不会包含css文件,需要在测试时手动创建
const createStyleTag = (): HTMLStyleElement => {
  const styleContext = `
    .b-submenu {
      display: none;
    }
    .b-submenu.b-submenu--opened {
      display: block;
    }
  `
  const style = document.createElement('style')
  style.innerHTML = styleContext
  return style
}

wrapper.container.append(createStyleTag())  // 然后在 wrapper 的 container 上加入
Storybook
CRA create-react-app 不适合组件库开发时的展示
组件完美开发工具应有特点
- 分开展示各个组件不同属性下的状态
- 能追踪组件的行为并且具有属性调试功能
- 可以为组件自动生成文档和属性列表
选型: StoreBook@5.2.8
Storybook 添加全局样式
// .storybook/config.js

import '../src/styles/index.scss';
Storybook TSX 支持
在.storybook 目录下新建 Webpack 的配置文件
// .storybook/webpack.config.js
module.exports = ({config}) => {
  config.module.rules.push({
    test: /\.tsx?$/,
    use: [
      {
        loader: require.resolve("babel-loader"),
        options: {
          presets: [require.resolve("babel-preset-react-app")]
        }
      }
    ]
  });

  config.resolve.extensions.push(".ts", ".tsx");

  return config;
}
然后修改 .storybook/config.js 文件的configure
configure(require.context('../src', true, /\.stories\.tsx$/), module); // 改目录为 src, 匹配为 tsxStoreBook 添加组件 story
使用 storiesOf API 添加页面, 在 add 处添加示例名 + 示例组件
import React from 'react'
import { storiesOf } from '@storybook/react'
import { action } from '@storybook/addon-actions'

import Button from './button'

const defaultBtn = () => (
  <Button onClick={action('clicked')}>default button</Button>
)

const btnWithSize = () => (
  <>
    <Button size="small">small button</Button>
    <Button size="large">large button</Button>
  </>
)

const btnWithType = () => (
  <>
    <Button btnType="default">default button</Button>
    <Button btnType="primary">primary button</Button>
    <Button btnType="danger">danger button</Button>
    <Button btnType="link" href="#">link button</Button>
  </>
)

storiesOf('Button Component', module)
  .add('默认 Button', defaultBtn)
  .add('Button 尺寸', btnWithSize)
  .add('Button 类型', btnWithType)
Storebook 插件系统 Addons
Decorator
全局 decorator 可以为每一个 story 页添加公共样式或代码
// .storybook/preview.js
const styles = {
  textAlign: 'center',
}

export const decorators = [
  (Story) => <div style={styles}>{Story()}</div>
]
Native Addons
在单个story中导入,使用 addDecorator API, 可以位单个story导入 decorator, 这里为 button story 导入自动生成文档的插件
import { storiesOf } from '@storybook/react'
import { withInfo } from '@storybook/addon-info'

storiesOf('Button Component', module)
  .addDecorator(withInfo)
自动生成组件描述
使用 @storybook/addon-info作为装饰器, 自动为组件生成源码+描述等
自动生成组件属性
使用 react-docgen-typescript-loader 通过配置 Webpack的 loader 自动读取组件的属性定义, 类型, 默认值等, 并生成表格
自动生成注释
使用 jsdoc 标准写注释
JavaScript 模块化
模块化历史
- Namespace 全局挂载
- CommonJS (NodeJS,不支持浏览器)
AMD(支持浏览器)
ES Module(大一统)
Webpack
UMD模式
通过代码兼容 commonjs, amd, es module.
不建议umd, 无法做到按需加载
es6 module
使用 Es module 可以静态分析, 做到 tree shaking
package.json 中配置 module 入口, main是 commonjs 的入口
所以组件库项目配置 package.json 如下:
// package.json

"main": "build/index.js",
"module": "build/index.js",
"types": "build/index.d.ts",
Typescript 转为 ES Module
通过 src 下的 index.tsx 统一导入组件
package.json 配置 module 字段为 Src/index.tsx
"build-ts": "tsc -p tsconfig.build.json",Typescript 配置文件
tsconfig.build.json
{
  // 编译选项
  "compilerOptions": {
    "outDir": "build",  // 编译输出文件
    "module": "esnext",  // 采用的模块化类型
    "target": "ES5",  // 编译目标级别
    "declaration": true,  // 为类型生成 .d.ts 声明文件
    "jsx": "react",  // 让jsx|tsx文件 代替 react.createElement
    "moduleResolution": "node", // 支持从 node_module 查找绝对路径的依赖
    "allowSyntheticDefaultImports": true  // 支持 default 的导出方式
  }
  // 编译包含路径
  "include": [
    "src"
  ],
  // 编译不包含的路径
  "exclude": [
    "src/**/*.test.tsx",
    "src/**/*.stories.tsx",
  ]
}
Typescript 处理绝对路径的坑
ts 有几种 module 处理方式, 配置项为 :
moduleResolution:
- classic(默认): 查找绝对路径的依赖从当前路径向上找到根目录, 在 node_module 的库会找不到
- node: 支持从 node_module 查找绝对路径的依赖
所以要配置 moduleResolution: true
Sass 文件编译
配置npm script, 使用node-sass 编译 scss 入口文件
"build-scss": "node-sass ./src/styles/index.scss ./build/index.css",其他
跨平台删除目录工具
跨平台删除目录的工具 rimraf: The UNIX command rm -rf for node.
npm scripts
"build": "npm run clean && npm run build-ts && npm run build-scss",
"build-ts": "tsc -p tsconfig.build.json",
"build-scss": "node-sass ./src/styles/index.scss ./build/index.css",
"clean": "rimraf ./build"
Npm Link 本地测试组件库
被link的一方, 如组件库:
npm link: 将本地的 package 创建软链接到全局的 node_modules 中
link的一方, 如使用组件库的web app:
npm link xxx: 将某个全局包 link 到自己的项目的 node_modules 中
引入组件库后出现invalid hook错误
出现在 npm link 本地调试的情况: 由于存在两个版本的react (本地的react与link过来的组件库中的react), 所以出错
解决方案一:
在组件库的node_moduleslink Web app所使用的 react
Npm
主要功能
- 下载别人编写的第三方包到本地使用
- 下载并安装别人编写的命令行程序到本地使用
- 将自己编写的包或者命令行程序上传到npm服务器
账户
npm whoami # 查看登录状态

npm config ls # 查看当前 npm 的仓库, 如果设了别的镜像源就登录不上去, 要改回 官方源 https://registry.npmjs.org/

npm adduser # 登录
发布
package.json 基础参数解析
- name: 包名
- version: 版本, 版本号命名请遵循: 语义化版本
版本格式:主版本号.次版本号.修订号,版本号递增规则如下:

主版本号:当你做了不兼容的 API 修改,
次版本号:当你做了向下兼容的功能性新增,
修订号:当你做了向下兼容的问题修正。
先行版本号及版本编译元数据可以加到“主版本号.次版本号.修订号”的后面,作为延伸。- description: 包描述
- author: 作者
- license: 开源协议, 一般为 MIT
- keywords: 搜索关键字
- homepage: 项目主页
- repository: 代码仓库
- type: 类型, 如 git
- url: 仓库链接
上传相关参数
- files: 指定哪些文件会被上传到 npm
"files": [
	"dist"
],- script
- prepublish: 发布前的钩子, 可以指定构建命令
"scripts": {
	"build": "xxx",
	"prepublish": "npm run build"
}
发布命令
npm publish知识点
将 css class 名组合起来
classnames: https://github.com/JedWatson/classnames
批量创建 css 类名
使用 Sass提供的 @each 与 @map 方法
通过创建 名字与 变量的 map, 再通过 each 循环取出 key, value, 来批量生成类名称与对应变量的值
如批量创建icon颜色类名
$theme-colors: (
  "primary": $primary,
  "secondary": $secondary,
  "info": $info,
  "warning": $warning,
  "danger": $danger,
  "light": $light,
  "dark": $dark,
);

@each $key, $val in $theme-colors {
  .icon-#{$key} {
    color: $val;
  }
}
CSS动画
动画库
Animate.css: https://animate.style/
旋转图标
css3 属性 transform rotate
transform: rotate(angleValue)opacity 与 display 同时设置, 动画不生效?
原因: display 不是一个 animation 支持的属性, 当 display: none -> display: block 变化时, 所有 动画效果都会失效.
解决方案: 通过 js 让 display 先生效, 再让 opacity 变化
思路:
// enter
display: none; opacity: 0;
-> display: block; opactiy: 0;
-> display: block; opacity: 1;

// leave
display: block; opacity: 1;
-> display: block; opactiy: 0;
-> display: none; opacity: 0;
实现: 使用 React Transition Group
CSSTransitionGroup原理

疑惑
5 years ago