clifer v1.2.3
Clifer
A lightweight library for building beautiful command-line interfaces for NodeJS applications.
Install
Yarn
yarn add cliferNPM
npm install cliferUsage
Create src/cli.ts with the following content:
import { cli, input, runCli } from 'clifer'

enum Type {
  api = 'api',
  subscriber = 'subscriber',
}

interface Props {
  service: string
  instances?: number
  type?: Type
  dryRun?: boolean
}

function run(props: Props) {
  // Handle the action here
  console.log({ props })
}

const program = cli<Props>('create-model')
  // Add an option '--version' to the version of the CLI
  .version('1.0')

  // Add a positional input of type string and prompt if not provided
  .argument(input('name').description('Name of the model').string().required().prompt())

  // Add --service=<string>
  .option(input('service').description('Name of the service').string().required())

  // Add --instances=<number>
  .option(input('instances').description('Number of instances').number().default(2))

  // Add --type=[api|subscriber]
  .option(
    input('type').description('Type of the model').string().options([Type.api, Type.subscriber]),
  )

  // Add --dry-run flag
  .option(input('dryRun').description('Perform a dry run'))

  // Load values from an external source or at runtime (e.g., from a file)
  .load(async (props: Partial<T>) => readJSONAsync('./env.json'))

  // Handle the command
  .handle(run)

runCli(program).catch(e => console.error(e))
Configure Project
To make an npm package executable, follow these steps:
- Add a
binfield topackage.json: This field specifies the executable files and the command names. - Create the executable file: The file should start with a shebang (
#!) that specifies the path to the Node.js executable. - Ensure the file has execute permissions: Make the file executable by setting the correct permissions.
Here's a step-by-step guide:
Step 1: Add bin Field to package.json
In your package.json, add a bin field that maps command names to executable files. For example:
{
  "name": "your-package-name",
  "version": "1.0.0",
  "bin": {
    "your-command": "bin/cli"
  },
  ...
}
Step 2: Create the Executable File
Create the executable JavaScript file (bin/cli) and start it with a shebang:
#!/usr/bin/env node

const { spawn } = require('child_process')
const { resolve } = require('path')
const cli = resolve(__dirname, '..', 'dist', 'index.js')
const args = process.argv.slice(2)
const child = spawn('node', [cli, ...args], {
  detached: false,
  stdio: 'inherit',
  cwd: process.cwd(),
})
child.on('exit', function (code, signal) {
  process.exit(code)
})
Step 3: Ensure the File has Execute Permissions
Make the file executable by setting the correct permissions. Run the following command in your terminal:
chmod +x bin/cliStep 4: Install the Package Globally (Optional)
If you want to test the command globally, you can install your package globally:
npm install -g .Step 5: Run Your Command
After following the above steps, you should be able to run your command from the terminal:
your-commandTesting the Package Locally
Instead of installing globally, you can also link the package locally for testing:
npm linkNow you can run the your-command command:
your-commandBy following these steps, you can make your npm package executable and create your own command-line tools.
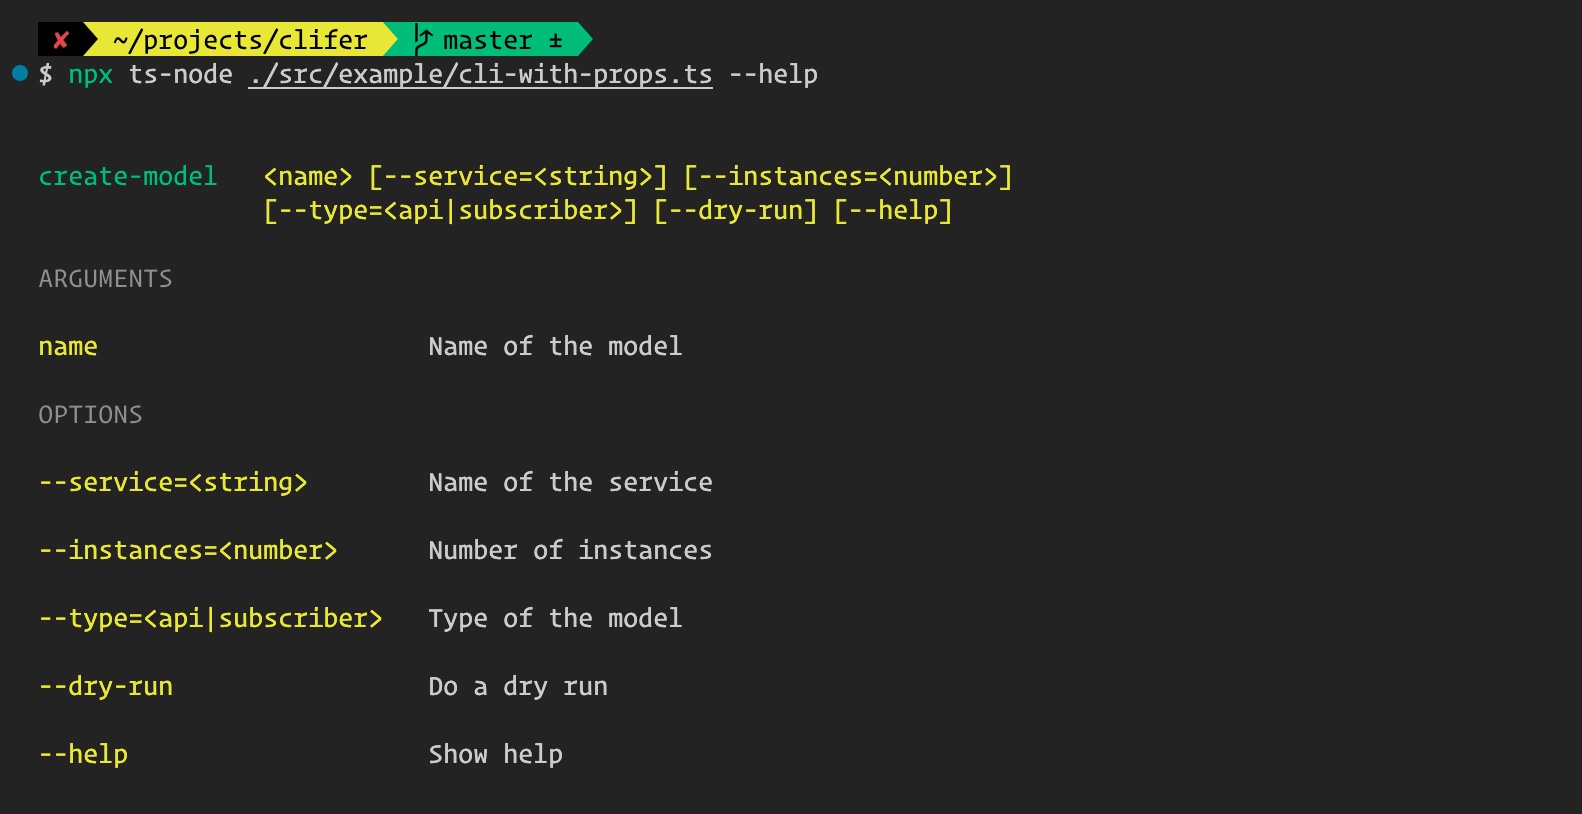
Auto-Generated Help

Commands
import { cli, command, input, runCli } from 'clifer'

enum Type {
  ts = 'ts',
  js = 'js',
}

interface Props {
  dryRun?: boolean
}

interface CreateCommandProps {
  name: string
  type?: Type
}

interface IndexCommandProps {
  name: string
  publish?: boolean
}

const createModel = command<CreateCommandProps>('model')
  .description('Create a model')
  .argument(input('name').description('Name of the model').string().required())
  .option(input('type').description('Type of the model').string().options([Type.ts, Type.js]))
  .handle((props: CreateCommandProps) => {
    // Handle action
  })

const createRepository = command<CreateCommandProps>('repository')
  .description('Create a repository')
  .argument(input('name').description('Name of the repository').string().required())
  .option(input('type').description('Type of the repository').string().options([Type.ts, Type.js]))
  .handle((props: CreateCommandProps) => {
    // Handle action
  })

const createSchema = command<CreateCommandProps>('schema')
  .description('Create a schema file')
  .argument(input('name').description('Name of the schema').string().required())
  .option(input('type').description('Type of the schema').string().options([Type.ts, Type.js]))
  .handle((props: CreateCommandProps) => {
    // Handle action
  })

const createCommand = command('create')
  .description('Create backend modules')
  .command(createModel)
  .command(createRepository)
  .command(createSchema)

const indexCommand = command<IndexCommandProps>('index')
  .description('Create database index')
  .argument(input('name').description('Name of the file to create').string().required())
  .option(input('publish').description('Publish the index'))
  .handle((props: IndexCommandProps) => {
    // Handle action
  })

const program = cli<Props>('builder')
  .version('1.0')
  .command(createCommand)
  .command(indexCommand)
  .option(input('dryRun').description('Execute a sample run'))

runCli(program).catch((e: any) => console.error(e))
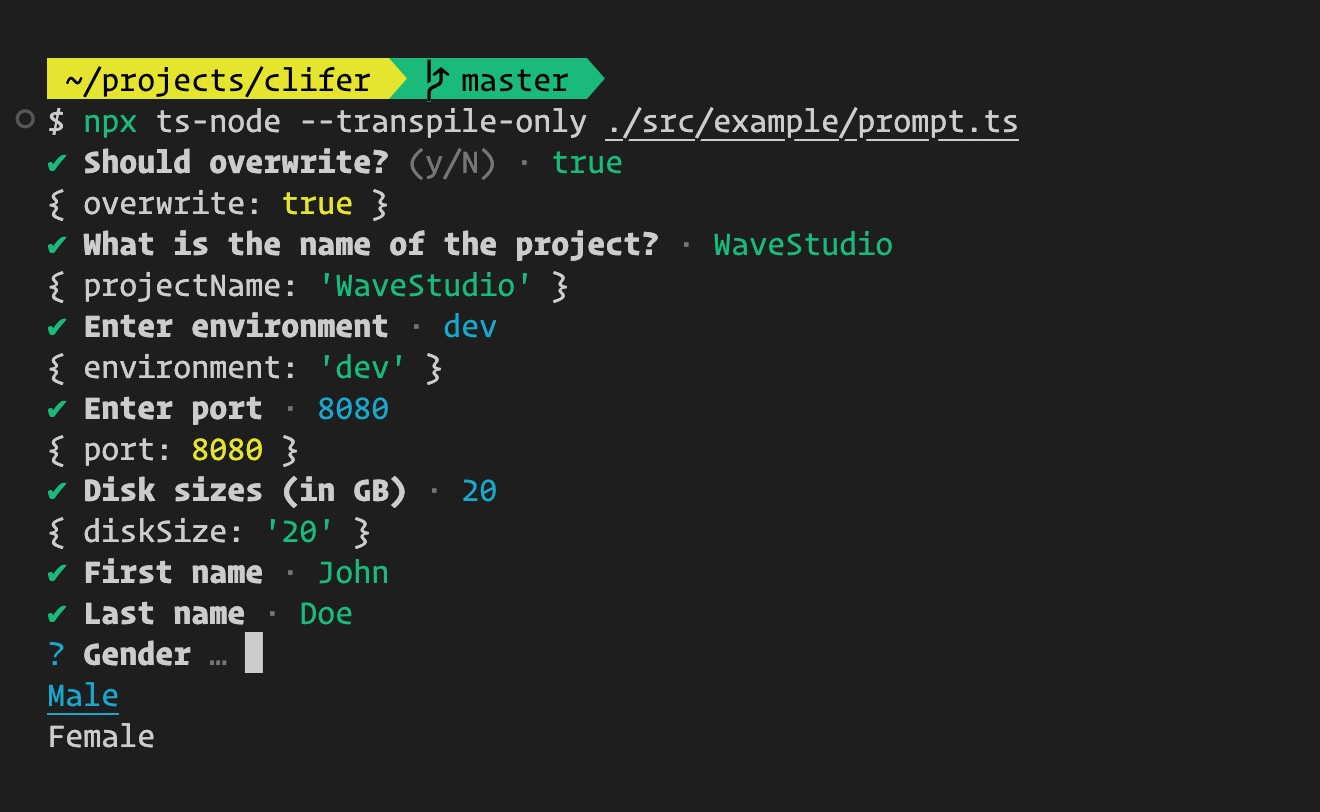
Use Prompt
import { input, prompt } from 'clifer'

// Yes/No confirmation
const { overwrite } = await prompt(
  input('overwrite').description('Overwrite existing files?').prompt('Should overwrite?'),
)
console.log({ overwrite })

// String prompt
const { projectName } = await prompt(
  input('projectName')
    .description('Name of the project')
    .string()
    .prompt('What is the name of the project?'),
)
console.log({ projectName })

// String prompt with auto-complete
const { environment } = await prompt(
  input('environment')
    .description('Environment')
    .string()
    .prompt('Enter environment')
    .choices(['local', 'dev', 'prod']),
)
console.log({ environment })

// Number prompt
const { port } = await prompt(
  input('port').description('Server port').number().prompt('Enter port'),
)
console.log({ port })

// Number prompt with choices
const { diskSize } = await prompt(
  input('diskSize')
    .description('Disk size to use the cloud')
    .number()
    .choices([10, 20, 50, 100])
    .prompt('Disk sizes (in GB)'),
)
console.log({ diskSize })

// Multiple inputs together
const output = await prompt(
  input('firstName').description('First name').string().prompt(),
  input('lastName').description('Last name').string().prompt(),
  input('gender').description('Gender').string().choices(['Male', 'Female']).prompt(),
)
console.log(output)
Error Handling
Use the CliExpectedError class to throw errors for validation issues and configuration errors,
ensuring that Clifer displays a clear error message without a stack trace.
import { CliExpectedError } from 'clifer'

throw new CliExpectedError('Missing a required argument "--arg"')
Here are additional sections that are commonly found in open-source project documentation:
Contributing
Contributions are welcome! If you'd like to contribute to Clifer, please follow these steps:
- Fork the repository.
- Create a new branch (
git checkout -b feature/YourFeature). - Commit your changes (
git commit -m 'Add some feature'). - Push to the branch (
git push origin feature/YourFeature). - Open a pull request.
Please ensure your code adheres to our coding standards and includes tests where applicable.
License
This project is licensed under the MIT License. See the LICENSE file for details.
Code of Conduct
To ensure a welcoming environment, please follow our Code of Conduct.
Changelog
See the Changelog for a detailed history of changes to the project.
If you encounter any issues or have any questions, feel free to open an issue on GitHub.
FAQ
Q: How do I install Clifer? A: You can install Clifer using Yarn or NPM. See the Install section for details.
Q: How do I create a command-line tool with Clifer? A: Refer to the Usage section for a step-by-step guide on creating a command-line tool.
Q: How can I contribute to Clifer? A: See the Contributing section for instructions on how to contribute to the project.
Feel free to modify or expand these sections to better fit your project's needs.
Automatic Release
Here is an example of the release type based on commit messages:
| Commit Message | Release Type |
|---|---|
| fix: comment | Patch Release |
| feat: comment | Minor Feature Release |
| perf: comment | Major Feature Release |
| doc: comment | No Release |
| refactor: comment | No Release |
| chore: comment | No Release |
