coattail v1.0.2
This project is still in it's infancy and should not be used in any production environments or for any application that handles sensitive data.
Coattail
"Ride the Coattails" To succeed by virtue of association.
Coattail was based on the practice of "Coattail Investing" or "Copy Trading". Unlike those practices, which are aimed at mimicking the trades made by well known investors, Coattail targets real-time notification of events. While it is only based on this investment practice and not intended to be used for investment purposes, it mimics the concept in that an action performed by one party can trigger actions to be performed by one or more other parties. Coattail takes this a step further however allowing for a waterfall effect to take place.
In more technical terms, Coattail is a secure peer-to-peer remote execution and data publication service. It's intention is to provide a generic publication mechanism in which subscribers can utilize the publication data in anyway they see fit.
Features
| Feature | Documentation |
|---|---|
| Peer-to-peer architecture providing a decentralized base for communication. | Architecture |
| Easy to use data manipulation, publication and subscription. | Managing Subscriptions |
| Support for TLS providing a secure tunnel with end-to-end encryption for data transport. | Configuring TLS |
| Subscription based publication mechanism. | Actions & Receivers |
| Secure permission driven remote execution on peered instances. | Remote Execution |
| Support for secure signature based packet source verification. | Validation Tokens |
| Modern command line interface for managing instances. | CLI Usage |
Index
- Installing Coattail
- Getting started
- Configuring TLS for your Coattail Service
- Managing Actions & Receivers
- Managing Peers
- Managing Subscriptions
- Authentication
- Development Progress
Installing Coattail
Coattail is primarily a command-line application. You can install Coattail via the Node Package Manager. I would highly recommend you install NPM using nvm instead of the official distribution. Provided you have NPM installed, you can run the following command to install Coattail.
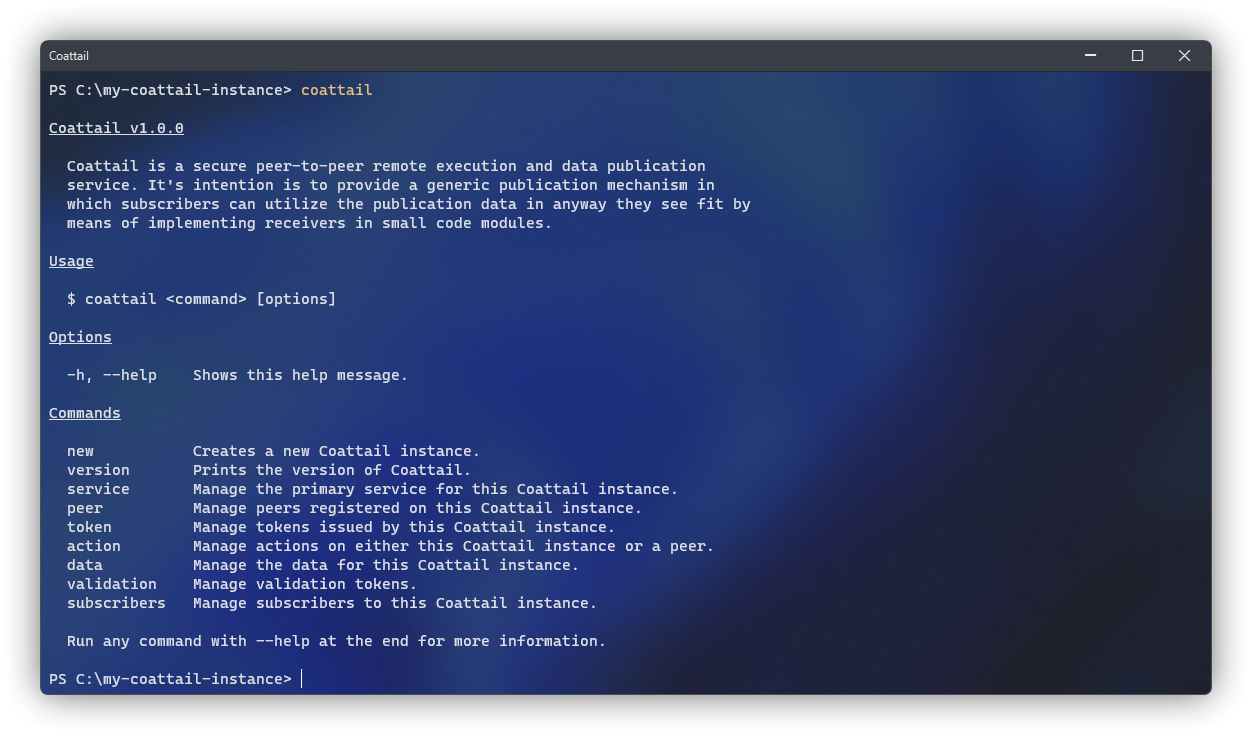
$ npm i -g coattailOnce completed, the Coattail command will be available globally on your system. You can verify that the installation was successful by attempting to run the coattail command. You should see the following output. If you do not see the expected output, verify that your Node installations bin directory is added to your path. See here for more information.
Getting started
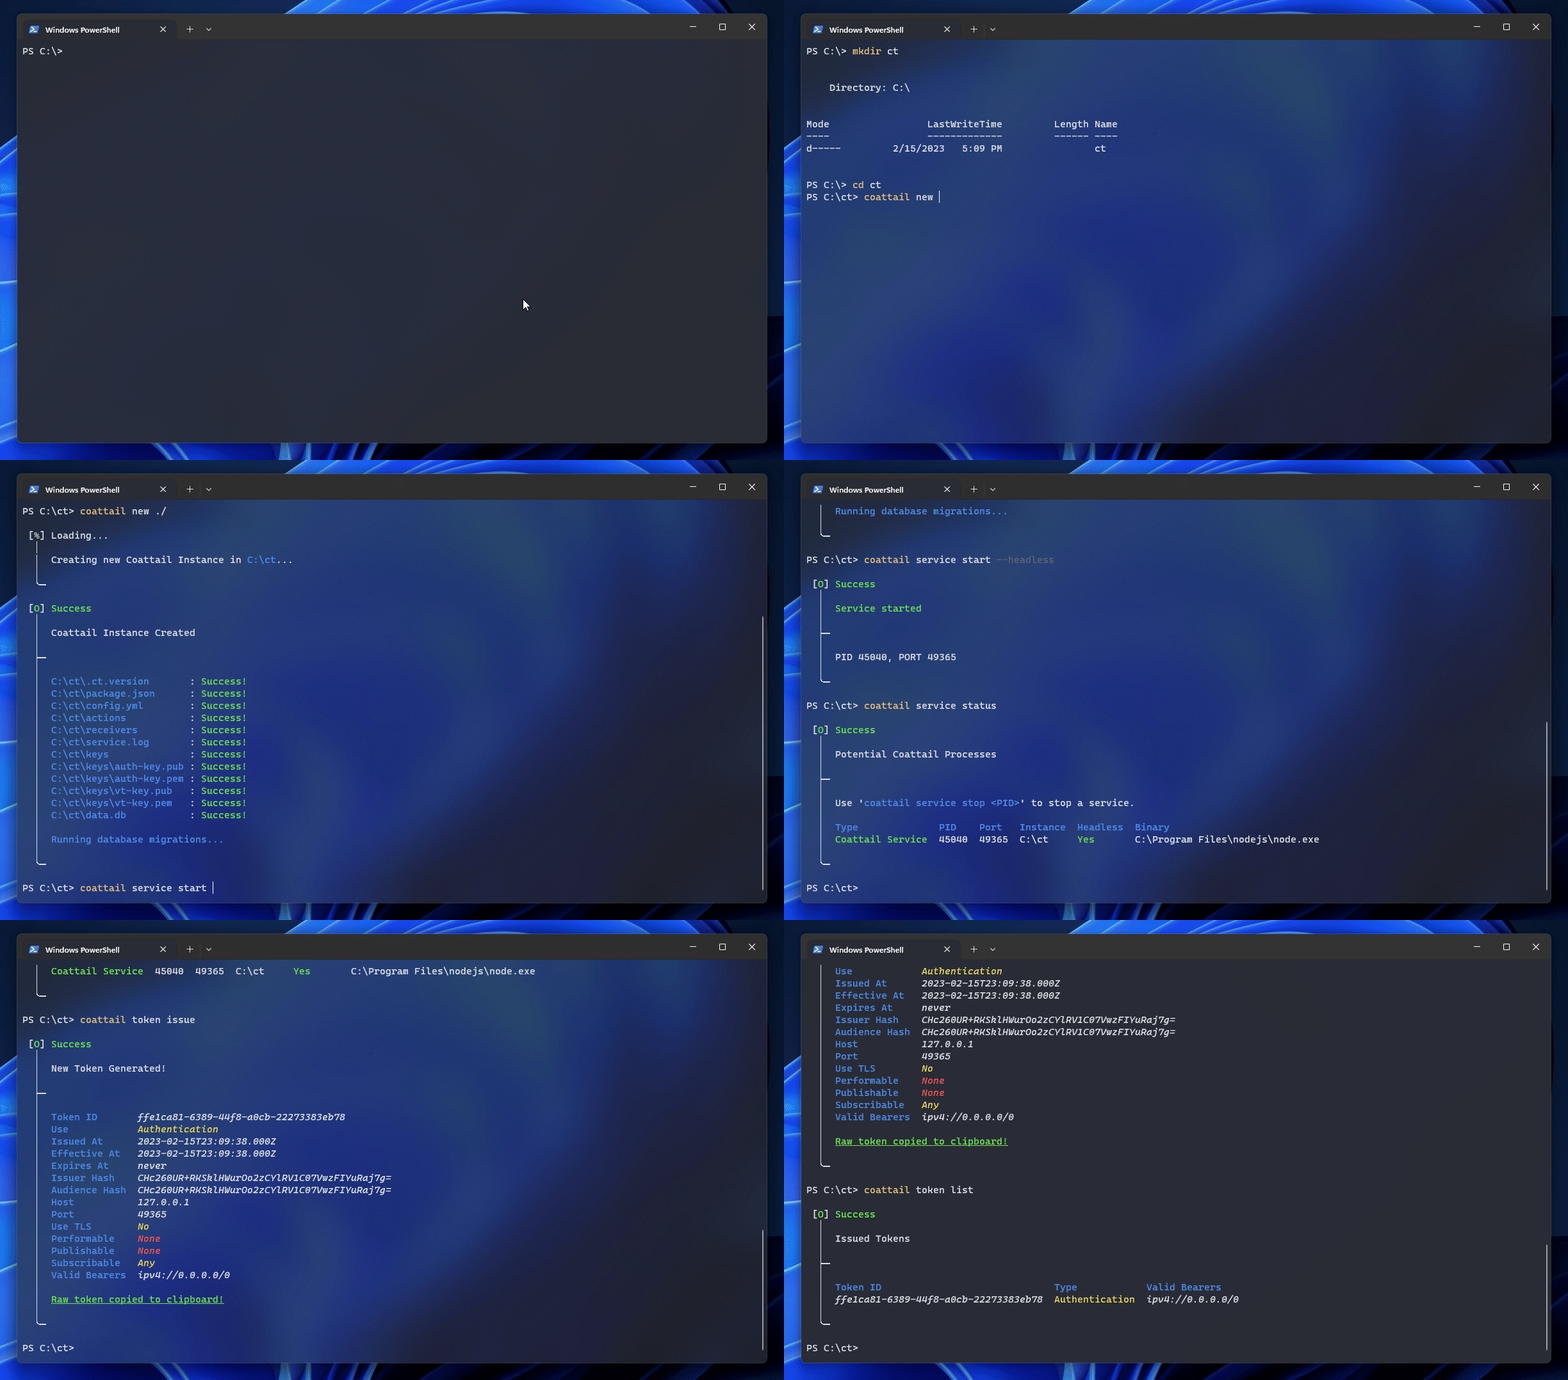
This quick guide will walk you through creating your first Coattail instance and initializing it for first time use. It includes creating the Coattail instance and starting it's core service.
Initializing a Coattail Instance
You will need an empty directory in which to store your Coattail Instances files.
$ mkdir "my-coattail-instance" ; cd "my-coattail-instance"
$ coattail new "./"
You should now have the following file structure in your Coattail Instance directory.
my-coattail-instance/
├── actions            # Actions that can be performed with this instance.
│   └── <empty>
├── receivers          # Receivers for incoming publications.
│   └── <empty>
├── keys               # Cryptographic keys
│   ├── auth-key.pem   # Authentication private key.
│   ├── auth-key.pub   # Authentication public key.
│   ├── vt-key.pem     # Validation private key.
│   └── vt-key.pub     # Validation public key.
├── data.db            # Local data storage.
├── package.json       # The npm package file for the Coattail instance.
├── config.yml         # Instance configuration.
├── service.log        # Your service log file.
└── .ct.version        # Version file for Coattail CLI.
Managing your Coattail service
There are several commands built into the Coattail CLI that can be used to manage the instance of Coattail running on your system. These can be used to start a service, stop a service or list running services on the system.

Starting a Service
Your Coattail Instance will need to be running in order to communicate with peering Coattail instances. You should ideally run your Coattail Instance in headless mode to keep it running in the background. To start your coattail instance, navigate to your Coattail instance and run the following command.
$ coattail service start --headlessViewing Service Status
You can check the status of your Coattail instance (along with any other Coattail instance running on the system) by navigating to any Coattail instance and running the following command.
$ coattail service statusStopping a Service
You can stop a Coattail instance by determining the PID for the service (this is listed in the output of the status command above) and passing it to the following command.
$ coattail service stop <pid>Configuring TLS for your Coattail Service
By default Coattail runs over plain TCP/IP. Coattial is most secure when running over TCP/IP with TLS. You can enable TLS in your instances config.yml file.
Generating Certificate & Key
Before you can enable TLS, you will need to generate a Certificate and Key. It is important that when generating your certificate you provide the Issuer Hash from your Coattail instance for the "Common Name" (CN).

The token issuer is based on a Base-64 encoded SHA-256 hash of your public Validation Token. As such, replacing your Validation Token will change your issuer hash. This means that if you change your Validation Token you will also need to re-generate your Certificate & Key.
Once you've retrieved the issuer hash from your Coattail instance, you can generate the certificate and key using the following commands.
# Retrieve the issuer hash
# This will be used for the CN value in your certificate
$ coattail token issuer

# Generate the key
$ openssl genrsa -out "server-key.pem" 1024

# Generate a CSR for the certificate
# Make sure to use the issuer hash for the Common Name (CN)
$ openssl req -new -key "server-key.pem" -out "server-csr.pem"

# Generate the certificate
$ openssl x509 -req -in "server-csr.pem" -signkey "server-key.pem" -out "server-cert.pem"

# Remove the CSR as we no longer need it.
$ rm "server-csr.pem"
I recommend you place this key and certificate in the
keysdirectory of your Coattail instance alongside the other cryptographic keys used by the instance.
Applying Certificate & Key
Once you have the keys, you will need to open your instances config.yml file and configure the service.tls section as written below. Be sure to use the absolute paths to your certificate and key files.
service:
  tls:
    enabled: true
    key: '/absolute/path/to/server-key.pem'
    cert: '/absolute/path/to/server-cert.pem'
Once it has been configured, make sure that you restart your Coattail Instances service if it is already running. See Managing your Coattail service for more information on starting/stopping your Coattail service.
Any tokens issued before you modify the service section of your configuration will cease to function with your Coattail instance. It's recommended that you configure your instance before issuing any tokens.
Managing Actions & Receivers
The basic purpose of Coattail revolves around Actions and Receivers. An action is a small module of code that can be executed on the instance. Once completed, the results of this action can optionally be published to registered subscribers. When published, other Coattail instances that have subscribed to the particular Action on this instance will be notified of the resulting data. When notified, these subscriptions are processed by Receivers.
sequenceDiagram
    autonumber

    actor Publisher
    participant Action
    actor Subscriber
    participant Receiver

    Publisher ->> Action: Perform Action
    Publisher ->> Subscriber: Publish Result
    Subscriber ->> Receiver: Handle Result
Actions
An action is a small module of code that can be executed on the instance. Once completed, the results of this action can optionally be published to registered subscribers.
Creating an Action
The following command will create a new action on your Coattail instance. This should be run from the root directory of your Coattail instance. Alternately, if you wish to create an action for a particular Coattail instance on your system, you can pass the absolute path of the Coattail Instance to the --instance flag. Once you have run this command, a new file will be created in the actions directory of your Coattail instance.

The default behavior for this newly created action will be to simply return whatever input it has received as it's output. You can of course customize this behavior to tailor the action to whatever you'd like it to perform. However, if you intend to allow your action to be remotely executed, it is important that you perform thorough validation of the input data.
$ coattail action create --name "My Action"/* ./actions/My Action.js */
module.exports = (Coattail) => class extends Coattail.Action {
async perform(input) {
// Perform action and return output.
return { ...input };
}
};Performing an Action
You can perform this action locally by running the following command. The action should simply return the input data as the output for the action.
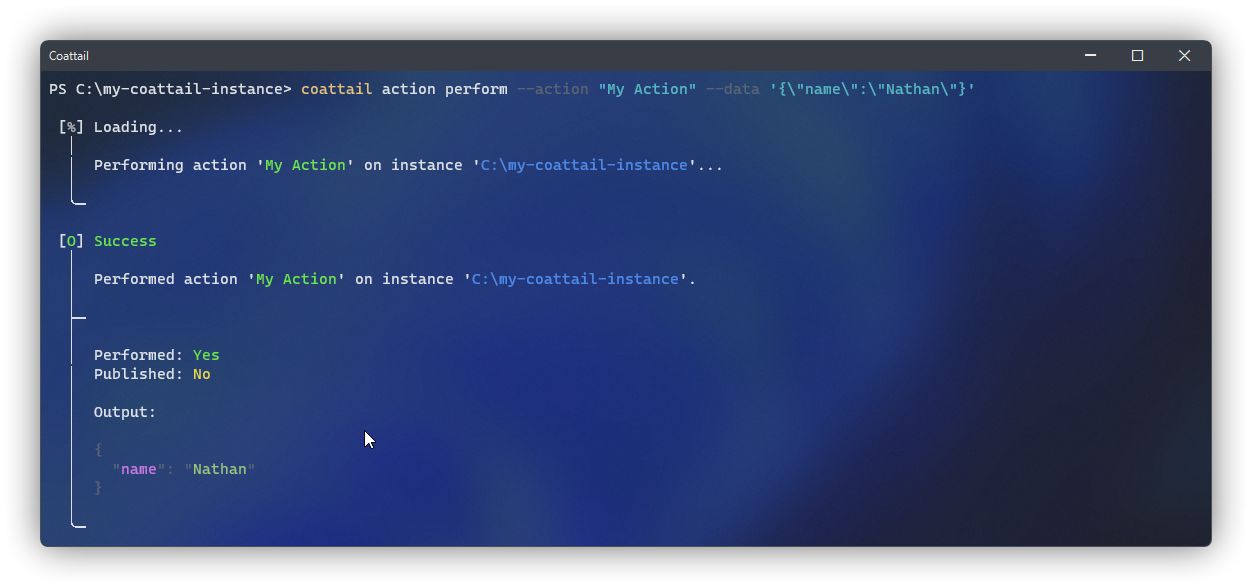
$ coattail action perform --action "My Action" --data '{"name":"Nathan"}'Publishing Action Result
Once an action is performed, you can optionally notify any subscribers who are subscribed to this particular action. To do so, add the --notify flag to your perform command invocation.
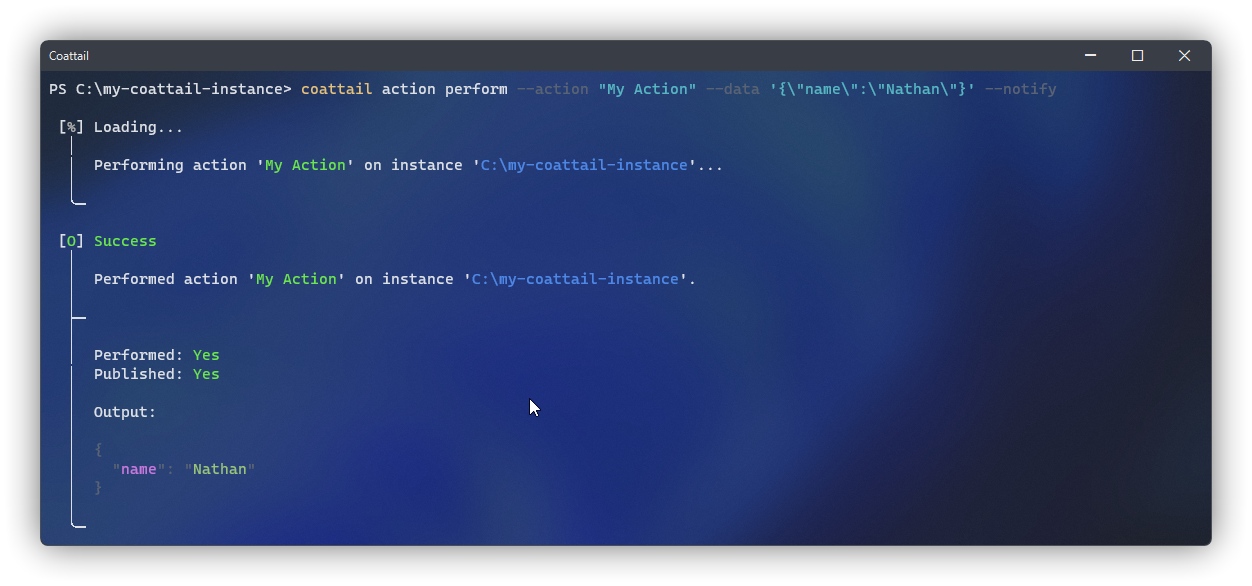
$ coattail action perform --action "My Action" --data '{"name":"Nathan"}' --notifyAlternately, you can directly publish data to subscribers of an action without performing the action.
$ coattail action publish --action "My Action" --data '{"name":"Nathan"}'Listing available Actions
To list the available actions on your Coattail instance, you can use the following command:
$ coattail action listReceivers
When an action is published, other Coattail instances that have subscribed to that particular Action on this instance will be notified of the resulting data. When notified, these subscriptions are processed on the subscribing Coattail instance by Receivers.
Creating a Receiver
The following command will create a new receiver on your Coattail instance. This should be run from the root directory of your Coattail instance. Alternately, if you wish to create a receiver for a particular Coattail instance on your system, you can pass the absolute path of the Coattail Instance to the --instance flag. Once you have run this command, a new file will be created in the receivers directory of your Coattail instance.

The default behavior for this newly created receiver will be a no-op. You should customize this behavior to appropriately handle the incoming data published by the action.
$ coattail action create --name "My Receiver" --receiver/* ./receivers/My Receiver.js */
module.exports = (Coattail) => class extends Coattail.Receiver {
async onReceived(input) {
// Handle input
}
};Listing available Receivers
To list the available receivers on your Coattail instance, you can use the following command:
$ coattail action list --receiversActions API
The Coattail Actions API is exported to actions and receivers in your Coattail instance through the Coattail parameter. You can use this to control your Coattail instance from within an Action or Receiver. The Coattail API includes access to the Peer class, the Action class and the Receiver class.
A common use case for this might be to trigger another action when a Receiver is executed.
/* ./receivers/My Receiver.js */

module.exports = (Coattail) => class extends Coattail.Receiver {
    // When the receiver is triggered, perform another action
    async onReceived(input) {
        // Retrieve the local peer instance.
        const local = Coattail.Peer.local();

        // Perform the other action, notifying it's subscribers
        await local.performAction({
            name: "My Action",
            publish: true,
            data: {
                name: "Nathan"
            },
        });
    }
};
Remote Execution
Certain commands can be run remotely on a peer, provided you have the appropriate permission. This can be useful if you wish to remotely execute a task, or simply see what tasks are available to you on another instance. To remotely execute a command, you must add the --peer <id> flag to it; providing the ID of the peer you wish to remotely execute the command on.
In order to remotely execute a command, you must first add a peer using an Authentication Token. See Managing Peers for more information.
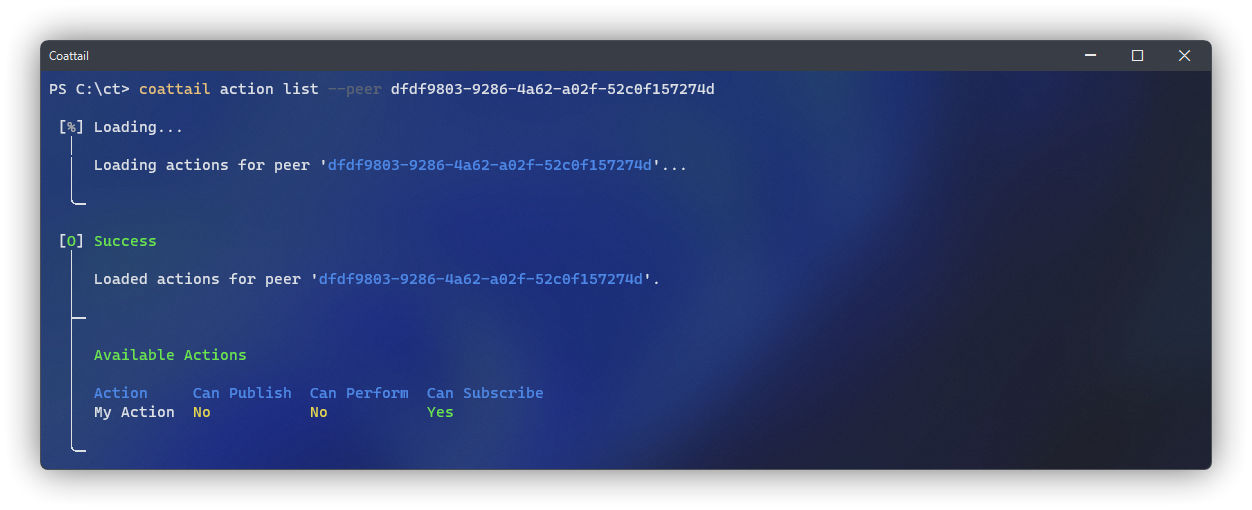
The commands available for remote execution include performing an action, publishing an action and listing available actions. In order to perform or publish an action on a peer, that peer must have granted you permission to do so when they issued you your Authentication Token. See Authentication: Token Permissions for more information.
Managing Peers
A peer is any Coattail instance that has allowed you to subscribe to one or more actions published by the issuing Coattail instance, or that has allowed you to perform or publish actions on it's behalf. The specifics of which of these operations are permitted by the peer is determined based on the Authentication Token you are issued. See Authentication: Token Permissions for more information.
Adding a Peer
You can add a peer by requesting an Authentication Token from the administrator of the Coattail Instance you wish to peer with. They will generate this token by following the instructions outlined in Authentication: Token Issuance. Once you have the Authentication Token, you can add the peer by running the following command.
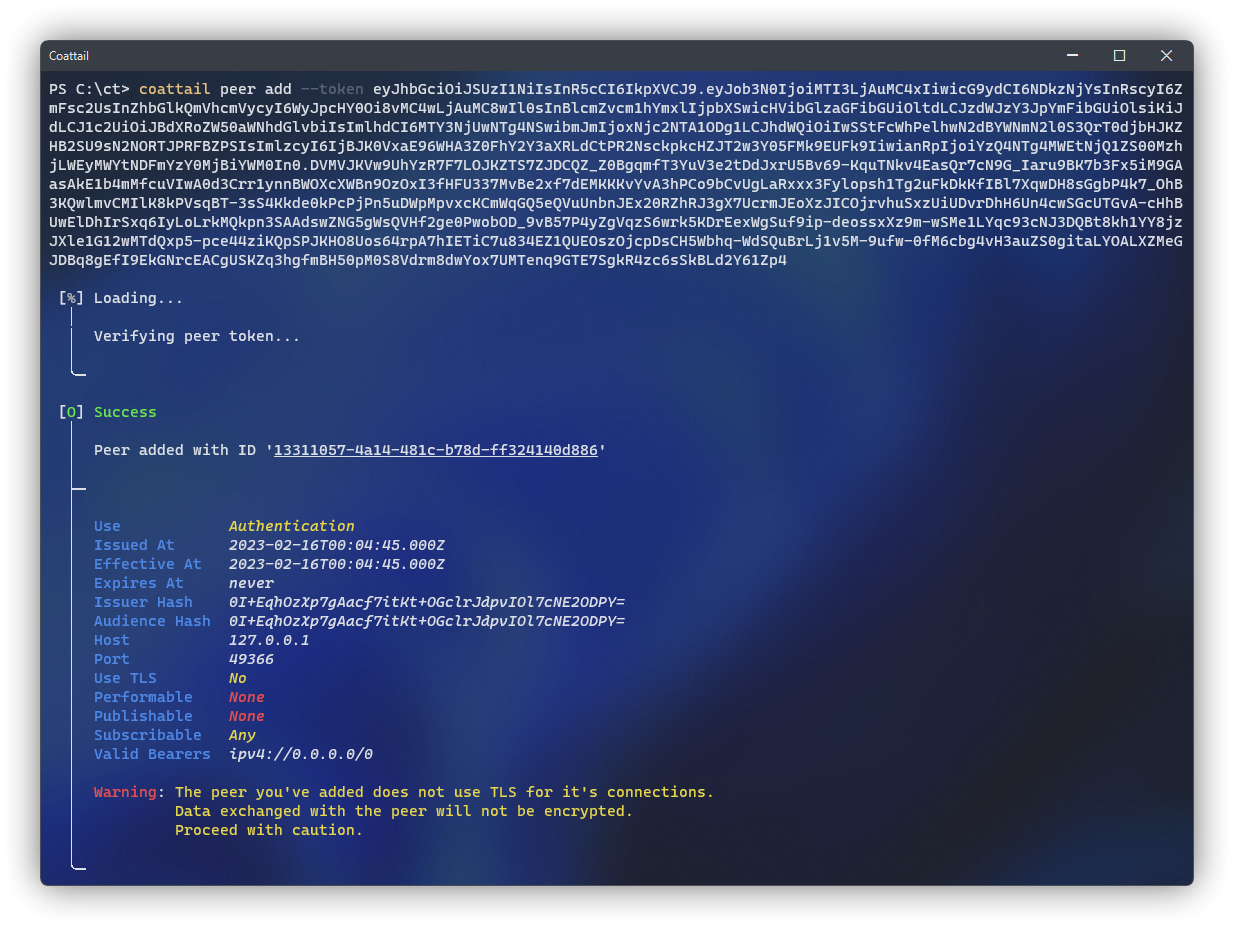
$ coattail peer add --token <token>Once completed, you will now have an ID associated with the peer. This ID will be used in subsequent commands related to the peer you have added. You can see the peer in your list of peers by running the following command.
$ coattail peer listRetrieving Peer Information
You can retrieve detailed information about the token you were issued by running the following command. This information includes what operations you are permitted to execute on the peer, whether or not your connection to the peer is using TLS, relevant connection data that will be used and much more.
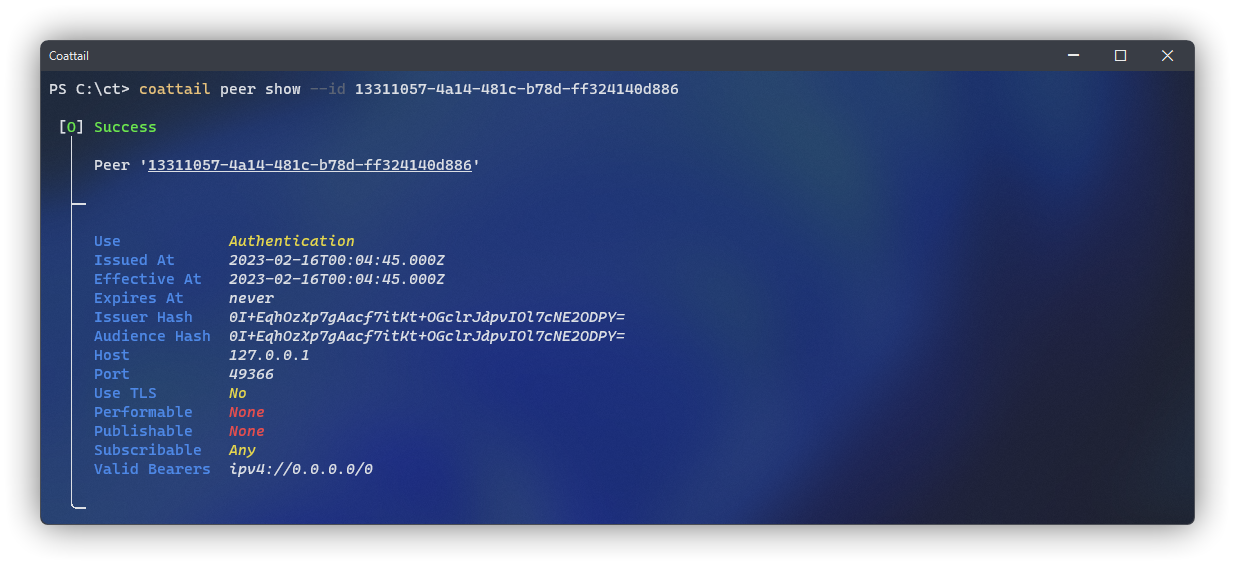
$ coattail peer show --id <id>Managing Subscriptions
In order to subscribe to an action on another Coattail instance, you must have it registered as a peer. This is covered in the Managing Peers documentation.
Subscribing & Un-subscribing
In order to subscribe to an action on a peer, you must first list the available actions for that peer. You can do this by taking advantage of some of the remote execution features of Coattail.
Normally, you would list your own actions as described in Listing Available Actions, however in our instance we're going to add the --peer flag to the command. This will tell Coattail to run the operation on that peer, as opposed to our local Coattail instance. Once you've determined which actions you can subscribe to, you can subscribe to them using the action subscribe sub command.
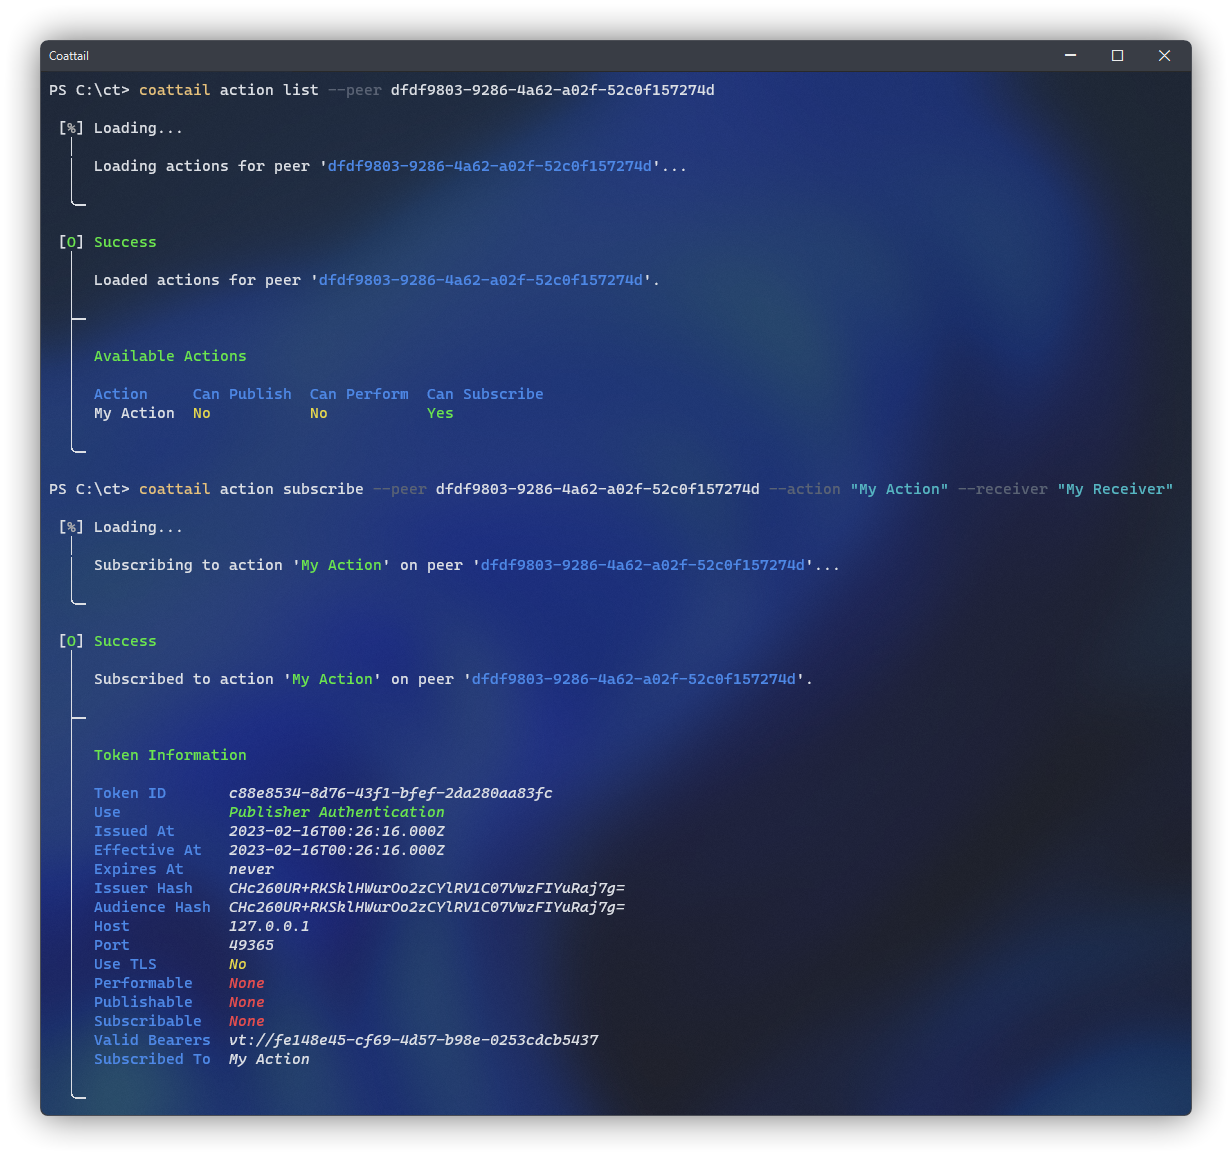
$ coattail action list --peer <id>$ coattail action subscribe \
--peer <id> \
--action <action> \
--receiver <receiver>The <id> you provide here is the peer you are subscribing to the action on. The <action> is the particular action you are subscribing to, and the <receiver> is the local receiver you'd like to use to handle publications from this action. Under the hood, the following operations take place between the two peers.
sequenceDiagram
    autonumber

    actor Publisher
    actor Subscriber

    Subscriber ->> Publisher: Subscribe to Action with Receiver
    Note over Publisher: Validate Request
    Note over Publisher: Issue Validation
    Publisher ->> Subscriber: Request Subscription Token using Validation & Authentication Token ID
    Note over Subscriber: Save Validation
    Note over Subscriber: Issue Subscription
    Subscriber ->> Publisher: Respond with Subscription Token and Subscription Token ID
    Note over Publisher: Save Subscription
    Publisher ->> Subscriber: Terminate Success with Subscription Token ID
Once you have subscribed to the action, if you decide you no longer wish to receive publications from that particular action, you can un-subscribe from it using a similar command.
$ coattail action unsubscribe \
                      --peer <id> \
                      --action <action> \
                      --receiver <receiver>
When you un-subscribe from an action, under the hood the following operations take place between the peers.
sequenceDiagram
    autonumber

    actor Publisher
    actor Subscriber

    Note over Subscriber: Validate Subscription
    Note over Subscriber: Delete Validation Token
    Note over Subscriber: Delete Subscription

    Subscriber ->> Publisher: Notify Unsubscribe

    Note over Publisher: Validate Subscription
    Note over Publisher: Validate Permissions
    Note over Publisher: Delete Subscription
Revoking a Subscription
If you have issued an Authentication to a peer and they have subscribed to an action, but you wish to revoke that distinct subscription without revoking the subscribers ability to subscribe to actions, you can do so using the subscribers sub-command.
First, you will need to list the active subscriptions to determine which one you wish to revoke. You can do this using the subscribers list sub-command.

$ coattail subscribers listIn the output of this command, the "Subscribed with Token" field references the ID of the token that was issued to this subscriber when you initially granted them access to your Coattail instance as described in Authentication: Token Issuance. You can use this along side the "Subscribed To" header to determine which subscription you wish to revoke.
Once you've decided which subscription to revoke, simply pass that subscription ID into the subscribers revoke sub-command.

$ coattail subscribers revoke <id>When you revoke a subscription for a peer, under the hood the following operations take place between the two peers.
sequenceDiagram
    autonumber

    actor Publisher
    actor Subscriber

    Note over Publisher: Validate Subscription

    par
        Note over Publisher: Delete Subscription
    and
        Publisher ->> Subscriber: Notify Subscription Revocation
        Note over Subscriber: Validate Subscription
        Note over Subscriber: Validate Permissions
        Note over Subscriber: Delete VT
        Note over Subscriber: Delete Subscription
    end
Authentication
Coattail has a robust authentication protocol built in with features such as signature based packet source verification. Below we will outline how to configure this authentication mechanism, as well as how to issue or revoke authentication tokens and validation tokens.
General Token Management
You can manage the tokens stored in your Coattail instances database using the coattail token subcommands. These commands allow you to issue new tokens, list the tokens currently stored in your database and remove or revoke the tokens stored in your database.
Types of Tokens
Tokens stored in your database have one of three types. These include Validation Tokens, Authentication Tokens and Publisher Authentication Tokens.
| Type | Description |
|---|---|
| Validation Tokens | Used to verify a peers distinct ability to utilize it's Authentication Token. These act as public keys in the exchange. See Validation Tokens for more information. |
| Authentication Tokens | Used as a means of authentication between peers. These are signed tokens granting access to different actions that may be performed by the peer. See Token Permissions for more information. |
| Publisher Authentication Tokens | These tokens are automatically generated by the system during the subscription process. They are used as limited Authentication Tokens so that the publishing instance can notify subscribers of events. See Managing Subscriptions for more information. |
Listing Tokens
You can list all tokens currently stored for your Coattail Instance using the following commands. Keep in mind that Validation Tokens are listed using the coattail validation sub-commands where as Authentication Tokens are listed using the coattail token sub-commands.

$ coattail token list$ coattail validation listConfiguring Authentication
Token Ownership
Tokens issued by a Coattail instance correspond directly to the address and port configured in the config.yml file. This means, if you change those values or use a different configuration file, tokens issued with the old values will no longer be considered valid (or even work for Bearers who are using them).
If you wish to manage tokens for a particular Coattail instance that is running, be sure to pass --config <your_config> to the respective token management commands.
Token Signatures
In your config.yml file there is a section labeled authentication. In this section you should define a key-pair that will be used for signing/verifying authentication tokens.
authentication:
  private_key:
    type: "string"
    value: "my-secret-password"
  public_key:
    type: "string"
    value: "my-secret-password"
type
- Can be one of "string" or "file".
value
- When
typeis set to "string",valueshould be the string value of your private key. - When
typeis set to "file",valueshould be the path to the corresponding key file, relative to the root installation directory of your Coattail instance.
Warning: Using "string" type keys is not recommended for production instances of Coattail.
Token Issuance
Definitions
- "Issuing Coattail Instance": The Coattail instance that is generating a Token to be used by other Coattail instances to connect to it.
- "Bearing Coattail Instance": The Coattail instance that uses the issued Token to connect to the Issuing Coattail Instance.
Basic Token Issuance
To issue a generic token you can run the following command on the Issuing Coattail Instance.
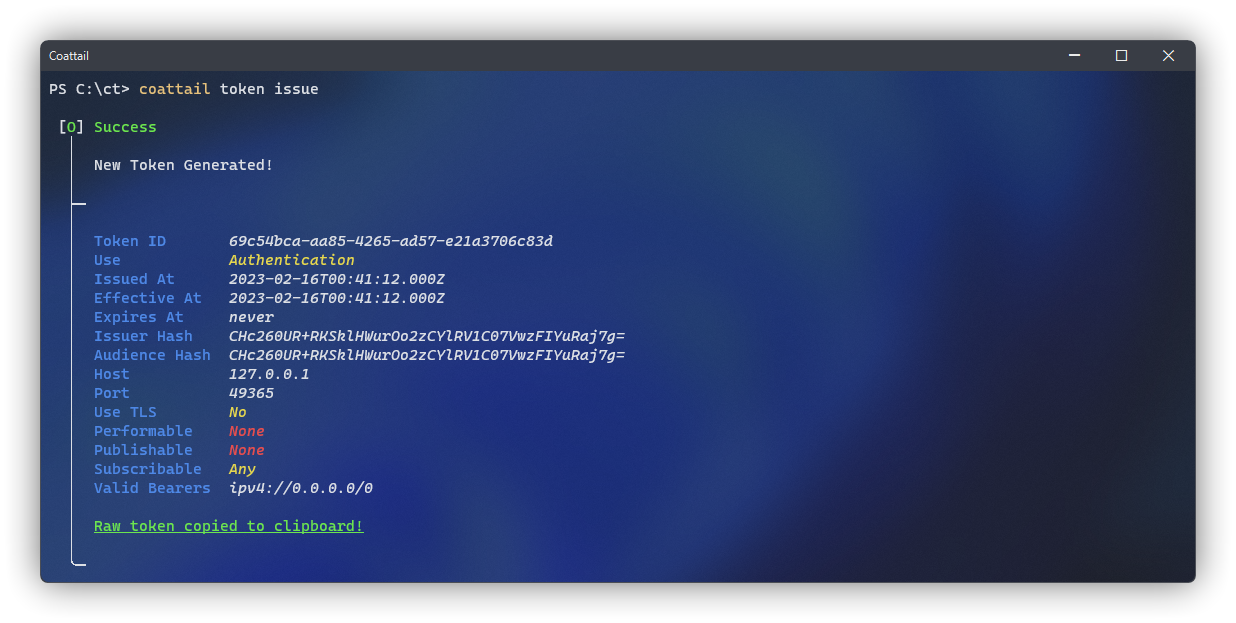
$ coattail token issueThis will issue a signed token that can be used by a Bearing Coattail Instance to connect to the Issuing Coattail Instance. The permissions embedded in the token will allow the Bearing Coattail Instance to subscribe to any action on the Issuing Coattail Instance, but it will not be able to remotely perform or publish actions on its behalf.
After executing the command, by default, the issued token will be stored locally in your database and the raw JWT will be copied to your clipboard. If you wish to print the token instead of copying it to the clipboard, you can use --print-raw-token.
Combining the
--quietoption with the--print-raw-tokenoption allows you to get the issue command to spit out only the raw token. This is useful when scripting with Coattail.
Token Bearers
You can specify Bearing Coattail Instances who are authorized to use a particular token by passing a JSON serialized array to the --bearers parameter. When doing this, the issued token will only be valid if used from a Bearing Coattail Instance with an IPv4 address within one of the IPv4 subnet specified in the bearers, or from a Bearing Coattail Instance who has the Validation Token specified by one of the Validation Token ID's set in the Bearers array.
Each Bearer can be either a Validation Token ID or an IPv4 subnet.
- Bearers containing a Validation Token ID should be prefixed with
vt://. - Bearers containing an IPv4 Subnet should be prefixed with
ipv4://and the subnet mask should be formatted with CIDR notation.
Example
$ coattail token issue --bearers '[
    "vt://159193bc-cbf2-47a2-8cae-97d562de40e1",
    "ipv4://192.168.0.0/24"
]'
Token Permissions
When issuing a token, you can specify which actions the Bearing Coattail Instance can perform, publish or subscribe to on the issuing Coattail instance.
See: Managing Actions & Receivers for more information on the distinction between "publishing" an action and "performing" an action.
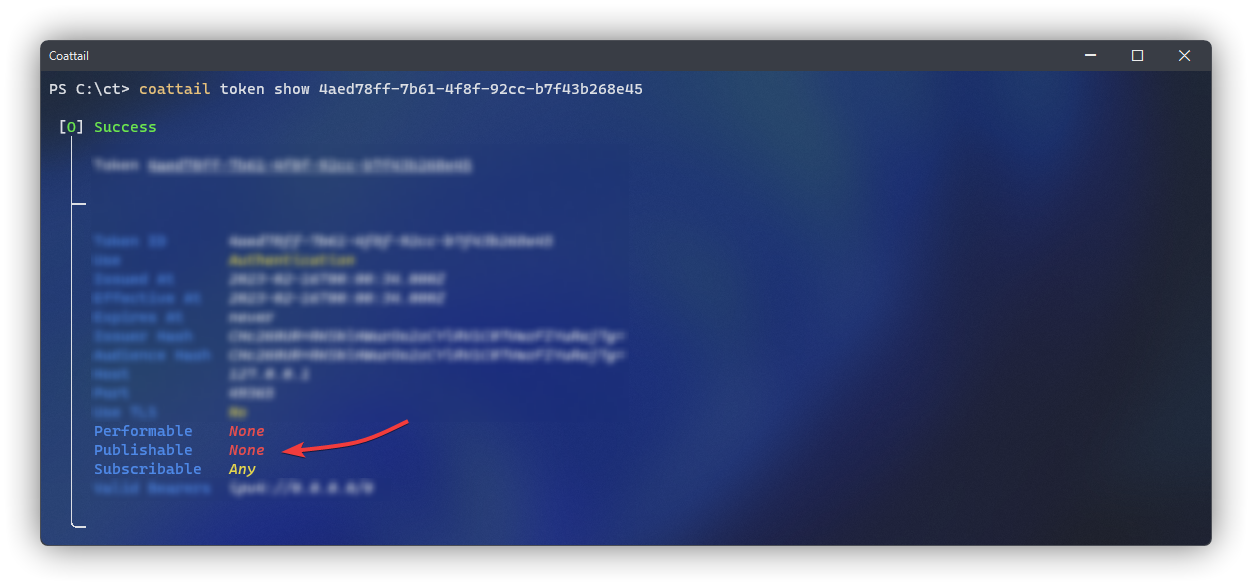
- "Subscribable": A JSON encoded array containing action names corresponding to actions on the Issuing Coattail Instance who's output can be subscribed to by the Bearing Coattail Instance.
- "Publishable": A JSON encoded array containing action names corresponding to actions on the Issuing Coattail Instance who's subscribers can be remotely notified by the Bearing Coattail Instance with plain data.
- "Performable": A JSON encoded array containing action names corresponding to actions on the Issuing Coattail Instance that can be remotely performed by the Bearing Coattail Instance.
By default, tokens are issued by the Issuing Coattail Instance with all actions being subscribable and no actions being remotely performable or publishable.
If you provide a
*value as an array element to any of these options, it will indicate to the Issuing Coattail Instance that this token can be used to perform, publish or subscribe to (respectively) any action.
Example
$ coattail token issue --performable '["action1","action2"]' \
                       --publishable '["action1","action2","action3"]' \
                       --subscribable '["*"]'
Token Lifetime
When issuing a token, you can specify the time period during which the token will be valid. This is done using the --not-before and --expires-in options.
By default, tokens issued by the Issuing Coattail Instance can be used immediately and never expire.
Note: All timestamps use vercel/ms format.
--not-before: Indicates the time at which this token becomes usable.--expires-in: Indicates the time at which this token expires.
Example
# Issue a token that can start being used one week from now
# and expires two weeks from now.
$ coattail token issue --not-before 1w \
                       --expires-in 2w
Token Revocation
You can revoke an issued token so that Bearing Coattail Instances who have been issued that token can no longer use it to authenticate with the Issuing Coattail Instance.
When the token is initially issued by the Bearing Coattail Instance, you will be given an ID corresponding to the token. To revoke that token, simply pass that ID to the revoke command.
Example
$ coattail token revoke 73708702-6f0e-47c3-a76a-6e3db433c564Running this command will prompt you for a confirmation. If you wish to bypass the confirmation prompt, you can run the command with the --force option.
Validation Tokens
Validation Tokens are a special type of Token that can be used to verify that a particular Bearing Coattail Instance is authorized to use the token it's bearing. They are generated by the Bearing Coattail Instance and used as a Bearer when when issuing general purpose tokens on an Issuing Coattail Instance.
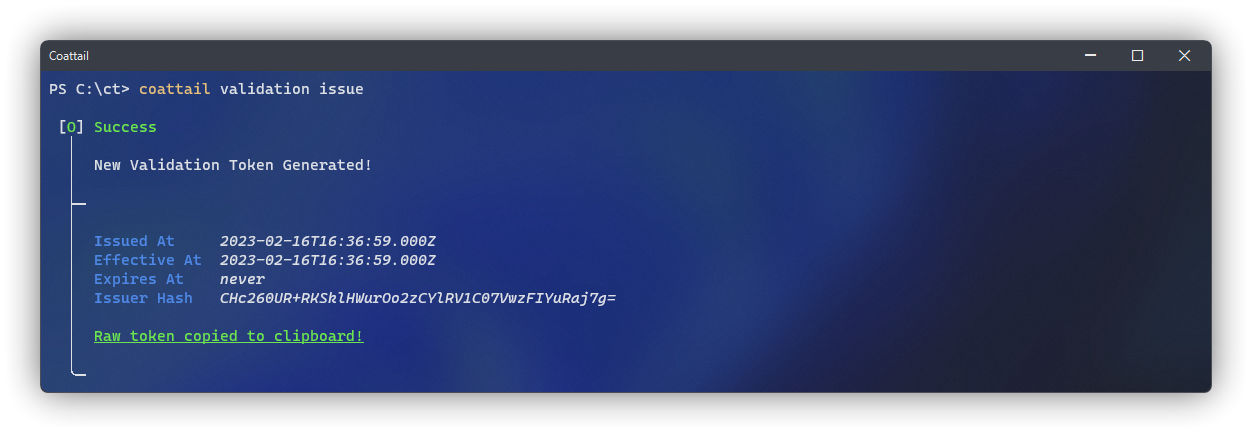
Generate a validation token on the Bearing Coattail Instance.
The
validation issuecommand supports the same--not-before,--expires-in,--print-raw-tokenand--quietoptions as thetoken issuecommand.$ coattail validation issueThis will issue an unsigned validation token containing the Bearing Coattail Instance's public signing key. This token will never expire and can be used immediately.
Distribute the token to any Issuing Coattail Instance who wishes to be able to validate authentication requests made from your Bearing Coattail Instance.
On the Issuing Coattail Instance, load the validation token into the database.
$ coattail validation add <validation-token>This will make the validation token available for general token issuance.
Note the Token ID returned for the Validation Token.
On the Issuing Coattail Instance generate a new token using the Validation Token as a Bearer. You can do this by prefixing the validation token ID with
vt://when providing it to the array of bearers. See Token Bearers for more information.$ coattail token issue --bearers '[ "vt://<vallidation-token-id>" ]'
The token that has been generated will now ONLY be authorized when used from the Bearing Coattail Instance on which the Validation Token was generated. This is determined by a signature on the authentication payload signed by the Bearing Coattail Instance using it's private key. That signature is then verified using the public key stored in the Validation Token that was loaded into the Issuing Coattail Instances database.
You can further manage validation tokens on an Issuing Coattail Instance using the list, show and remove sub-commands under the validation command.
See coattail validation --help for more information.
Development Progress
- Actions API documentation
- Token / Authentication documentation
- Implement a rate limiting mechanism in the network protocol.
- Cascade deletions for Peer, Token, etc.
- When notifying a subscriber, if the subscription token fails to authenticate, delete it.
- Update UI to properly handle tables for plain / json output types.
- Add support for "peer-specific" publications.
- Add system for key rotation
- Update
service stopcommand to use PWD when no process-id is provided. - Bug: non-headless coattail instances in
service statusoutput don't show instance path. - Update remote execution to transmit log message back to remote executor.
- Debug Task: Ensure that publications are not blocked when a subscriber is un-reachable.