consent-kit v1.0.0
consent-kit
consent-kit is a lightweight implementation of a GDPR-compliant banner and modal in vanilla JavaScript.
It allows the website visitor to easily accept all cookies or change his/her preferences through the preference screen.
Behind the scenes, consent-kit places a cookie containing the stored preferences. The content of this cookie can then easily be read with 3rd party tools. (Google Tag Manager is the most popular example)

Demo site
You can view a full working example on the consent-kit demo page.
Use cases
- You want to implement a clean and lightweight cookie consent banner on your website that complies with the European General Data Protection Regulation (GDPR).
- You want a responsive layout 'out of the box' but still be able to adapt the styling to your own preferences.
- You want to present your website users with the option to select categories of cookies.
Installation
Include the CSS and JS on your website
You can choose to embed the CSS and JS files through the jsDelivr CDN network or install and host the packages yourself.
Embedding through CDN
Add the JS and CSS files in the <head> of your website:
<link
  rel="stylesheet"
  href="https://cdn.jsdelivr.net/npm/consent-kit@1.0.0/dist/css/consent-kit.min.css"
/>
<script src="https://cdn.jsdelivr.net/npm/consent-kit@1.0.0/dist/js/consent-kit.min.js"></script>
Alternative: install the npm packages
You can host the files yourself by installing the package and referencing the files in your project:
npm install consent-kit --saveInclude the banner and modal
The banner and modal should be loaded inside the <body> of your website. See the example file in the docs/
folder.
Enable consent-kit
To enable consent-kit (and show the cookie banner when the consent cookie is not present), fire the consentKit()
function in the '' of your website:
<script>
  consentKit({
    cookie_name: "consent_kit",
    expiry_days: 365,
  });
</script>
The consentKit() function requires 2 configuration parameters:
cookie_name: the consent cookie will be saved under this name when your website visitors gives a consent.expiry_days: the expiration time (in days) for new consent cookies.
How it works
Once consent-kit is loaded on your website, it will first check if a valid consent has been given, in that case the consent banner and modal will remain hidden for your visitor.
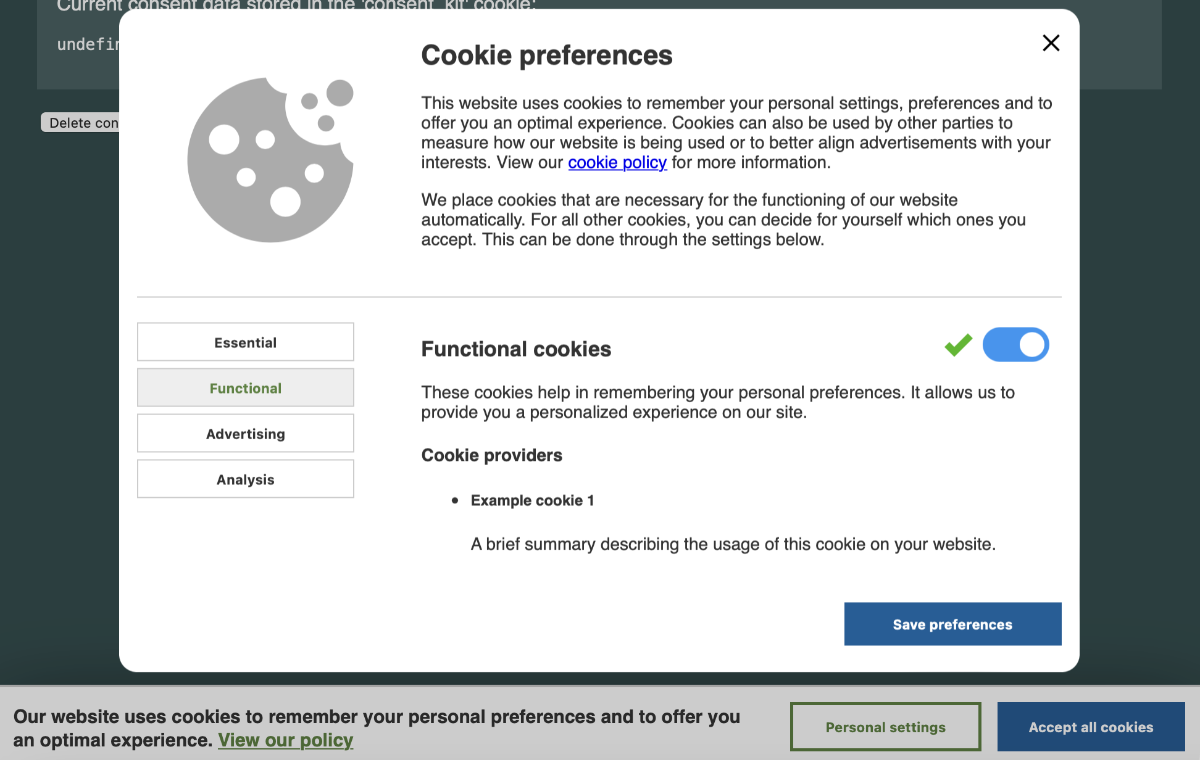
In case consent has not yet been given, the consent banner will appear. The visitor will be presented with 2 choices:
Accept all cookies
If the visitor clicks the 'Accept all cookies' button, the banner will immediately disappear and the consent cookie will be installed with all cookie categories enabled.
Personal settings
If the visitor clicks the 'Personal settings' button, a modal will popup and the user will be presented with the 4 cookie categories:
- Essential
- Functional
- Advertising
- Analysis
Except for the essential cookies (this categorie can not be turned off, the switch is greyed out by default in the 'active' state) the visitor can choose for each categorie to enable or disable the preferred cookie category.
The cookie data
Once the cookie is updated: it will contain an array indicating the categories the visitors has consented to.
Note that essential will always be included in the list.

Using a Tag Manager
Work in progress.