digital-logic-gate v1.0.4
digital-logic-gate
This is for simulation of basic digital logic gates using javascript
Welcome to the digital-logic-gate documentation!
Overview
The main motivation to create this npm based package is to connect the digital electronics simulation domain to the essence of javascript and also making the simulation of the basic gates simpler. Anyone wishing to contribute is most welcome to the repository.
Welcome contributors
What you need to learn before the start?
You have to know about the basics of digital gates AND, OR, NOT, NAND, NOR, XOR and XNOR.You have to know about the truth table of that particular gate for which you are writing code.
Head over to the wiki for more developer documentations.
- See the Contributing Guidelines Wiki Page For more info.
Install
npm install --save digital-logic-gateUsage
Here is the basic usage of the following basic gates.
import React, { Component } from 'react'

import { AndGate,ORGate,NoTGate,NANDGate,NORGate,XORGate,XNORGate } from 'digital-logic-gate'

function simuLateSomething(){

  const AndGateResult = AndGate(1,1); // 1
  const ORGateResult = ORGate(0,1); // 1
  const NoTGateResult = NoTGate(1);  // 0
  const NANDGateResult = NANDGate(0,0); //1
  const NORGateResult = NORGate(0,1); // 0
  const XORResult = XORGate(0,1); // 1
  const XNORResult = XNORGate(0,0); // 1

}
Gates Demonstration
AND Gate
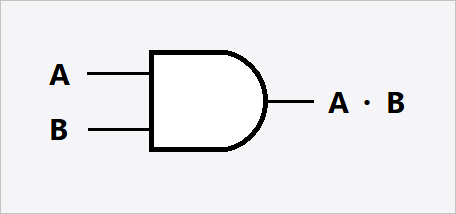
The following figure shows the logic diagram of a 2 input AND gate.

Here is the truth table of the above gate.
| A | B | F = A.B |
|---|---|---|
| 0 | 0 | 0 |
| 0 | 1 | 0 |
| 1 | 0 | 0 |
| 1 | 1 | 1 |
Usage of the above gate
import React, { Component } from 'react'

import { AndGate } from 'digital-logic-gate'


function simuLateSomething(){

  const AndGateResultA = AndGate(0,0); // 0
  const AndGateResultB = AndGate(0,1); // 0
  const AndGateResultC = AndGate(1,0); // 0
  const AndGateResultD = AndGate(1,1); // 1

}
OR Gate
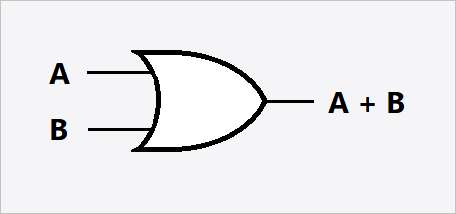
The following figure shows the logic diagram of a 2 input OR gate.

Here is the truth table of the above gate.
| A | B | F = A+B |
|---|---|---|
| 0 | 0 | 0 |
| 0 | 1 | 1 |
| 1 | 0 | 1 |
| 1 | 1 | 1 |
Usage of the above gate
import React, { Component } from 'react'

import { ORGate } from 'digital-logic-gate'


function simuLateSomething(){
  const ORGateResultA = ORGate(0,0); // 0
  const ORGateResultB = ORGate(0,1); // 1
  const ORGateResultC = ORGate(1,0); // 1
  const ORGateResultD = ORGate(1,1); // 1


}
NOT Gate
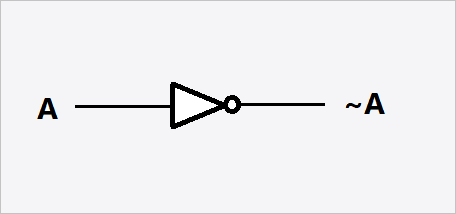
The following figure shows the logic diagram of a NOT gate.

Here is the truth table of the above gate.
| A | F = A' |
|---|---|
| 0 | 1 |
| 1 | 0 |
Usage of the above gate
import React, { Component } from 'react'

import { NoTGate } from 'digital-logic-gate'


function simuLateSomething(){
  const NoTGateResultA = NoTGate(1);  // 0
  const NoTGateResultB = NoTGate(0);  // 1


}
Other Basic Gate Functions
Before calling the functions always import them just like below
import React from 'react'
import { AndGate,ORGate,NoTGate,NANDGate,NORGate,XORGate,XNORGate } from 'digital-logic-gate'| Gate | Logical Function | Usage of API |
|---|---|---|
| NAND | F = (A.B)' | NANDGate(0,0) |
| NOR | F = (A+B)' | NORGate(0,1) |
| XOR | F = A'B + AB' | XORGate(0,1) |
| XNOR | F = AB + A'B' | XNORGate(0,0) |
How to Contribute
Instructions-
- Fork this Repository using the button at the top
- Clone your forked repository to your pc ( git clone
'git@github.com:ayan-biswas0412/digital-logic-gate.git') - Create a new branch for your modifications (ie.
git branch new-userand check it outgit checkout new-userandgit checkout -b new-user) - Run
npm installfrom inside the cloned project and runnpm installfrom inside the example folder. - See the issues from the https://github.com/ayan-biswas0412/digital-logic-gate/issues and comment and ask for working
- After your assigned work do the following
- Add your files (
git add -A), commit (git commit -m "added myself") and push (git push origin new-user) - Create a pull request to the
developbranch and your pull request title must contain[dev]keyword and your work short title - Star this repository
If your branch is not fully updated with the develop branch please follow the below instructions before making any PR
CAUTION: Synch up your local repo with original repo (Upstream) before pushing your commits. This avoids unnecessary conflicts during the merge.
NOTE: You can do so by adding a remote handler reference to the original repo and pull the changes from the respective branch. Resolve the merge-conflicts if any.
#Add upstream repo
git remote add upstream https://github.com/ayan-biswas0412/digital-logic-gate.git

#Disable accidental push to the upstream
git remote set-url --push upstream DISABLE

#List the remote repo and fetch references
git remote -v && git fetch upstream

#Check for any new commits in the upstream branch
git log HEAD..upstream/master #No output indicates, upstream has not moved ahead

#See the patch difference between local and upstream branch
git diff -p HEAD..upstream/master
CAUTION: If the upstream has moved ahead, rebase your commit and resolve conflicts if any. Skip otherwise
git rebase upstream/master
7. Push your local commits to the remote repo.
git push -u origin <your_branch_name>8. Create a PR !
9. Congratulations! Sit and relax, you've made your contribution to digital-logic-gates project.
- See the Contributing Guidelines Wiki For more info.
Changelog
Keep an eye at the detailed Changelog wiki page
License
MIT © ayan-biswas0412

