1.0.4 • Published 2 years ago
ewelink-api-next v1.0.4
ewelink-api-next
English | 简体中文
受到 ewelink-api 启发编写的 CoolKit v2 API 库
特点
- 跟随官方文档更新
- 简洁清晰的调用方法
使用说明
推荐使用 npm, 下载 ewelink-api-next(node >= 16.16)
npm i ewelink-api-next
# or pnpm i ewelink-api-next
示例
ESM: 设置 package.json 中的 { "type": "module" }
// eWeLink v2 API

import eWeLink from "ewelink-api-next";

const client = new eWeLink.WebAPI({
  appId: "xxx",
  appSecret: "xxx",
  region: "us",
  logObj: eWeLink.createLogger("us") // or console
});

try {
  const response = await client.user.login({ account: "xxx@xxx.com", password: "12345678", areaCode: "+1" });
  const userInfo = response.error === 0 ? response.data.user : {};
  console.log("userInfo:", userInfo);
} catch (err) {
  console.log("Failed to get user information:", err.message);
}
// eWeLink WebSocket API
import eWeLink from "ewelink-api-next";
const wsClient = new eWeLink.Ws({
appId: "xxx",
appSecret: "xxx",
region: "us"
});
let ws = await wsClient.Connect.create({
appId: wsClient?.appId || "",
at: wsClient.at,
region: "us",
userApiKey: wsClient.userApiKey
});
setTimeout(() => {
wsClient.Connect.updateState("xxxx", {
switch: "on"
});
}, 5000);// eWeLink Lan Control
import eWeLink from "ewelink-api-next";
const lanClient = new eWeLink.Lan({
selfApikey: "xxx",
logObj: eWeLink.createLogger("lan")
});
lanClient.discovery((server) => {
console.log("server:", server);
}); // Start Discovery Service
// 将设备信息保存到本地缓存
// 控制时需要传入 deviceId, secretKey, encrypt, iv
try {
const res = await lanClient.zeroconf.switch({
ip: "xxx",
port: 80,
data: {
switch: "on"
},
deviceId: "xxx",
secretKey: "xxx",
encrypt: true,
iv: "xxx"
});
console.info("Request result::", res);
const res2 = await lanClient.zeroconf.switches({
ip: "xxx",
port: 80,
data: {
switches: [
{ switch: "on", outlet: 0 },
{ switch: "on", outlet: 1 },
{ switch: "on", outlet: 2 },
{ switch: "on", outlet: 3 }
]
},
deviceId: "xxx",
secretKey: "xxx",
encrypt: true,
iv: "xxx"
});
console.info("Request result::", res2);
} catch (error: any) {
console.info(error.message);
}CommonJS: 使用 require 导入(ewelink-api-next@^1.0.2)
const eWeLink = require('ewelink-api-next').default

const client = new eWeLink.WebAPI({
    appId: 'xxx',
    appSecret: 'xxx',
    region: 'cn',
    logObj: eWeLink.createLogger('eu'),
  })

;(async () => {
  let response = await client.user.login({
    account: 'xxx',
    password: 'xxx',
    areaCode: '+1',
  })
  console.info(JSON.stringify(response))
})()
授权页登录方法可参考 https://github.com/nocmt/eWeLinkOAuthLoginDemo
方法说明
功能
- 首页管理
- 用户管理
- 设备管理
- 家庭房间
- 消息中心
- OAuth2.0
- 长连接控制
- 局域网控制
FAQ
1、请求接口时出现 407 错误
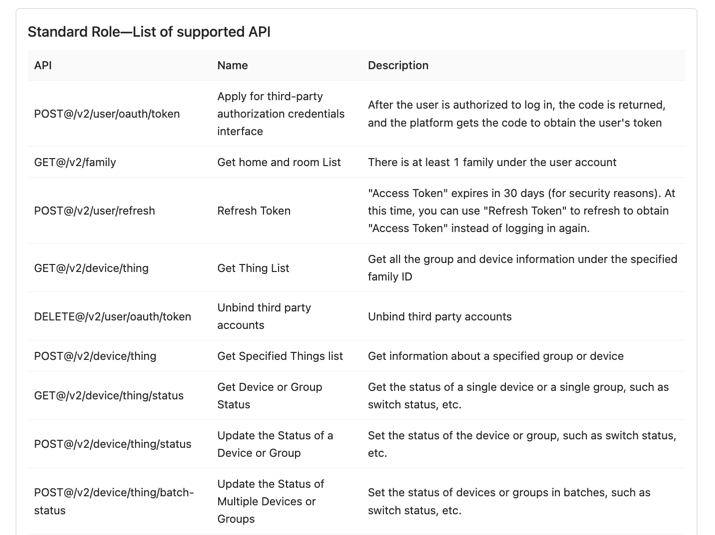
你当前使用的APPID可用的接口清单中不包括这个接口(受到应用类型的限制),比如:从eWeLink开发者中心创建的应用只能使用以下接口:

2、请求首页、获取ThingList等接口 无法获取到设备数据
原因是:从eWeLink开发者中心创建的应用只免费授权了 sonoff、SONOFF、嵩诺、coolkit 品牌的权限,其他品牌的授权需要得到制造商的同意(付费后商务沟通)。
3、控制设备时返回 4002 错误
设备离线或者控制指令错误,指令具体查阅:UIID协议文档 - CoolKit开放平台 4.2
4、如何获取自己的apikey?
如果你没有登录、获取自己账号信息的接口权限,那么可以调用 GET@/v2/family、GET@/v2/device/thing、POST@/v2/device/thing等接口间接获取,家庭和设备都会关联在你的用户账号下,字段名称是 "apikey"。
修改日志
致谢
| Item | Reason |
|---|---|
| ewelink-api | 社区项目,有借鉴其思路 |
| wechat-api-next | 参考实现了项目结构,特别是新学到了混合模式的使用 |


