exl-touchnet-connector v0.0.7
Ex Libris Touchnet Connector
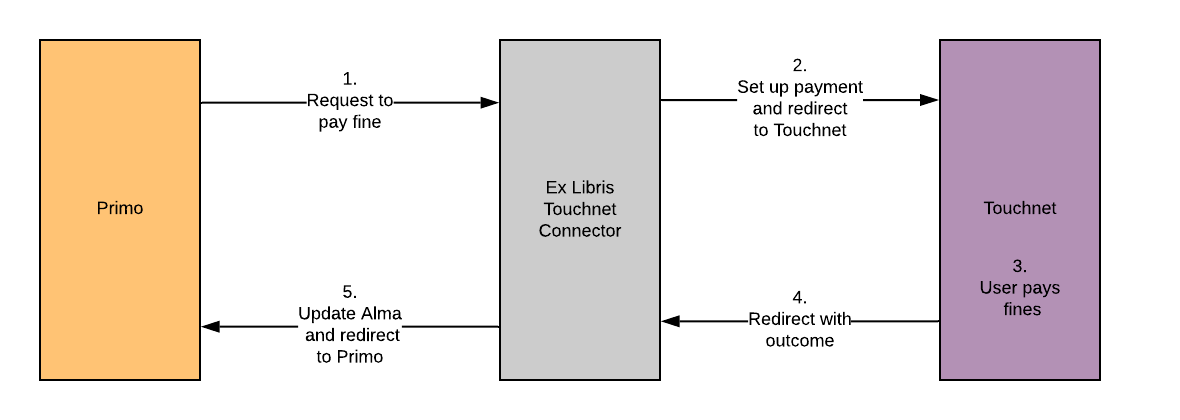
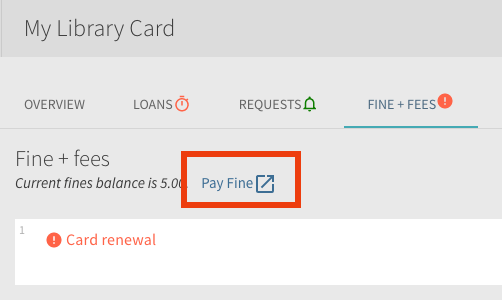
This connector enables libraries from universities that use Touchnet payment services to accept payment of fines and fees. The university can set up a link to the connector in the discovery system. When the patron clicks on the "Pay Fines" link, the conenctor will set up the payment and direct the patron to Touchnet to pay. Successfully completed payments are posted to the patron's account in Alma.
Overview
This connector performs the following tasks:
- Set up the payment in Touchnet and redirect to the Touchnet site for payment
- Receive the response from Touchnet and post the payment to Alma
- Redirect the user back to Primo

No PCI information is handled by the connector. All of the payment information is entered only in the Touchnet site.
Configuring the Connector
In order to use the connector, you need to coordinate with Touchnet customer service. They will provide the following two pieces of information:
- uPay Site ID, stored in the
UPAY_SITE_IDenvironment variable - uPay Site URL, stored in the
UPAY_SITE_URLenvironment variable
The production Touchnet Web Service URL is hardcoded in the service. If you're testing the connector in the Touchnet test environment, set the TOUCHNET_WS_URL environment variable to the value provided by Touchnet.
In addition, you'll need an API key for Alma. Instructions for obtaining an API key are available at the Ex Libris Developer Network. The API key should include read/write permissions for "users". The API key is stored in the ALMA_APIKEY environment variable.
Deploying the Connector
Local Deployment
To run the connector locally on a machine with Node.js installed, set the environment variables, clone the repository, install the dependencies, and then run npm start:
$ git clone https://github.com/ExLibrisGroup/exl-touchnet-connector
$ cd exl-touchnet-connector
$ npm install
$ npm start
To run the connector in HTTPS, set the CERTIFICATE_KEY_FILE and CERTIFICATE_CRT_FILE to the path of the desired plain text certificate and key files.
Hosted Connector (Experimental)
There is a community-supported hosted version of the connector which removes the need to deploy the connector to your own environment. To use the connector, install the Touchnet Payment Helper Cloud App, click the configuration menu, and enable the hosted connector. You need to supply an API key as described above.
The URL for the hosted connector is: https://api.exldevnetwork.net/tn/touchnet
Note: The hosted connector is currently only supported for Primo VE.
Deploying to Heroku
One easy way to deploy the connector is to use the Heroku platform. Heroku has free plans (which could be appropriate depending on the level of usage) or very reasonable "hobby" plans. To deploy to Heroku, gather the parameters specified above and then click on the link below to sign up and deploy the connector. At the end of the process, Heroku will provide the URL for your connector. Use it to configure Primo in the following section.
Deploying to AWS
Another option for deploying the connector is to use Amazon Web Services (AWS). AWS has starter and free tiers which make hosting the connector nearly free. To deploy to AWS, log into your account (or create a new one). Then follow the instructions below. (Note: the connector template is currently available in the us-east-1 AWS region. Be sure your console is set to use that region. If you would like to install the connector in another region, please open an issue.)
- Click on this link to open the AWS console.
- Fill in the specified parameters and check off the boxes in the Capabilities and transforms section and then click the Create stack button
- AWS will create the necessary components. When it's complete, the stack will be in the CREATE_COMPLETE state. Click the Outputs tab to view the URL for the connector. You will use the URL to configure Primo in the following section. The public IP address will also appear in the Outputs tab. This IP may be given to Touchnet to enable access to the Touchnet API.
For a walkthrough of the installation and configuration process on AWS, see this video.
Deploying with Docker
On a machine with Docker installed, you can run the following:
docker run --rm -p 3002:3002 --env-file <<ENV FILE>> -d exlibrisgroup/exl-touchnet-connectorBe sure to include the configuration parameters in the environment file.
Configuring Primo
Configuration in Primo VE
To add the "Pay Fines" link to Primo VE, follow the instructions in this online help entry. Be sure to include a ? at the end of the URL. For example, if your connector URL is https://exl-touchnet-connector-myuni.herokuapps.com, configure the following in Primo: https://exl-touchnet-connector-myuni.herokuapps.com/touchnet?.

Configuration in Primo Classic (new UI)
To add the "Pay Fines" link to Primo Classic (new UI), follow the instructions in this online help entry to declare a Pay Fine Link. For the Link URL, specify the URL of the connector, and add the pds_handle query striong parameter and the Primo institution code (not the Alma code) in the URL. For example:
https://exl-touchnet-connector-myuni.herokuapps.com/touchnet?institution=<<INSTITUTION_CODE>>&pds_handle={{pds_handle}}Return URL
The Connector will attempt to determine the correct return URL automatically. However, if you prefer to specify the return URL explicitly, you can use the returnUrl parameter when configuring your payment link. (Note that any querystring parameters should be escaped).
For example, to specify the Fines and Fees screen of the account section in Primo VE, I would configure the following URL as the return URL: https://MY-INST.alma.exlibrisgroup.com/discovery/account?vid=MY_INST:MY_VIEW§ion=fines&lang=en
So my full Payment Link would be as follows:
https://********.execute-api.us-east-1.amazonaws.com/touchnet?returnUrl=https://MY-INST.alma.exlibrisgroup.com/discovery/account%3Fvid=MY_INST:MY_VIEW%26section=fines%26lang=enNotice the escaped ? and & signs.