generator-blueocean-toons v1.0.1
HACK Alert
I just forked the generator https://github.com/tfennelly/generator-blueocean-usain and changed it to work slightly different.
Overview
This is a Yeoman generator for creating a very simple Jenkins plugin (HPI) project that contains a Jenkins Blue Ocean UI client-side (JavaScript) Extension Point implementation.
The Extension Point being implemnented is jenkins.pipeline.run.result, which allows plugins to contribute to the "Run Details" page.
In the case of the plugin generated by this generator, the Run Details page gets some animations while the build is running and then after run is complete.
Prerequisites
- Node and NPM. Required by Yeoman. You'll need these anyway if you're developing Blue Ocean plugins/extensions.
- Yeoman -
sudo npm install -g yo. - Java, Maven etc. Basically, the prerequisites for building any Jenkins HPI plugin.
Install
Installing this Yeoman Generator is very easy:
sudo npm install -g generator-blueocean-toonsDon't forget to install Yeoman itself i.e. sudo npm install -g yo. See Prerequisites.
Run
With everything installed, running the generator is very simple:
yo blueocean-toonsAnd then just follow the on-screen instructions in your console, using a Pipeline script similar to the following (optional).
node {
   stage 'Stage 1'
   echo 'Hello World'
   sleep 10
}
After running the pipeline job and going to the Run Details page (follow on-screen instructions), you should see something similar to what is shown in the animated GIF at the top of this page.
Plugin Anatomy
The plugin generated by this generator demonstrates a number of things that should be useful to Plugin Developers interested in developing/porting plugins to work in Blue Ocean.

The following sections explain the relevance of the different parts.
How to Implement a Client-Side (JavaScript) Extension Point
Two resources need to be added to your plugin when implementing an Extension Point:
- The plugin's Extension Point definition file where all Extension Points in the plugin are defined. This file needs to be named
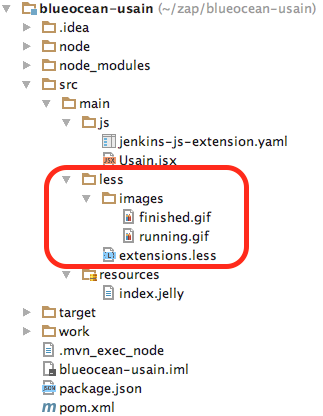
jenkins-js-extension.yamland needs to be placed insrc/main/js(the root of your JavaScript source). - The
.jsxcomponent file that implements the Extension Point. This can be named whatever you like (so long as it's a.jsxfile), but must be placed relative tojenkins-js-extension.yaml. In this case, the.jsxfile contains a React component (that gets rendered in the view), but the.jsxcomponent can also contain other non-rendered Extension Point implementations. That, however, is a topic outside the scope of this tutorial.

As stated earlier, the plugin generated by this generator implements the jenkins.pipeline.run.result Extension Point (contributing content to the Run Details page).
The implementation of that Extension Point is obviously contained in Toons.jsx, but we must declare/define that in jenkins-js-extension.yaml in order for that
Extension Point to be "picked up" by Blue Ocean.
#
# Extension point implementations in this plugin.
#
# This file tells Blue Ocean what Extension Point components are in this
# plugin + what extension points they implement.
#

extensions:
  - component: Toons
extensionPoint: jenkins.pipeline.run.resultNOTE: We may add support for other formats (other than
.yaml) in the future. We could also look at discovery mechanisms ala the@Extensionannotation.
How to Add Style, images etc for your Plugin Extension Point using LESS
Adding style/CSS, images etc for your plugin Extension Point implementations is easy. We are currently using LESS for processing all CSS (we might add support for SASS etc in future).
Simply create a folder named src/main/less and into place a file named extensions.less. All other web assets (fonts, images etc) should also be placed under this folder.

NPM Scripts
The package.json in the generated plugin contains a number of NPM scripts that are useful to know. You mostly need to know these scripts in order to streamline your development process.
As is typical with NPM scripts, they are run by executing npm run <script-name> on the command line e.g. npm run build.
| name | Description |
|---|---|
build | Build JavaScript artifacts and add them to your HPI + run tests. Same as running bundle, test and lint. |
bundle | Build JavaScript artifacts and add them to your HPI, but do not run tests or linting. |
test | Run tests only (src/test/js/**/*-spec.js). |
lint | Run linting only. |
lint:fix | Run linting and fix fixable lint errors. |
bundle:watch | Run bundle continuously, rerunning on source changes. |
The package.json in the generated plugin also contains the mvnbuild and mvntest scripts that get executed as part of the maven build.
More Advanced Builds
The builds in these plugins are built on top of @jenkins-cd/js-builder, which in turn is built on top of
Gulp (and others). The NPM scripts (see above) use the @jenkins-cd/js-builder CLI (jjsbuilder) by default (but can use whatever you like).
jjsbuilder relies on an internal/"default" gulpfile.js when it executes, building Blue Ocean extensions etc. This is fine in many cases, but sometimes you need to
customize the plugin build a little. To do this, simply add a gulpfile.js in the root dir of the plugin. When doing this however, be sure to at least require the
@jenkins-cd/js-builder package, allowing it the opportunity to register its default gulp tasks.