genji4rn v2.1.1
Genji4rn
Genji4rn 为 react-native 应用提供了统一的状态管理,路由切换入口。
Genji4rn 2.0 更新
Genji4rn 2.0 提供了针对 ipad 分屏模式下的全局控制路由。
注册分屏组件 API
新增注册方法:
genji.startWithTag(yourComponent, componentTag)
创建好 genji 实例后,通过 genji.startWithTag(yourComponent, componentTag) 注册分屏组件,替换原来的 genji.start(yourComponent)。componentTag 用于标识你的 Component,后续跳转路由的时候会通过这个 compoonentTag 获取相应区域的路由。
示例
import {createGenji} from 'genji4rn'
import {AppRegistry} from 'react-native'
const genji = createGenji()

const mainPageComp = genji.startWithTag('MainPageNavigator', 'Left')
const subPageComp = genji.startWithTag('SubPageNavigator', 'Right')
AppRegister.register('left', () => mainPageComp)
AppRegister.register('right', () => subPageComp)
路由跳转 API
Genji4rn 的路由配合 react-navigation2.0。在使用 react-navigation2.0 的时候,你可以通过 this.props.navigation 获取当前 Component 的路由。类似的,在 Genji4rn 中,你可以通过 this.props.genjiNavigation 获取到所有通过 genji.startWithTag(yourComponent, componentTag) 方法注册的路由。
当你想在左屏切换右屏的路由的时候,可以通过 genjiNavigation 操作。而当你只想在右屏操作右屏路由的时候,你还可以通过 genjiNavigation 操作。当然,你也可以直接通过 this.props.navigation。
push
this.props.genjiNavgation.push 方法类似于 react-navigation2.0 提供的 push 方法。不过此处要指定要跳转的 Component,即上面注册时候的 ComponentTag
this.props.genjiNavigaiton.push(componentTag, yourComponentRouterName, params)
// 类似于
this.props.navigation.push(yourComponentRouterName, params)
pushWithMask
this.props.genjiNavigation.pushWithMask 方法是为了应对左屏 push 右屏的时候,要给左屏遮罩的情景。当然,这种遮罩并不只局限于左右屏的场景。如果是左中右屏,左屏 push 中屏,那么左屏和右屏都是会有遮罩效果的。
this.props.genjiNavigation.pushWithMask(componentTag, yourComponentRouterName, params)navigate
this.props.genjiNavigation.navigate 方法是为了应对右屏是通过 createSwitchNavigator 创建的组件,并且左屏点击需要切换右屏的情况。常见于左屏是个人中心的列表,右屏根据左屏点击,显示不同功能的页面。
this.props.genjiNavigaiton.navigate(componentTag, yourComponentRouterName, params)pop
pop 方法其实可以直接使用组件内的 this.props.navigation.pop() 。但是如果涉及到要隐藏 Mask,那就还是得通过 genjiNavigation 完成了:
this.props.genjiNavgation.pop()接收参数
对于通过 this.props.genjiNavigation.push(componentTag, yourComponentRouterName, params) push 的页面传递的参数。可以直接通过 react-navigation2.0 的方法获取:
this.props.navigation.getParam('param 名')如此统一了跳转页的接收方式。
以下为 1.0 的功能
状态管理
为了能更方便的使用 Redux,genji4rn 提供了基于 redux,react-redux,redux-thunk,redux-actions, redux-promise-middleware 的状态管理的封装
示例
外部注册
// App.js
import { createGenji } from 'Genji4rn'

const genji = createGenji()
genji.registerModule(require('./page/mainPage'))
genji.registerModule(require('./page/subPage'))
genji.use([
  promiseMiddleware({
    promiseTypeSuffixes: ['Loading', 'Success', 'Error']
  })
])
export default genji.start(TopLevelNavigator)
创建视图
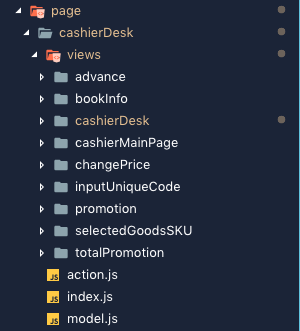
项目结构如下:

page 下的每一个文件夹代表一个模块。如图所示,有一个 cashierDesk 模块。模块下的 views 文件夹内包含该模块下的所有视图,每个文件夹表示一个页面。
模块文件夹下包含还包含三个文件 action.js index.js model.js。action.js 中包含所有操作 redux 方法。index.js 中包含了所有通过 react-redux 进行 connect 的页面。model.js 包含该模块的 state,以及 reducer。
API
registerModule
registerModule() 方法接收一个模块对象作为参数。也就是各个模块下的 index.js:
import {connect} from 'Genji4rn'
import model from './model'

module.exports = {
  models: model,
  views: {
    Login: connect(null, model)(require('./views/login')),
    Launch: connect(null, model)(require('./views/launch')),
  }
}
模块对象包含两个字段 models 和 views,分别为逻辑部分和视图部分。
视图部分封装了 react-redux 提供的 connect() 方法,第一个参数还是传入 mapStateToProps,第二个参数变为 model,mapDispatchToProps 中的参数将在 model 中获取。
model 把 redux 中分割的各个部分都集合了起来:
module.exports = {
  namespace: 'login',
  state: {
  },
  handlers: [
    // 清空会员信息
    'clearCustomerInfo',
    // 搜索会员信息
    {name: 'searchCustomerInfo', action: searchCustomerInfo},
    // 注册用户
    {name: 'registerCustomer', action: registerCustomer},
    // 清空购物车的时候清空用户信息
    {name: 'updateCashierDesk', handler: 'cashierDesk/updateGoodsInfo'},
  ],
  reducers: {
    selectCard (state, action) {
      return {...state, selectedCardIndex: action.payload}
    },
    '/cashierDesk/clearAll' (state) {
      return {...state, customerInfo: null, selectedCardIndex: 0}
    },
  },
  publicHandlers: [
    // 清空所有信息
    {name: 'clearAll', action: () => {}},
    // 刷新优惠信息
    {name: 'updateGoodsInfo', action: updateGoodsInfo}
  ],
}
可以看到有这些属性:
- namespace: 模块名,注册到 store 中的键
- state: 注册到 store 中的值
- handlers:
mapDispatchToProps的提供者,name为方法名,action为具体的方法。 - reducers: redux 中改变 store 状态的方法。另外如果 reduces 的键以
/开头,则可以监听非本模块的 action。 - publicHandlers: 全局的 handlers,任意模块都能使用这个方法。比如上面
{name: 'updateCashierDesk', handler: 'cashierDesk/updateGoodsInfo'}就是调用 publicHandlers 中的方法。
补充,全局 reducer 和 publicHandler 是非常有用的两个功能。它们分别对应着两种常用的场景。
publicHandlers 的适用场景是,其他人的变动要通知我做出相应变动的情况。即多对一。
全局 reducer 的适用场景是,我的变动要通知其他人的变动的情况。即一对多。
use
注册 redux 使用的中间件。使用方式详见 redux 中间件。
start
start() 方法接收视图组件,给视图组件提供全局 store。
隐藏 Warning
一些外部组件引入的 Warning 需要隐藏可以使用。
使用
ignoreYellowBoxArr() 方法接收一个字符串数组,字符串包含 Warning 信息即可。
示例
import { ignoreYellowBoxArr } from 'Genji4rn'

const ignoreCase = [
  // ant design 引入的
  'Warning: NativeButton: prop type `background` is invalid;',
  'Required dispatch_sync to load constants for RNDeviceInfo.'
]
ingoreYellowBoxArr(ignoreCase)