ion-custom-form-builder v0.1.6
Ionic Custom Form Builder
This is an ionic-angular component library to simplify and eliminate some redundancies of building forms when developing ionic apps.
Features (Current Version)
- Email Validation
- Password Validation
- Credit Card Validation (With support for detecting card type)
- Implement Your Own Submit Button
- Ionic FormFieldTypes included
- ion-input
- ion-textarea
- Use Official Ionic Icons
Upcoming Features
- Set errors to specific fields
- Css Styling
- Additional FormFieldTypes
- ion-datetime
- ion-select
- ion-checkbox
- ion-radio
- ion-toggle
- ion-range
- Credit Card Expiration Validation
- Date Validation
- File Input
Docs
Usage Example Output

Installation
In your project root, run
npm i ion-custom-form-builder@latestUsage Example
Lets walk through a getting started example that will show you how to setup the component in your project
import the module in your top level *.module.ts file
...
import { IonCustomFormBuilderModule } from 'ion-custom-form-builder';
...

@NgModule({
  imports: [
    ...
    IonCustomFormBuilderModule.forRoot()
    ...
  ]
})

...
Now in your *.page.html file add
...
  <ion-custom-form-builder
    [formFields]="fields"
    [submitButtonText]="'Login'"
    (formSubmission)="onIonCfbFormSubmission($event)"
  >
  </ion-custom-form-builder>
...
Head over to your *.page.ts file and add
  ...
  import { FormField } from 'ion-custom-form-builder';
  import { Validators } from '@angular/forms';
  ...

  fields: FormField[] = [];

  constructor() {
    this.fields = [
      {
        icon: 'mail',
        type: 'email',
        title: 'Email',
        formControlName: 'email',
        validators: [Validators.required, Validators.email],
        validationMessages: [
          {
            type: 'required',
            message: 'Email is required'
          },
          {
            type: 'email',
            message: 'Email is incorrect'
          }
        ]
      },
      {
        icon: 'lock-closed',
        type: 'password',
        title: 'Password',
        formControlName: 'password',
        validators: [Validators.required],
        validationMessages: [
          {
            type: 'required',
            message: 'Password is required'
          }
        ]
      }
    ];
  }

  onIonCfbFormSubmission(formData) {
    console.log('FORM_DATA=,', formData);
  }

  ...
Serve your app to see it in action
ionic serveAdvanced Features
- Password Validation
- Credit Card Validation
- Implement Your Own Submit Button
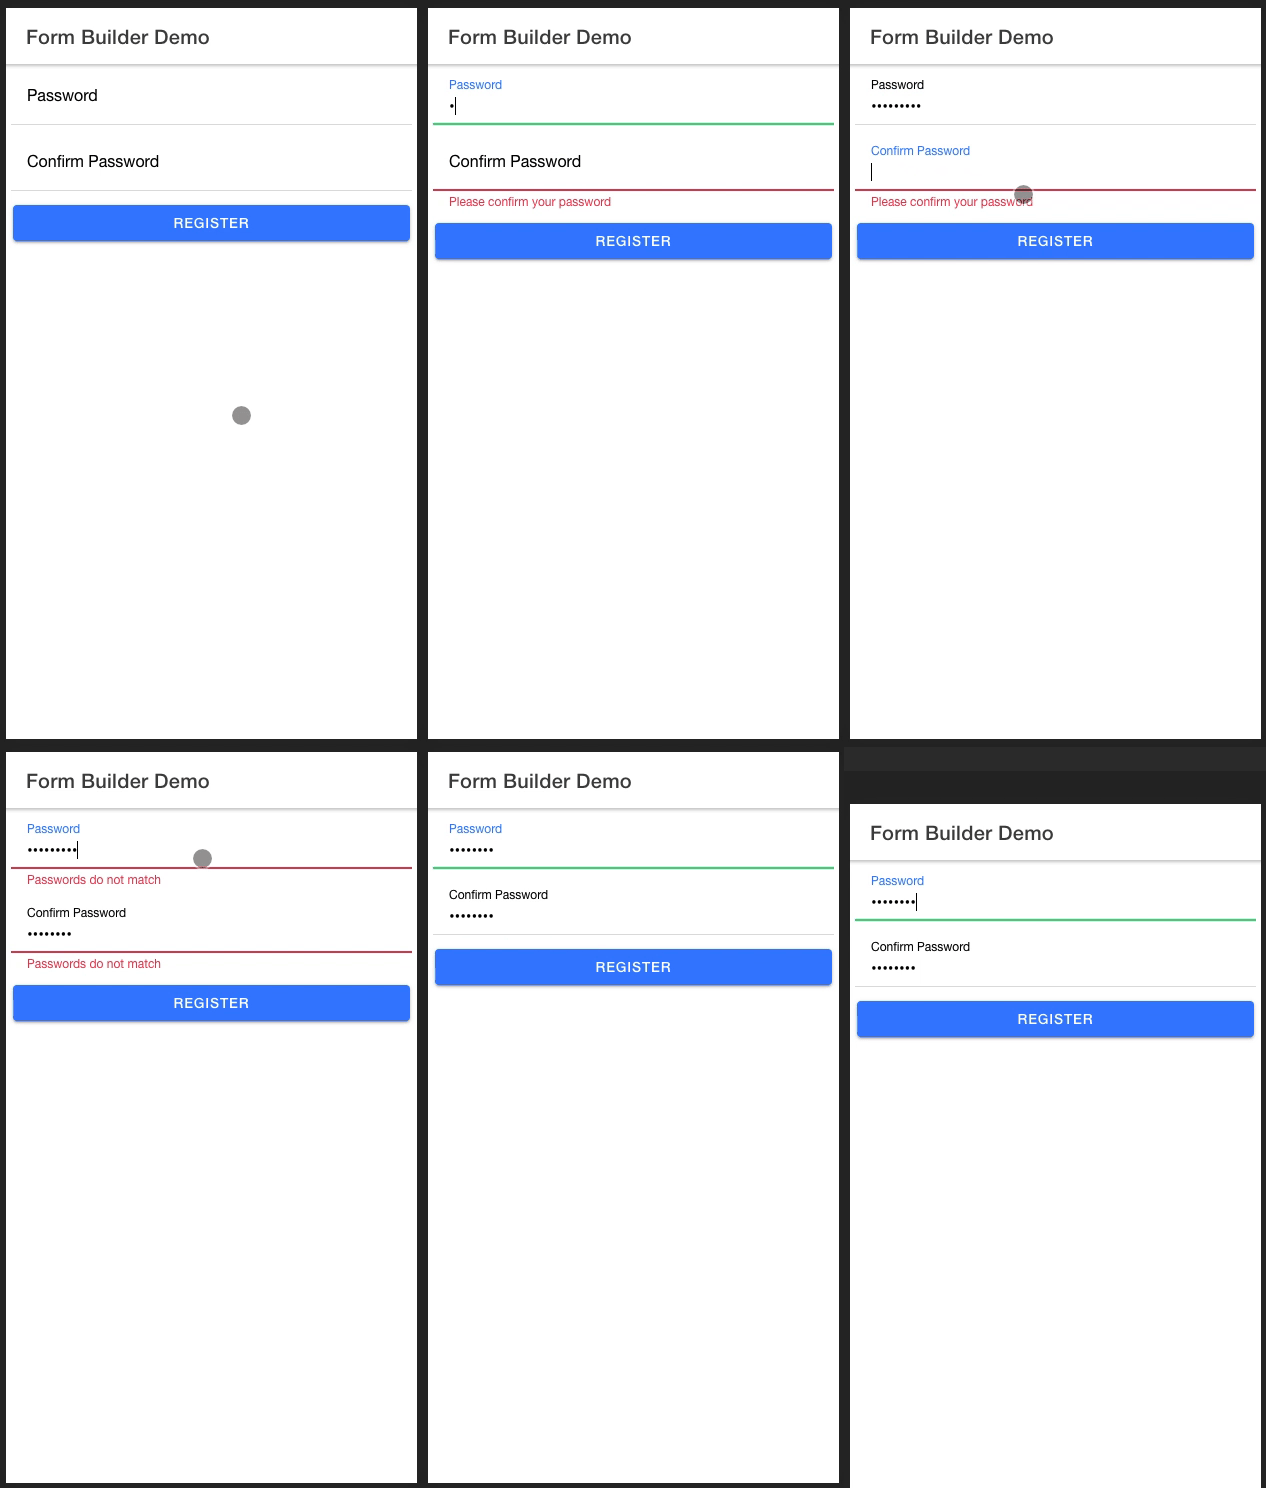
Working with passwords
Usage Example Output

The ion-form-builder component provides you with an elegant way to validate passwords by doing the following
Password Validation Usage Example
Head over to your *.page.ts file and add
In your *.page.ts file , create FormField array objects with formFieldType of 'password' & 'confirm-password'
  ...
  import { FormField } from 'ion-custom-form-builder';
  import { Validators } from '@angular/forms';
  ...

  fields: FormField[] = [];

  constructor() {
    this.fields = [
      {
        icon: 'lock-closed',
        type: 'password',
        title: 'Password',
        formControlName: 'password',
        validators: [Validators.required],
        asyncValidators: [this.passwordValidator],
        validationMessages: [
          {
            type: 'required',
            message: 'Password is required'
          },
          {
            type: 'passwordValidator',
            message: 'Passwords do not match'
          }
        ],
      },
      {
        icon: 'lock-closed',
        type: 'password',
        title: 'Confirm Password',
        formControlName: 'confirm-password',
        validators: [Validators.required],
        asyncValidators: [this.confirmPasswordValidator],
        validationMessages: [
          {
            type: 'required',
            message: 'Please confirm your password'
          },
          {
            type: 'confirmPasswordValidator',
            message: 'Passwords do not match'
          }
        ]
      }
    ];
  }
  ...

  /**
   * Validates password against password confirmation
   *
   * @param {AbstractControl} control
   * @return {*}  {Promise<any>}
   */
  passwordValidator(control: AbstractControl): Promise<any> {
    if (!control.parent) {
      return Promise.resolve(null)
    }else if (control?.parent.get('confirm-password')?.value && control?.value !== control?.parent.get('confirm-password')?.value) {
      control.markAsTouched({ onlySelf: true });
      return Promise.resolve({ passwordValidator: { valid: false } });
    }else {
      if (control?.parent.get('confirm-password')?.invalid) {
        control?.parent.get('confirm-password')?.updateValueAndValidity({ onlySelf: true });
      }
      return Promise.resolve(null)
    }
  }


  /**
   * validates password confirmation against password
   *
   * @param {AbstractControl} control
   * @return {*}  {Promise<any>}
   */
  confirmPasswordValidator(control: AbstractControl): Promise<any> {
    if (!control.parent) {
      return Promise.resolve(null)
    }else if (control?.parent.get('password')?.value && control?.value !== control?.parent.get('password')?.value) {
      control?.parent.get('password')?.updateValueAndValidity({ onlySelf: true });
      return Promise.resolve({ confirmPasswordValidator: { valid: false } });
    }else {
      control?.parent.get('password')?.updateValueAndValidity({ onlySelf: true });
      return Promise.resolve(null)
    }
  }
  ...
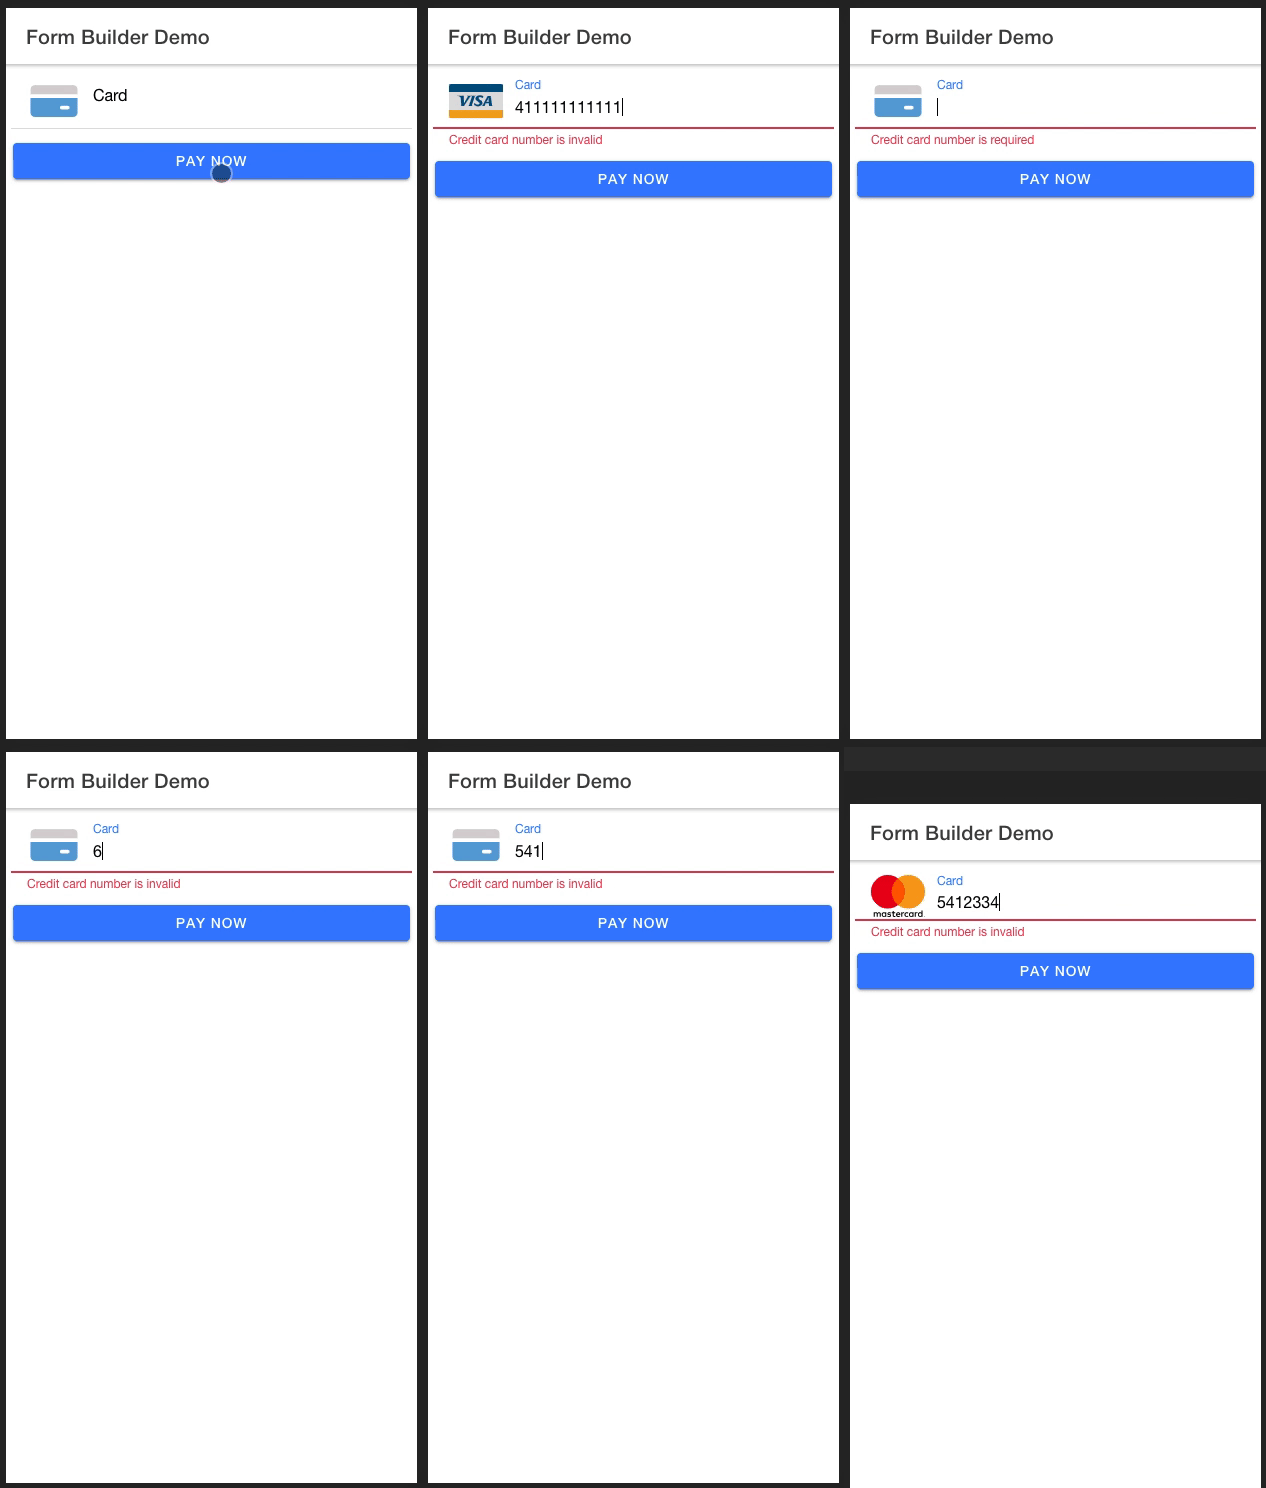
Credit Card Validation
ion-custom-form-builder comes with the ability to validate credit cards thanks to Payform Library
Usage Example Output

Credit Card Validation Usage Example
IMPORTANT
First you need to add the following in the assets array of your angular.json file, this will map library's assets to your project assets folder
  ...
  "architect": {
    "build": {
      "options": {
        "assets": [
          {
            "glob": "**/*",
            "input": "node_modules/ion-custom-form-builder/src/assets",
            "output": "assets"
          }
        ]
      }
    }
  }
  ...
In your *.page.ts file , create a FormField array object with a formFieldType of 'credit-card'
...
  fields: FormField[] = [];

  constructor() {
    this.fields = [
      {
        type: 'number',
        title: 'Card',
        formControlName: 'card',
        formFieldType: 'credit-card',
        validators: [Validators.required],
        validationMessages: [
          {
            type: 'required',
            message: 'Credit card number is required'
          }
        ]
      }
    ];
  }
...
Serve your app again to see the changes
ionic serveImplement Your Own Submit Button
You are able to implement your own submit button in case you want content in-between your form and submit button
In your *.page.html file where you put the ion-custom-form-builder component ..
...
<ion-content>
  <ion-custom-form-builder
    [formFields]="fields"
    [showSubmitButton]="false"
    (formSubmission)="onIonCfbFormSubmission($event)">
  </ion-custom-form-builder>
  ...
  <ion-row>
    <ion-col>
      <ion-button expand="block" color="primary" (click)="onClickMyOwnSubmitButton()">
        Submit
      </ion-button>
    </ion-col>
  </ion-row>
</ion-content>
...
Then in your *.page.ts file import the IonCustomFormBuilderService..
  ...
  import { IonCustomFormBuilderService } from 'ion-custom-form-builder';
  ...

  constructor(
    private ionCfbService: IonCustomFormBuilderService
  ) {
  ...
  }

  ...

  /**
   * Triggered by the form submission event
   *
   * @param {*} formData
   */
  onIonCfbFormSubmission(formData) {
    console.log('FORM_DATA=,', formData);
  }

  /**
   * Trigger form submission using IonCustomFormBuilderService
   *
   */
  onClickMyOwnSubmitButton() {
    this.ionCfbService.triggerFormSubmission$.next(true)
  }
...5 years ago
5 years ago
5 years ago
5 years ago
5 years ago
5 years ago
5 years ago
5 years ago
6 years ago
6 years ago
6 years ago
6 years ago
6 years ago
6 years ago
6 years ago
6 years ago
6 years ago
6 years ago
6 years ago
6 years ago
6 years ago
6 years ago
6 years ago
6 years ago
6 years ago
6 years ago
6 years ago
6 years ago
6 years ago
6 years ago
6 years ago
6 years ago


