kodezi-cli v0.0.58
kodezi-cli
Install Kodezi CLI
npm i -g kodezi-cliUsage
Run command in terminal
kodeziOutput:
  _  __         _          _
 | |/ /___   __| | ___ ___(_)
 | ' // _ \ / _` |/ _ \_  / |
 | . \ (_) | (_| |  __// /| |
 |_|\_\___/ \__,_|\___/___|_|

Usage: kodezi [options]

Options:
  -V, --version                            output the version number
  --interactive                            use cloud features with interactive way.
  --auth                                   Login with Kodezi accounts.
  --email <user@company.com>               add user email
  --token <user_token>                     add user token
  --open-api                               start with open api configurations.
  --linter                                 Enable Linter in Cloud Feature.
  -ad , --auto-download                    enable auto-download openapi yml
  -l , --language <language>               Add languages.
  -file , --file-path <filepath>           Add file path full.
  -url , --dependency-url <dependencyurl>  Add dependency url.
  -cmp , --company-name <companyname>      Add company name.
  --cloud                                  Get Kodezi Cloud on your project.
  --out <file>                             Generate Output in custom directory
  -f , --features <cloud feature list>     add features in commands.
  -h, --help                               display help for command
Quicklinks
Authorization
kodezi --authEnter your Email

Enter your Token

Kodezi CLI Features
features :
We provided two type of mode for users to run command
- interactive
- non-interactive
Cloud
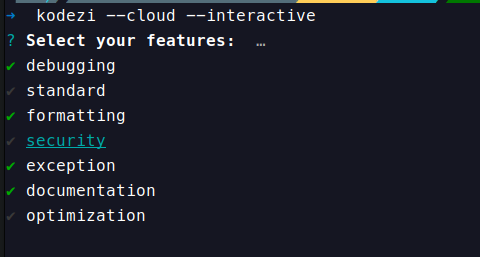
interactive mode command:
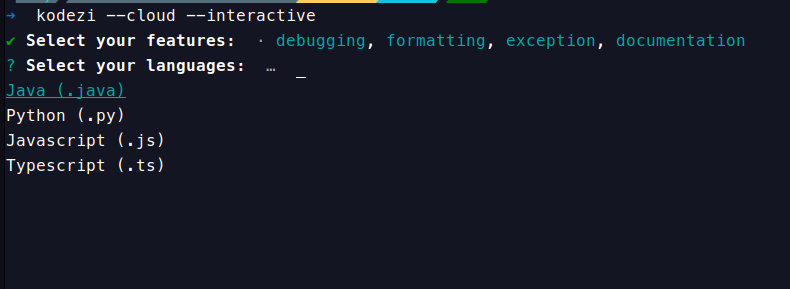
kodezi --cloud --interactiveSelect Features :
INFO : use SPACE key to select features and ENTER key to next step
Select Language :
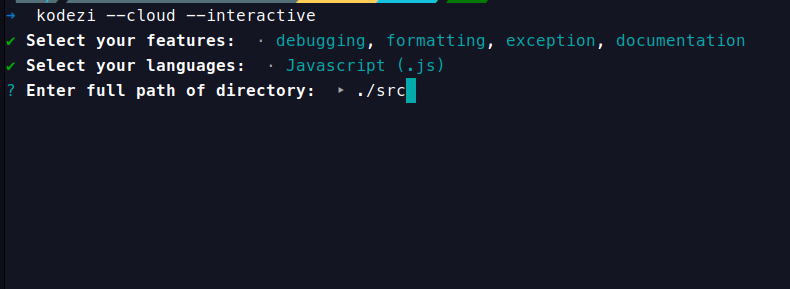
Enter Full Path of Directory:
INFO : Enter full path of specific directory or absolute path of dirctory.
Confirm to use Linter inside Cloud Feature:
INFO : Linter will Check Source Code that It is compilable or not before run features. v0.0.42 update

Choose to Overwrite file or not :
INFO : Enter key Y to Overwrite your files otherwise N to create a separate directory store the outputs.
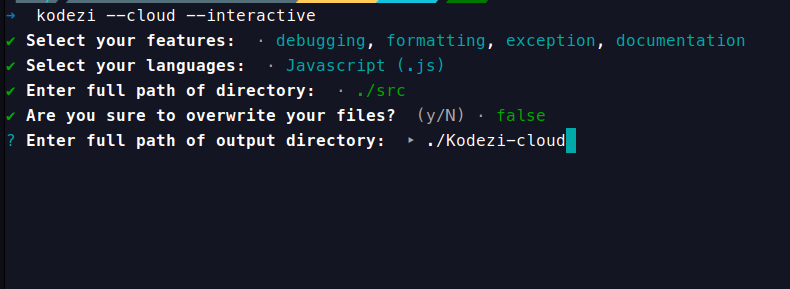
In Next step press ENTER key to start the features, or you can use the following command (non-interactive mode) to execute cloud service directly.
non interactive mode command:
kodezi --cloud -l "javascript" -f "debugging,documentation" -file ./src --email [USER_EMAIL] --token [USER_TOKEN] --out ./kodezimodeOpen API
INFO : Before using Open API, we need to configure URL for CORS in server.
// express in nodejs with cors library.
cors({
  origin: "https://documentation.kodezi.com",
});
interactive mode command:
kodezi --open-api --interactiveSelect Language :
INFO : Select the Language based on your Project.
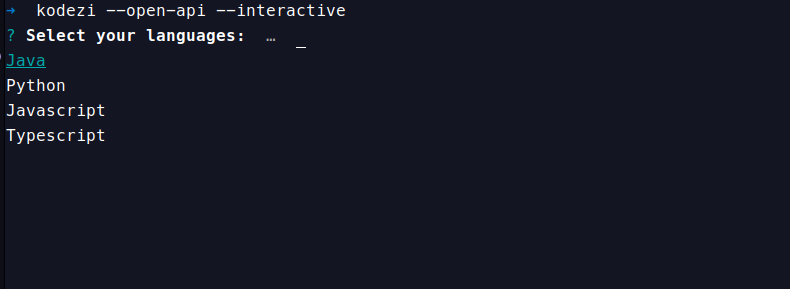
Enter Full Path Of file :
INFO : Full path of file where all routes mentioned.
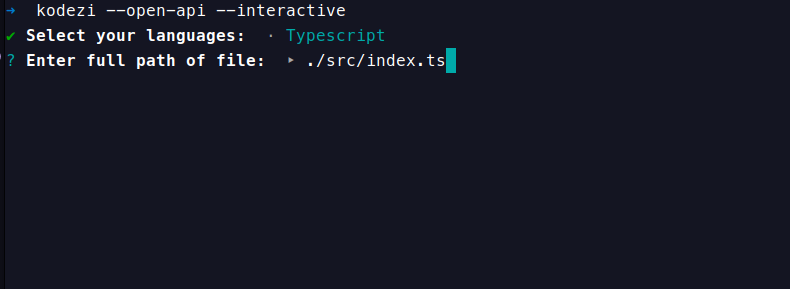
Enter Dependency URL :
INFO : Required Dependency URL where server hosted.
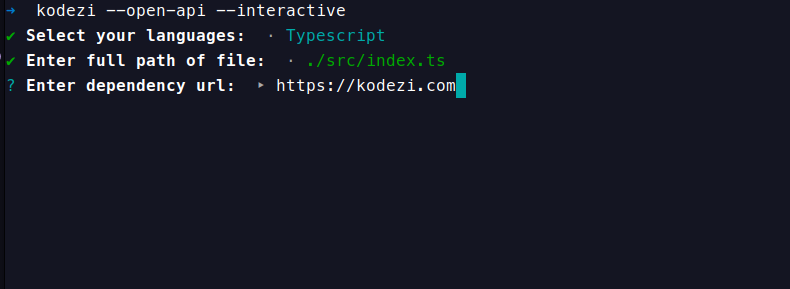
Enter Company Name :
INFO : It will use as endpoint where documentation hosted.
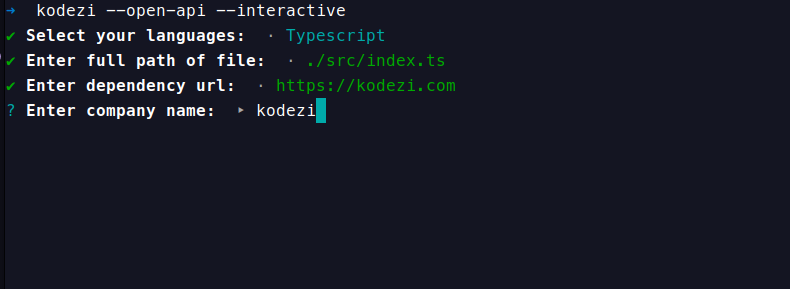
In Next step press ENTER key to start the features, or you can use the following command (non-interactive mode) to execute open api service directly.
non interactive mode command:
kodezi --open-api -l Javascript -file [FILE_PATH_OF_ROUTERS] -url [DEPENDENCY_URL] -cmp [END_POINT_BY_NAME] --email [USER_EMAIL] --token [USER_TOKEN]Cloud Options
Debugging :
Debugging tools are essential for developers to identify and automatically rectify errors within their code. These tools work in conjunction with linters to detect issues in code syntax and logic. Once errors are identified, the debugger tool assists by suggesting or automatically applying fixes, ensuring that the code operates smoothly without errors. This is invaluable for maintaining code quality and preventing runtime issues.
Standard :
Standard tools play a critical role in maintaining a consistent and high-quality codebase. They enforce coding conventions and best practices, reducing ambiguity in code by automatically applying naming conventions, formatting rules, and other established guidelines. These tools ensure that all developers working on a project adhere to the same coding standards, leading to more readable and maintainable code.
Formatting :
Formatting tools automatically enforce a uniform code structure throughout your source code. They handle tasks such as indentation, spacing, and code style, resulting in a well-organized and easily readable codebase. By consistently formatting the code, these tools enhance code maintainability and reduce the risk of formatting-related errors.
Security :
Security tools are crucial for safeguarding sensitive information within a codebase. They automatically identify potential security vulnerabilities and apply measures to protect data and prevent unauthorized access. This includes automatically hiding or encrypting critical information and ensuring secure coding practices, contributing to a more secure application.
Exception :
Exception tools automate the process of adding robust exception handling in specific code segments. By detecting potential error-prone areas, they help developers apply appropriate error-handling mechanisms automatically. This enhances the reliability of the code, ensuring that it gracefully handles unexpected situations or errors that may arise during execution.
Documentation :
Documentation tools streamline the process of creating and maintaining documentation for code segments. They automatically generate docstrings and comments, providing explanations of code functionality, usage, and important details. These tools improve code comprehensibility, making it easier for developers to understand and collaborate on the codebase, while also ensuring that documentation remains up-to-date.
Optimization :
Optimization tools automatically analyze the codebase to identify areas where improvements can be made to enhance performance and efficiency. They may suggest or apply code optimizations, such as algorithmic enhancements or code refactoring, to reduce code size and improve execution speed. These tools aim to create more efficient and responsive applications by automating optimization efforts.
CI/CD integration
Jenkins
INFO : insert jenkins ALL=(ALL) NOPASSWD: ALL inside /etc/sudoers file, to allow jenkins to install CLI globally. Use Jenkins featured Environment variable to store the credential of kodezi-cli user which will use in non-interactive mode.
FreeStyle Project :
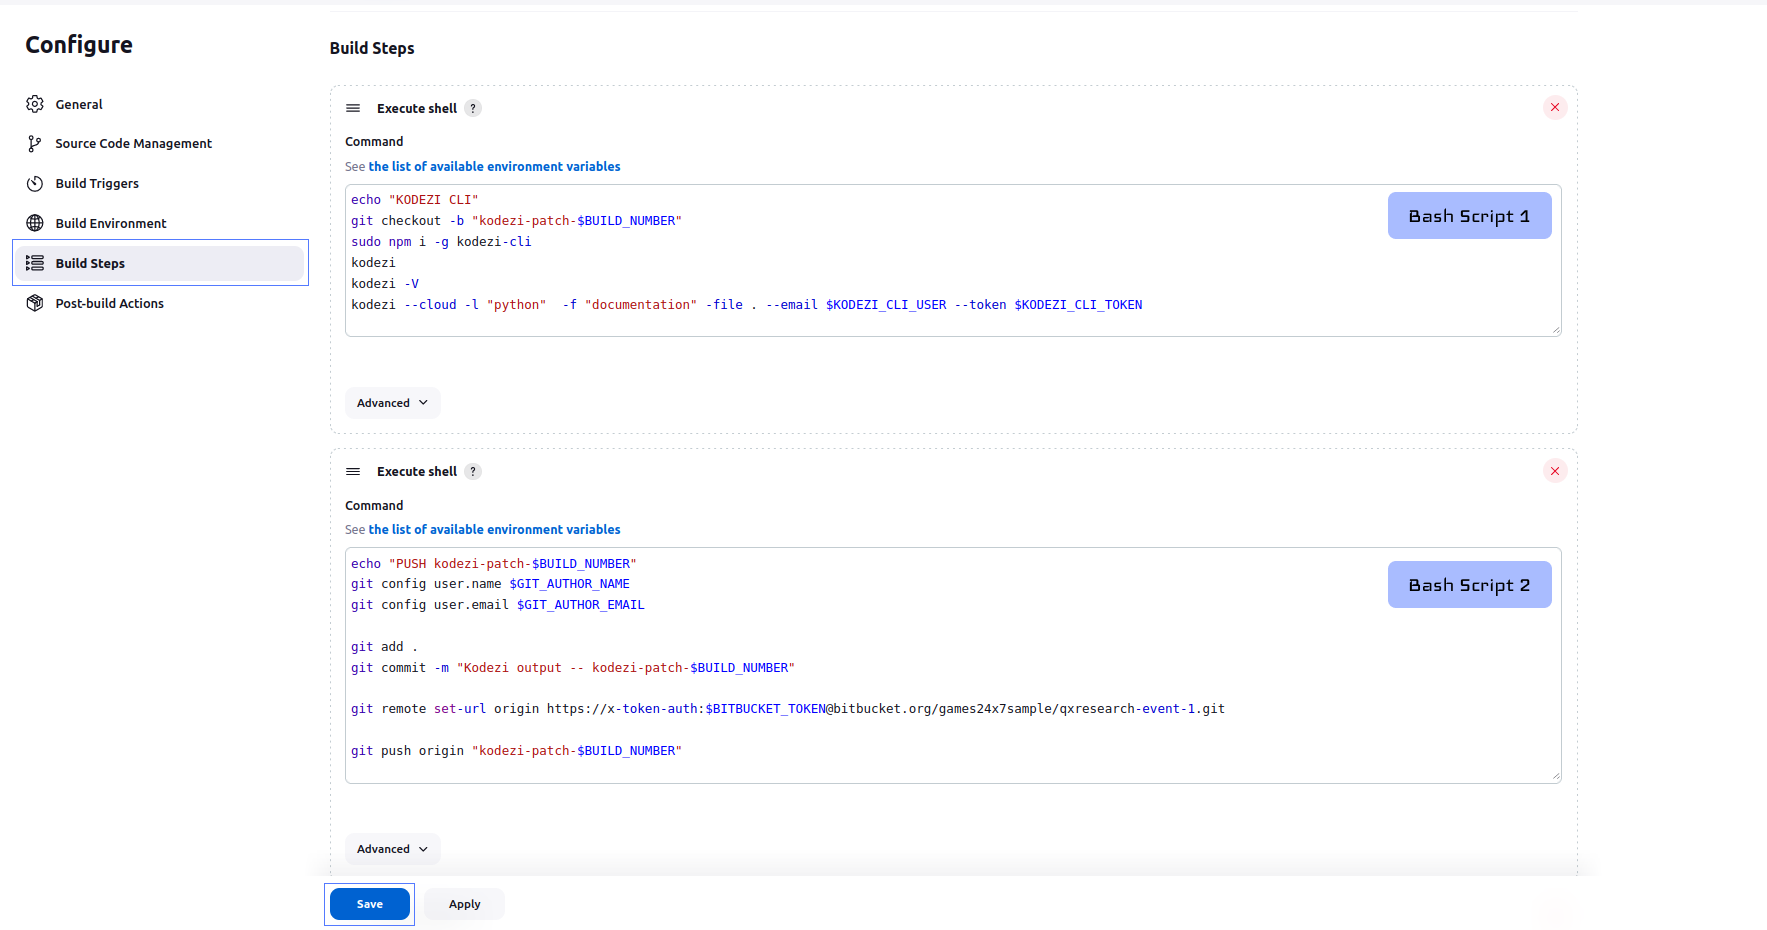
How To Add Kodezi-CLI in build steps of jenkins ?
Once we configured source code management, trigger and environment then we move next to Build steps, to use Kodezi-CLI we configure following 2 different steps
- KODEZI CLI (Bash Script 1)
echo "KODEZI CLI"
git checkout -b "kodezi-patch-$BUILD_NUMBER"
sudo npm i -g kodezi-cli
kodezi
kodezi --cloud -l "python"  -f "documentation" -file . --email $KODEZI_CLI_USER --token $KODEZI_CLI_TOKEN
In the above bash script, we check out to a new branch called kodezi-patch-$BUILD_NUMBER (e.g., kodezi-patch-323). Next, we install the Kodezi-CLI globally using npm. Please ensure that Node.js is installed on your CI/CD machine; if not, please install Node.js. Afterward, we can verify the successful installation of Kodezi-CLI by running either kodezi or kodezi -V. Once the version or installation is verified, we can proceed to run Kodezi cloud features. In the final command, you'll notice that we use -l for specifying the language, which is currently set to Python. We also use -f to specify the desired features and -file to set the directory path where you want to use these features.For more information about Kodezi-CLI features, please refer to the documentation on CLI features.
- PUSH Kodezi-patch-$BUILD_NUMBER (Bash Script 2)
echo "PUSH kodezi-patch-$BUILD_NUMBER"
git config user.name $GIT_AUTHOR_NAME
git config user.email $GIT_AUTHOR_EMAIL

git add .
git commit -m "Kodezi output -- kodezi-patch-$BUILD_NUMBER"

git remote set-url origin https://x-token-auth:$BITBUCKET_TOKEN@bitbucket.org/games24x7sample/qxresearch-event-1.git

git push origin "kodezi-patch-$BUILD_NUMBER"
git checkout $BRANCH_TO_DEPLOY
In the above bash script, we intend to push the code into the branch kodezi-patch-$BUILD_NUMBER (e.g., kodezi-patch-323). Before committing the code, it is essential to configure the user name and email. Jenkins conveniently provides us with the user details in the form of environment variables, namely $GIT_AUTHOR_NAME and $GIT_AUTHOR_EMAIL. Next, we need to commit the modified code, which corresponds to the updated source code of kodezi-cli features. Once the commit is completed, we proceed to push the code. This allows us to later create a pull request and conduct a side-by-side code comparison. In the final command, we use it to return to the initial deployment branch, which should be specified in your Jenkins environment as BRANCH_TO_DEPLOY.
Pipeline :
# Jenkinsfile
pipeline {
    agent any

    stages {
        stage('Kodezi CLI') {
            steps {
                echo 'KODEZI CLI'
                sh 'git checkout -b "kodezi-patch-$BUILD_NUMBER"'
                sh 'sudo npm i -g kodezi-cli'
                sh 'kodezi'
                sh 'kodezi --cloud -l "python"  -f "debug,documentation" -file . --email ${KODEZI_CLI_USER} --token ${KODEZI_CLI_TOKEN}'
                sh 'git config user.name ${GIT_AUTHOR_NAME}'
                sh 'git config user.email ${GIT_AUTHOR_EMAIL}'
                sh 'git add .'
                sh 'git commit -m "Kodezi output -- kodezi-patch-$BUILD_NUMBER"'
                sh 'git remote set-url origin https://x-token-auth:${BITBUCKET_TOKEN}@bitbucket.org/{project}/{repo}.git'
                sh 'git push origin "kodezi-patch-$BUILD_NUMBER"'
                sh 'git checkout ${BRANCH_TO_DEPLOY}'
            }
        }
        stage('Test') {
            steps {
                echo 'Testing..'
                // testing script e.g. npm test
            }
        }
        stage('Deploy') {
            steps {
                echo 'Deploying....'
                // deploying script e.g. npm run publish
            }
        }
    }
}
In the above Jenkinsfile, a new stage has been added with the name Kodezi CLI We have followed the same steps as those used in the previous FreeStyle Project. In this stage, we predominantly utilize parameterized variables. It's optional, giving users the flexibility to choose whether they want to use environment variables or parameterized values based on their preferences. To Know more about Jenkins Environment , Follow the Docs
Bitbucket
# bitbucket-pipelines.yml
image: node:16

pipelines:
  branches:
    main:
      - parallel:
          - step:
              name: Kodezi CLI Test
              caches:
                - node
              script:
                - git checkout -b kodezi-patch-$BITBUCKET_BUILD_NUMBER
                - npm install -g kodezi-cli
                - kodezi
                - kodezi -V
                - kodezi --cloud -l "java" -f "documentation,debugging" -file . --email $KODEZI_CLI_USER --token $KODEZI_CLI_TOKEN --out ./kodezimode
                - git config --global user.email $GITHUB_PROJ_EMAIL
                - git config --global user.name $GITHUB_PROJ_USER
                - git add .
                - git commit -m "A new test from CLI."
                - git push origin kodezi-patch-$BITBUCKET_BUILD_NUMBER
          - step:
              name: Build and Test
              caches:
                - node
              script:
                - npm install
                - npm test
          - step:
              name: Code linting
              script:
                - npm install eslint
                - npx eslint .
              caches:
- node- This step is responsible for testing and interacting with the "kodezi-cli."
- It begins by checking out a new Git branch with a name based on the build number, likely to isolate changes for testing.
- Next, it installs the "kodezi-cli" globally using npm, making it available for use in the pipeline.
- The step then runs various "kodezi" commands with specific options, likely to perform actions related to code analysis and documentation generation.
- It sets global Git configuration for the user's email and name, ensuring that Git commits can be made during the pipeline run.
- Changes made during the step are added to the Git repository, committed with a message indicating that it's a new test from the CLI, and pushed to the remote repository, effectively saving the changes made during the test.
Github
#.github/workflows/kodezi-cli.yml
name: Kodezi CLI

permissions: write-all

on:
  push:
    branches:
      - master

jobs:
  version:
    runs-on: ubuntu-latest
    steps:
      - uses: actions/checkout@v2
        with:
          token: ${{ secrets.GITHUB_TOKEN }}

      - name: checkout new branch
        run: |
          git checkout -b kodezi-patch-${{github.run_number}}

      - uses: actions/setup-node@v3
        with:
          node-version: "16.x"
          registry-url: "https://registry.npmjs.org"

      - name: kodezi cli test
        run: |
          npm i -g kodezi-cli
          kodezi
          kodezi --cloud -l "java"  -f "documentation,debugging" -file ./java_testcases  --email ${{secrets.KODEZI_CLI_USER}} --token ${{ secrets.KODEZI_CLI_TOKEN}}  --out ./kodezimode

      - name: Git configuration
        run: |
          git config --global user.email "41898282+github-actions[bot]@users.noreply.github.com"
          git config --global user.name "GitHub Actions"

      - name: Push Code
        run: |
          git add .
          git commit -m "kodezi cli used features."
          git push origin kodezi-patch-${{github.run_number}}
Name and Permissions:
- The workflow is named "Kodezi CLI."
- It has the permission to write to all resources, specified as "write-all."
Trigger:
- The workflow is triggered on a "push" event to the "master" branch.
Jobs:
- The workflow defines a single job named "version" that runs on the "ubuntu-latest" GitHub-hosted runner.
Steps within the Job:
Checkout : The job checks out the repository code using the "actions/checkout" action, utilizing the GitHub token from secrets.
Checkout New Branch: It creates a new Git branch named "kodezi-patch-{run_number}" based on the current branch.
Setup Node: Configures the Node.js environment with version 16.x and a specific NPM registry.
Kodezi CLI Test: Installs the "kodezi-cli" globally, then runs the "kodezi" command with various arguments, including specifying a cloud mode, programming language, and other parameters.
Git Configuration: Sets Git user email and name for the GitHub Actions bot.
Push Code: Adds, commits, and pushes changes to the newly created branch, likely to trigger further actions or workflows.
Overall, this "Kodezi CLI" step is a crucial part of the pipeline that tests the "kodezi-cli" tool by executing commands, making changes, and pushing those changes to a new branch in the Git repository. This helps automate testing and integration of the "kodezi" tool into the project's workflow.
2 years ago
2 years ago
2 years ago
2 years ago
2 years ago
2 years ago
2 years ago
2 years ago
2 years ago
2 years ago
2 years ago
2 years ago
2 years ago
2 years ago
2 years ago
2 years ago
2 years ago
2 years ago
2 years ago
2 years ago
2 years ago
2 years ago
2 years ago
2 years ago
2 years ago
2 years ago
2 years ago
2 years ago
2 years ago
2 years ago
2 years ago
2 years ago
2 years ago
2 years ago
2 years ago
2 years ago
2 years ago
2 years ago
2 years ago
2 years ago
2 years ago
2 years ago
2 years ago
2 years ago
2 years ago
2 years ago
2 years ago
2 years ago
2 years ago
2 years ago
2 years ago
2 years ago
2 years ago
2 years ago
2 years ago
2 years ago
2 years ago
2 years ago
2 years ago
2 years ago
2 years ago
2 years ago
2 years ago
2 years ago
2 years ago
2 years ago
2 years ago
2 years ago
2 years ago
2 years ago
2 years ago
2 years ago
2 years ago
2 years ago
2 years ago
2 years ago
2 years ago
2 years ago
2 years ago
2 years ago
2 years ago
2 years ago
2 years ago
2 years ago
2 years ago
2 years ago
2 years ago
2 years ago
2 years ago
2 years ago
2 years ago
2 years ago
2 years ago
2 years ago