lowcode-data-app v0.30.3
Prototype of a "Low Code Data App".
Build your multi tenant data driven apps quickly with the npm package: https://www.npmjs.com/package/lowcode-data-app
IMPORTANT: This is in experimental state!
General Idea
It starts with a generic, secure web gui.
Entities can be defined on-the-fly, as well as their relationship. Web forms and lists are generated to maintain data (documents) of this entities.
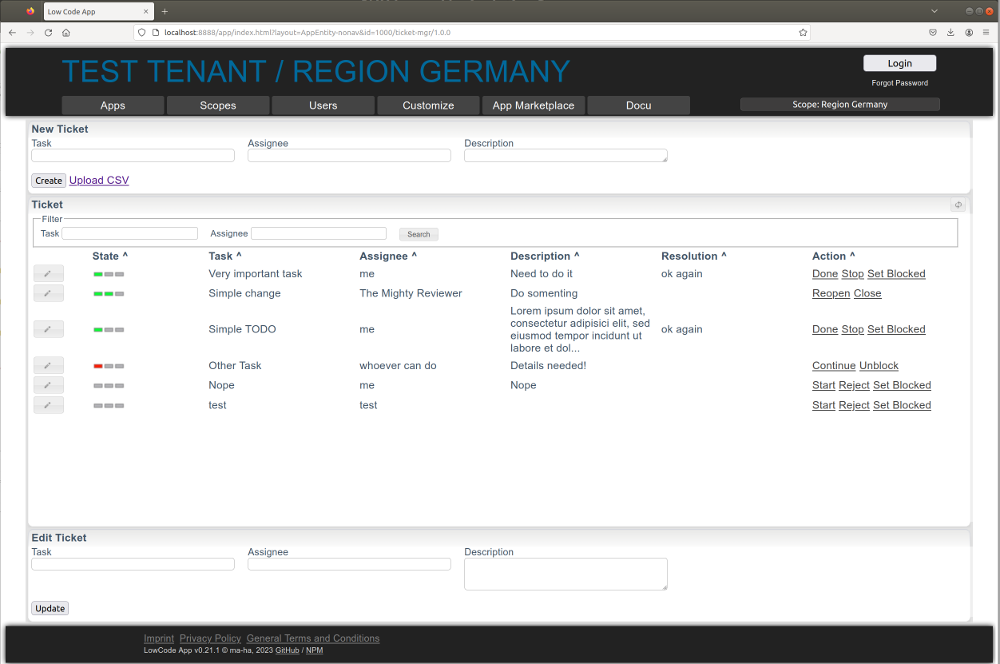
A powerful State Model can optionally be attached to entities (see "Task List" example). You define actions for state changes, e.g. "Start Progress". Selected data fields are displayed in the state change form.
All data, users and authorizations are within hierarchical scopes (like tenants). Entity definitions and data can be inherited to lower hierarchy scopes. A web gui user can switch the scope in the gui.
Entities are bundled in apps, so they can be exported and imported via a app marketplace. Apps are installed and can be customized within a scope. Tags can also be used to assign apps to a scope.
To start process adapters can subscribe to events, e.g. data changes. Adapters use service credentials defined on a dedicated scope.
All operations are exposed as API, e.g. for the adapters.
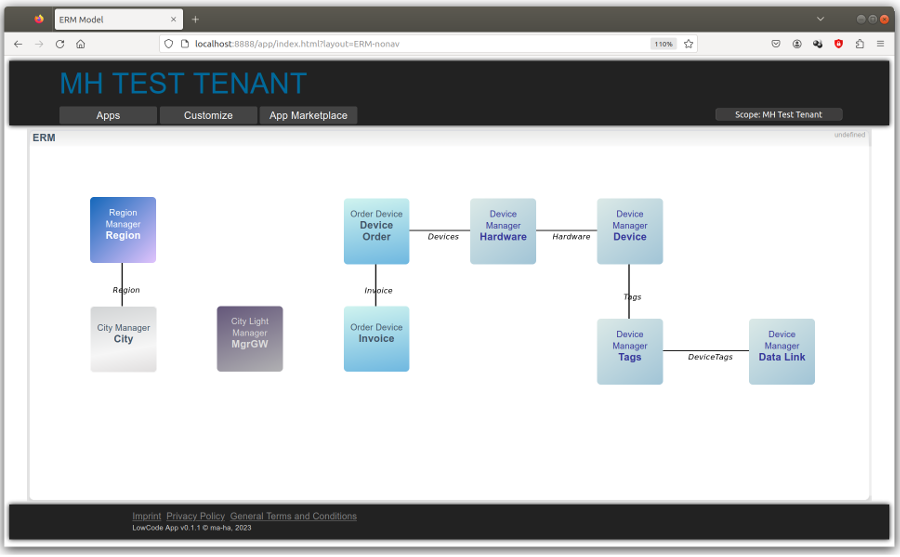
Sample Server
Standalone mode:
let lowCodeApp = require( 'lowcode-data-app' )

let app = lowCodeApp.init({
  DATA_DIR : '../dta/',
  GUI_URL  : 'http://localhost:8888/app/',
  URL_PATH : '/app',
  OIDC_SERVER : true
})
Open http://localhost:8888/app/index.html
Login with user demo and password demo.
A sample "database" is initialized already, so you should see already some apps, entities and data.
The init(...) returns the easy-web-app, so the whole API is open for customizing,
e.g. app.getExpress() to add API routes or gui.pages['main'].addFooterLink(...) to modify the footer.
Getting Started With Empty DB
Create User
- Login as "demo" / "demo"
- Open "Users" tab
- Add a new user with developer and admin role enabled
- Logout and Login with new user
- In Open "Users" tab, click the "deactivate" button for the "demo" user
Add a new App
- Open "Customize" tab
- In the "Add App" form enter an Id (e.g. "MyAwesomeApp), a name (e.g. "Mz Awesome App"), Scope (e.g. "Test Tenant", if all is still default), role "AppUser" and click "Add"
Add Entities to the new App
- In the newly created app click "Manage Entities"
- In the "Add / Update Entity" form define an ID (e.g. "Customer") and a title (Optional, but can contain spaces and special characters) and push the "Add" button.
- Click "Properties"
- Add some property fields, e.g. id="name", Label="Name", Type="String", Filter=checked
Test the App
Open your new app in the "App" tab (the app is only visible in the defined scope).
The web GUI supports CSV data upload, if this is enabled for the entity (checkbox).
Import Apps, Entity Models and State Models from Marketplace
Just select your scope, open "Marketplace" and click the App or State Model to inspect the details. Click the "Check import" link to check all dependencies and if everything is OK, click the "Import" link to add the models to your scope.
Entity / Document Model
Data types (and their Web GUI mapping)
String(simple input fields)String QR/Barcode(input field with QR and barcode scanner)Text(multi line input fields)Number(simple input fields)Boolean(checkboxes)Date(date picker)Selectwith an option array (pull down of values)DocMapmaster-detail reference (link to filtered docs)SelectRefto other entity (pull down of ids)MultiSelectRefto other entity (pull down of ids)UUIDauto generated, if field name isidthis will be the collection idMetricslink to a metrics (time series data) for this entity idJSON(Multi Line Edit)Link(simple input fields, will take placeholders)Event(link to send an event. Ref can have a simple condition to render the link, e.g. "status == ready" or "status != in progress,done")
So relations are
- 1:n =
DocMap... the child entity must have a reference key to the parent - n:1 =
SelectRef - n:m =
MultiSelectRef
Entity Ids must be alphanumeric, min length is 2.
Property features:
- you can select a property for the data table filter
- you can define a property as "API managed", means zo u will see it only in the table, but there is no input available in the add/change GUI form
Important: The entity id scope is globally within a top level scope between apps. This enables different views on the same data in different apps (if different apps have the same entity, but different properties). But: Please choose your entity ids wisely, if you don't want this behavior.
For JSON properties sub-elements can be defined with a dot-notation (e.g. "MyJsonProp.MySubField"). Allowed types: 'String', 'Text','Boolean','Date','Select'.
You can "inherit" a new child entity in your app from an existing entity in any app of your root scope. This is initially a 1:1 copy and it can be modified to your needs.
You can also create app versions, including all their entities. Simply click "Edit" and change the app id and click the "Add / Change" button to create a new (initially disabled) copy.
Add New Root Scope (aka "Tenant")
This should be done via API ... but it's simple:
const axios  = require( 'axios' )
let result = await axios.post(
  'http://localhost:8888/app/adapter/scope', // or whatever you've configured
  {
    name          : 'ROOD SCOPE NAME',
    adminEmail    : 'FOR NEW ADMIN USER',
    adminPassword : 'FOR NEW ADMIN USER',
    apiId         : 'FOR NEW API CREDENTIALS',
    apiKey        : 'FOR NEW API CREDENTIALS',
    owner         : 'SOME NAME'
  },
  { headers:  { 'provisioning-key': 'PROVISIONING KEY' } }
)
The new admin credentials are required, since the app can't send out emails (yet).
The API credentials can be used to bootstrap the new tenant and create apps, their entities and upload some initial data documents.
A new tenant (root scope) can also be added via GUI.
The user must be in the SUPER_TENANT_ADMIN list (comma separated user ids).
In the add scope form simple put a # into the scope id.
Entities with State
Entities can be attached to a "State Model".
The state model defines all states and the allowed transitions and their action name. State models can be created or customized in the browser.
For all actions you select the properties which need to be set in the state transition. In the GUI the user get entity create form(s) and action links for the state changes. Forms will be generated for each action to change the selected properties.
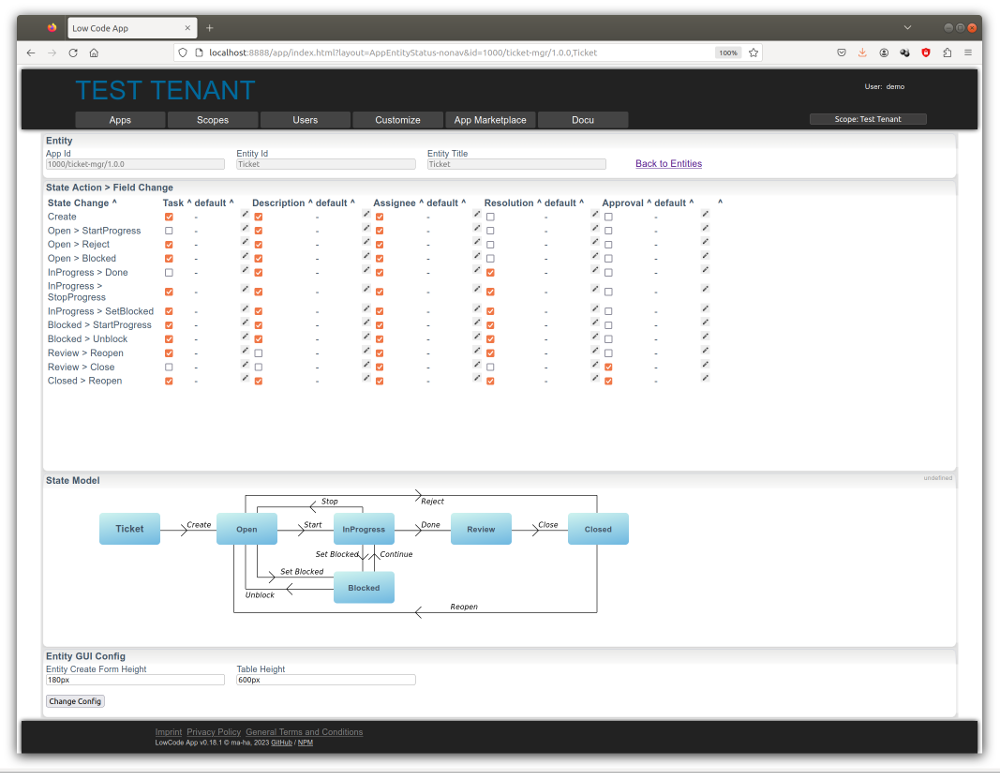
For the action you can also define default values for properties. If the property is not selected for the action but has a default value, this value is set always.
The default value for "select", "selectRef" and "multiSelectRef" properties can contain a condition to filter the allowed options, e.g.: color $eq 'red'.
Currently only $eq is allowed. The compared values can be a String (in single quotes) or a property.
The left value is prioritized taken from the select values and the right from the entity default values.
For "select" the condition can be val $eq ....
A CSV upload for the "create" action is available.
Metric Dashboard (WIP)
Dashboards can visualize data of an entity collection in simple way.
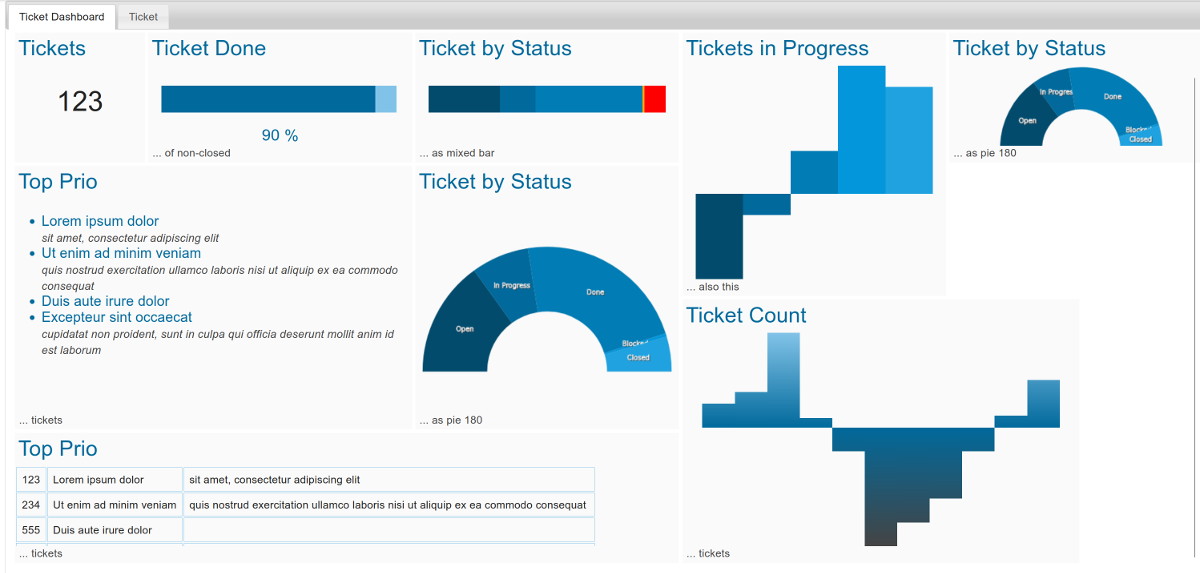
Two types of dashboards are available: 1. General dashboard: Every visualization has its own data source. 2. Entity dashboard: Board has a selector per entity, e.g. per product. (TODO)
Available visualizations:
- Number
- Text
- ProgressBar
- Distribution
- Pie180
- Pie360 (TODO)
- Table
- Items
- ItemBars (TODO)
- KeyValue (TODO)
- Graph (TODO)
- Bars
- BarGraph
In general the raw data is mostly not prepared to show easily on a dashboard. The approach is to aggregate metrics via cron-jobs: read data via API and write metric in dedicated table. An universal metric table may have properties: Id, metric-key, value, text, description, timestamp.
Integration
APIs
Adapters and connectors can use ReST APIs, see API and Format Reference Docu.
In the app manager you can export the Swagger/OpenAPI API spec file.
Event Hub
Adapters can subscribe to data events, to start processes or sync the data with external systems.
See example code.
GUI Links
Entities can refer to external GUI Apps using links. Placeholders in the links are populated with the entity data.
Customizing
The GUI framework is easy-web-app/rest-web-ui and the underlying api server is "express".
Theme colors and CSS can be configured per root scope in the GUI.
State Model
State models can be added or customized to your needs.
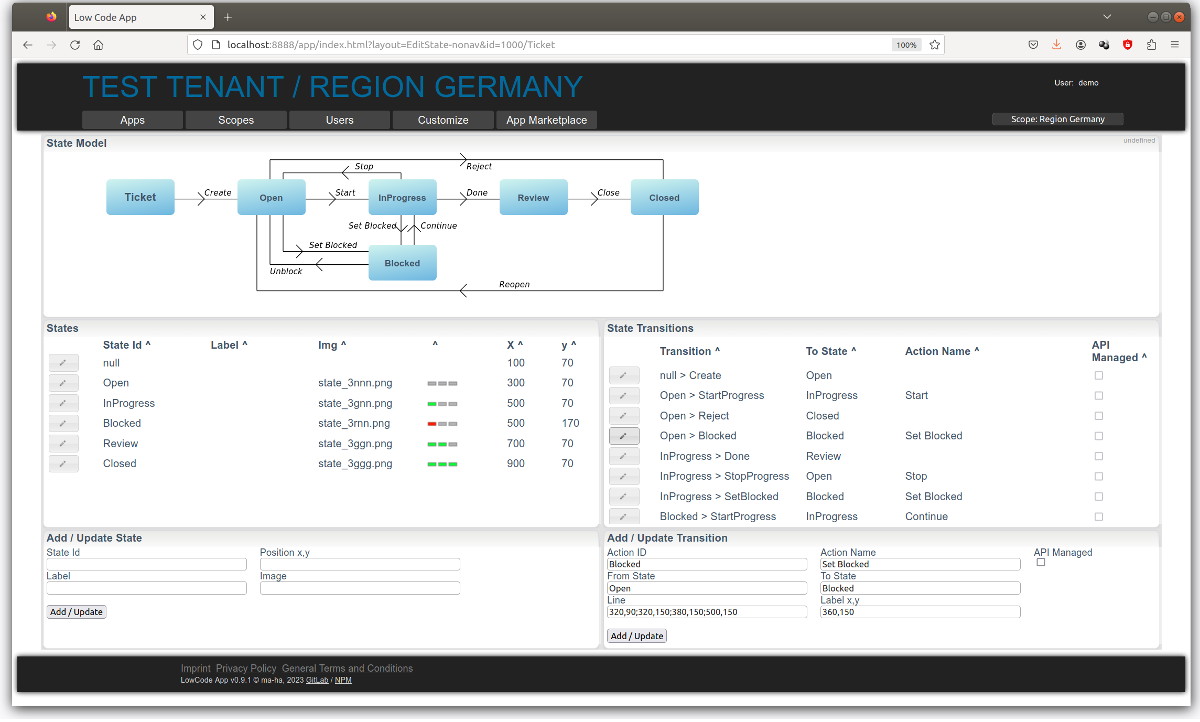
The start stateId is null.
Persistence
The persistence uses simple files and a memory cache. This is not recommended for production use.
It should be simple to replace the persistence with a document DB. Simply rewrite some methods in:
OpenID Connect
The implementation brings it's own OIDC auth server.
Have a look into the config files to configure a real OIDC IAM.
The invitation process may need some additional OIDC onboarding flow, if th users aren't already there.
Web Content
Some static doc files, GTC, imprint etc. need to be customized to your needs.
A simple markdown docu can be implemented, as well as a self-service onboarding, see api-content.js.
CSS
Simple color scheme changes can be done easily, just focus on the 1st 15 lines in custom.css
Release Notes
See: Changelog
2 years ago
2 years ago
2 years ago
2 years ago
2 years ago
2 years ago
2 years ago
2 years ago
2 years ago
2 years ago
2 years ago
2 years ago
2 years ago
2 years ago
2 years ago
2 years ago
2 years ago
2 years ago
2 years ago
2 years ago
2 years ago
2 years ago
2 years ago
2 years ago
2 years ago
2 years ago
2 years ago
2 years ago
2 years ago
2 years ago
2 years ago
2 years ago
2 years ago
2 years ago
2 years ago
2 years ago
2 years ago
2 years ago
2 years ago
2 years ago
2 years ago
2 years ago
2 years ago
2 years ago
2 years ago
2 years ago
2 years ago
2 years ago
2 years ago
2 years ago
2 years ago
2 years ago
2 years ago
2 years ago
2 years ago
2 years ago
2 years ago
2 years ago
2 years ago
2 years ago
2 years ago
2 years ago
2 years ago
2 years ago
2 years ago
2 years ago
2 years ago