nest-logging-transport v1.3.0
Nest-logging-transport
Logger for NestJS framework allowing you to use custom transports (or use predefined ones).
Installation
yarn:
yarn add nest-logging-transportnpm:
npm i nest-logging-transportUsage
Nest-logging-transport allows you to either define your own transport, or use predefined ones.
Example with predefined transport:
import { NestTransportLogger, DefaultTransportConsole } from 'nest-logging-transport';

const customLogger = new NestTransportLogger({
    transports: [new DefaultTransportConsole()],
});

const bootstrap = async () => {
    const logger = new Logger('Bootstrap');
    const app = await NestFactory.create(ExampleModule, { logger: customLogger });
    logger.log('Application ready');
    [...]
    await app.listen(3334, () => logger.log('Server listening'));
};
From this moment all log calls will be redirected to NestTransportLogger instance and then
to each transport defined in instance constructor.
Creating own transport
Creating own transport required implementing all methods from interface Transport.
To do it, simply create new object (or class):
import { Transport, LogEvent, LogEventWithReplacedNulls } from 'nest-logging-transport';

const customTransport = {
  log(event: LogEvent, eventWithoutNulls: LogEventWithReplacedNulls) {
    // [...]
  },
  // [...]
};
You can find examples in src/transports.
Difference between log events
To make operating on logs easier there is event with nulls replaced with empty strings ''.
Normal log:
{
  additionalContext: null,
  stacktrace: null,
  baseContext: 'Bootstrap',
  type: 'log',
  timestamp: 2022-03-23T19:26:59.295Z,
  message: 'Server listening'
}
Log with replaced nulls:
{
  additionalContext: '',
  stacktrace: '',
  baseContext: 'Bootstrap',
  type: 'log',
  timestamp: 2022-03-23T19:26:59.295Z,
  message: 'Server listening'
}
Log functions in your logger can take event with nulls as first argument and without nulls as the second one.
Examples
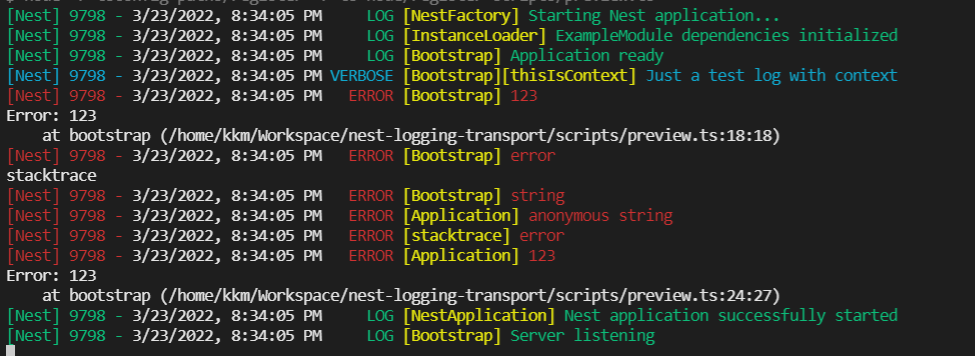
Logs from default (console) transport looks like this:

You can also use preview script, available after cloning the repository:
yarn previewPublishing package (for package maintainers and forks)
Publishing this package is semi-automated. Steps to do that:
- Clone repository and checkout branch you want to release
- Install dependencies from current lockfile
yarn install --frozen-lockfile - Use release scripts:
yarn release- in most cases, release script will take care of giving package the right numberyarn release:patch- when you want to change only last part of semver (x.x.X)yarn release:minor- when you want to change middle part of semver (x.X.x)yarn release:major- when you want to change first part of semver (X.x.x)
- Push created tags using
git push --follow-tags origin master. Don't use npm publish.
You can read more about semver on semver.org page.
This project will follow semver from first major release (versions starting with 0 will be considered beta versions and will not follow semver).