nest-next-2 v9.1.3
NestJS NextJS Integration
Installation
yarn add nest-nextUsage
Import and register the RenderModule
In the main.ts, import Next and prepare it. Get the RenderService and register it by passing it the
Nest application and next server.
import { NestFactory } from '@nestjs/core';
import { RenderModule } from 'nest-next';
import Next from 'next';
import 'reflect-metadata';
import { AppModule } from './application.module';

async function bootstrap() {
  const dev = process.env.NODE_ENV !== 'production';
  const app = Next({ dev });

  await app.prepare();

  const server = await NestFactory.create(AppModule);

  const renderer = server.get(RenderModule);
  renderer.register(server, app);

  await server.listen(process.env.PORT || 3000);
}

bootstrap();
In the application.module.ts import the RenderModule.
import { Module } from '@nestjs/common';
import { RenderModule } from 'nest-next';

@Module({
  imports: [
    RenderModule,
    ...
  ],
  ....
})
export class AppModule {}
Default Settings
interface RenderOptions {
  viewsDir: null | string;
  dev: boolean;
}
Views/Pages Folder
By default the the renderer will serve pages from the /pages/views dir. Due to limitations with
Next the /pages dir is not configurable, but the directory within the /pages dir is configurable.
The register method on the RenderModule takes an optional parameter viewsDir which determine the
folder inside of pages to render from. By default the value is /views but this can be changed or
set to null to render from the root of pages.
Dev Mode
By default the dev mode will be set to true unless the NODE_ENV is production. Currently the dev mode determines how the errors should be serialized before being sent to next.
Rendering Pages
The RenderModule overrides the Express/Fastify render. To render a page in your controller import
the Render decorator from @nestjs/common and add it to the method that will render the page. The
path for the page is relative to the /pages directory.
import {
  Controller,
  Get,
  Render,
} from '@nestjs/common';

@Controller()
export class AppController {

  @Get()
  @Render('Index')
  public index() {
    // initial props
    return {
      title: 'Next with Nest',
    };
  }
}
Additionally, the render function is made available on the res object.
@Controller()
export class AppController {

  @Get()
  public index(@Res() res: RenderableResponse) {
    res.render('Index', {
      title: 'Next with Nest',
    });
  }
}
The render function takes in the view, as well as the initial props passed to the page.
render = (view: string, initialProps?: any) => anyHandling Errors
By default, errors will be handled and rendered with next's error renderer, which uses the (customizable) _error page. Additionally, errors can be intercepted by setting your own error handler.
Custom error handler
A custom error handler can be set to override or enhance the default behavior. This can be used for things such as logging the error or rendering a different response.
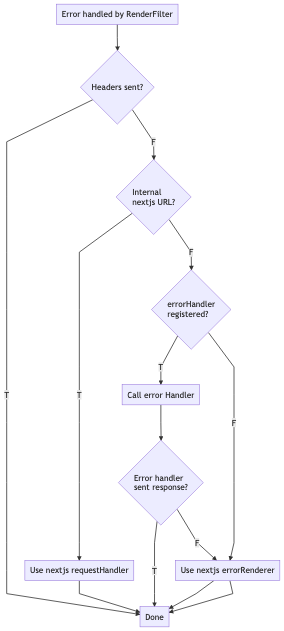
In your custom error handler you have the option of just intercepting and inspecting the error, or sending your own response. If a response is sent from the error handler, the request is considered done and the error won't be forwarded to next's error renderer. If a response is not sent in the error handler, after the handler returns the error is forwarded to the error renderer. See the request flow below for visual explanation.
ErrorHandler Typedef
export type ErrorHandler = (
  err: any,
  req: any,
  res: any,
  pathname: any,
  query: ParsedUrlQuery,
) => Promise<any>;
Setting ErrorHandler
You can set the error handler by getting the RenderService from nest's container.
// in main.ts file after registering the RenderModule

const main() => {
  ...

  const renderer = server.get(RenderModule);
  renderer.register(server, app);

  // get the RenderService
  const service = server.get(RenderService);

  service.setErrorHandler(async (err, req, res) => {
    // send JSON response
    res.send(err.response);
  });

  ...
}
Error Flow (Diagram)
The image is linked to a larger version
Examples folder structure
Basic Setup
Next renders pages from the pages directory. The Nest source code can remain in the default /src folder
/src
  /main.ts
  /app.module.ts
  /app.controller.ts
/pages
  /views
    /Index.jsx
/components
  ...
babel.config.js
next.config.js
nodemon.json
tsconfig.json
tsconfig.server.json
Monorepo
Next renders pages from the pages directory in the "ui" subproject. The Nest project is in the "server" folder. In order to make the properties type safe between the "ui" and "server" projects, there is a folder called "dto" outside of both projects. Changes in it during "dev" runs trigger recompilation of both projects.
/server
  /src
    /main.ts
    /app.module.ts
    /app.controller.ts
  nodemon.json
  tsconfig.json
  ...
/ui
  /pages
    /index.tsx
    /about.tsx
  next-env.d.ts
  tsconfig.json
  ...
/dto
  /src
    /AboutPage.ts
    /IndexPage.ts
  package.json
Configuring Next
Required Dependencies
reactreact-dom
tsconfig.json
Next 9 added built-in zero-config typescript support. This change is great in general, but next requires specific settings in the tsconfig which are incompatible with what are needed for the server. However, these settings can easily be overridden in the tsconfig.server.json file.
If you are having issues with unexpected tokens, files not emitting when building for production, warnings about allowJs and declaration not being used together, and other typescript related errors; see the tsconfig.server.json file in the example project for the full config.
Versioning
The major version of nest-next corresponds to the major version of next.
By Example
Fully setup projects can be viewed in the examples folder

