next-auth-hashpack v1.2.13
next-auth-hashpack
NextAuth.js is an open-source library that simplifies the implementation of authentication in serverless and server-rendered web applications using various authentication providers. It is built on top of the Next.js framework and provides a simple API and pre-built authentication providers.
install
npm install next-auth-hashpack
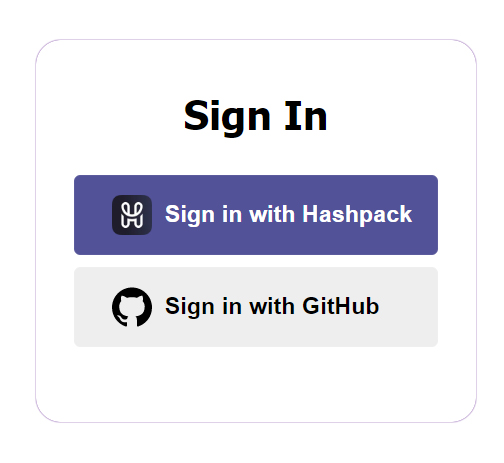
UI View

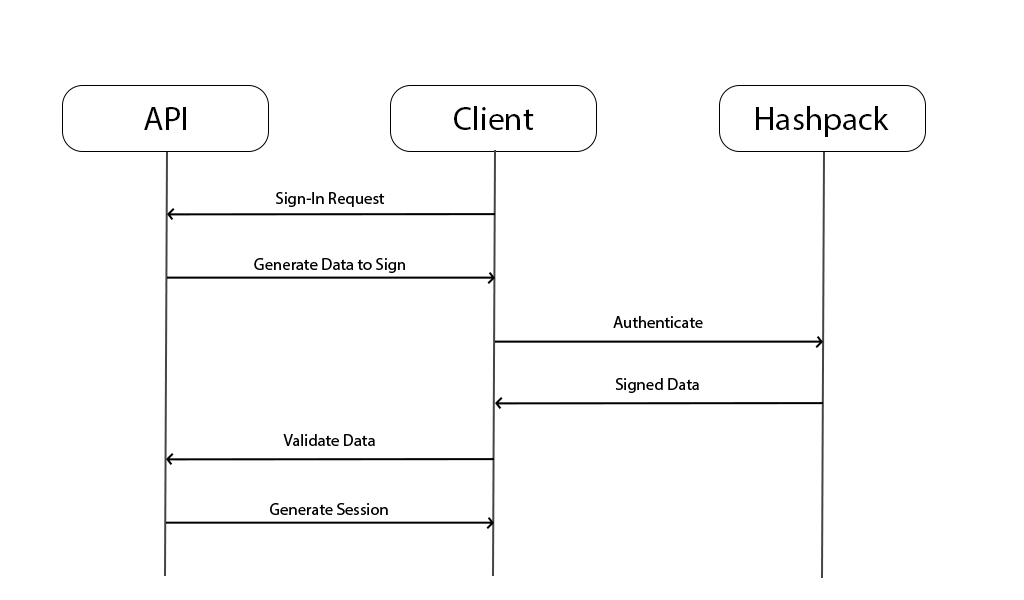
The Flow

Usage
HashpackProvider
after configuring next-auth, call HashpackProvider in the providers array:
NextAuth({
    providers: [
        hashpackProvider({
            userReturnCallback: ({ accountId, network }, userPublicKey) => {
                return { id: "DavinciGraph", accountId: accountId }
            },
            privateKey: "ServerAccountPrivateKey",
            mirrorNodeAccountInfoURL: {
                testnet: 'https://testnet.mirrornode.hedera.com/api/v1/accounts',
                mainnet: 'https://mainnet-public.mirrornode.hedera.com/api/v1/accounts'
            },
            getUserPublicKey: ({accountId, network}) => {
                "mechanism to return user's public key"
                return "UserPublicKey";
            },
            checkOriginalData: ({accountId, originalData, network}) => {
                "check the originData you had sent to the user to sign with an external source like database"
                return true;
            },
            debug: true
        })
    ]
})
hashpackProvider Options
userReturnCallback
mandatory this callback would be executed when user is authenticated successfully. it gets credentials inputs including user's accountId which can be used to fetch user's data from for example a database, and userPublicKey.
hashpackProvider({
    ...
    userReturnCallback: ({signedPayload, userSignature, accountId, network}, userPublicKey) => {}
})
privateKey
mandatory the server's hedera hashgraph account private key, this key would be used to generate a publicKey and verify the signed data. after version 1.1.6 private key for different network is supported.
hashpackProvider({
    ...
    privateKey: "server private key",

    //or
    privateKey: (network) => {
        if( network === 'mainnet' ){
            return 'pk for mainnet.'
        }

        return 'pk for testnet';
    }

    // or
    privateKey: {
        testnet: "server private key for testnet",
        mainnet: "server private key for mainnet"
    }
})
💡 Attention: prior to 1.2.2 we had used publicKey directly but it has some issues with verifying on mainnet. therefore after that we generate the publicKey from this privateKey
mirrorNodeAccountInfoURL
optional for development after version 1.0.6 you must define this variable as an object with two properties tesetnet and mainnet which both are urls pointing to a mirror node to get an account information. If left empty default urls are the public mirror nodes.
getUserPublicKey
optional if you want to implement your mechanism to get user's account public key, you can pass a callback to this property. you'll get signing-in user account id as the input
hashpackProvider({
    ...
    getUserPublicKey: ({accountId, network}) => {
        return "mechanism to return user's public key"
    }
})
checkOriginalData
optional if you want to add an extra security layer to check if the data you had sent to the user matches the receiving one, you can use this function.
hashpackProvider({
    ...
    checkOriginalData: ({accountId, originalData, network}) => {
        "check the originData you had sent to the user to sign with an external source like database"
        return true;
    }
})
debug
optional a flag which when true shows the process of running functionalities in the console.
authInitializer
The usual next-auth providers have a similar flow to initiate authentication(since they implement OAuth standard), but with a cryptocurrency wallet this is not available. therefore we need another route, which must be created manually.
By default, a hashpack.ts file is supposed to exist in pages/api/auth containing a route that calls authInitializer as presented in the following snippet.
export default async function hashpack(req: NextApiRequest, res: NextApiResponse) {
    const accountId = AccountId("server's hedera account Id");
    const privateKey = PrivateKey.fromString("Server's hedera account private key");

    let data = {
        url: 'https://davincigraph.io',
        data: {
            token: "a randomly generated token"
        }
    };

    // optionally you can define a preInitializingCallback and give it to authInitializer.
    // after validation of user's account ID, preInitializingCallback would receive it
    const preInitializingCallback = (accountId) => {
        // logic: e.g. store the accountId and data in the database
    }

    // return whatever authInitializer return to to prevent stale requests
    return authInitializer(req, res, accountId, privateKey, data, "testnet", preInitializingCallback, true);
    // the final argument is hedera network, and it accepts either testnet or mainnet
}
as you see, authInitializer requires the route request and response, server's Hedera hashgraph account Id and private key, and some data to be signed by both parts (server & user). also a preInitializingCallback that would run after validation of the request. debug is also available here.
💡 the
pages/api/auth/hashpack.tspath is not mandatory and the route can be created anywhere needed, the client knows about it in a way which would be explained in the following.💡 the request contains
networkin its body object.
Sign-in page
the other essential configuration for the next-auth is the sign-in page url. by default next-auth creates a page with this url pages/api/auth/signin. as you remembered crypto wallets cannot authenticate like oAuth providers by the default page treat all as that, so we cannot use it. instead we use some of next-auth-hashpack functionalities in the react.
to change the sign-in page url:
NextAuth({
    providers: [
        ...
    ],
    pages: {
        signIn: "/auth/signin" // you can write any path you want
    }
})
React
The previous functionalities described are responsible for handling the authentication flow related to the backend. In contrast, the following section explains how the frontend handles the authentication flow.
hashConnect
To connect to hashpack at any time, we must instantiate HashConnect and hold some of its properties as states. next-auth-hashpack requires 3 entries to interact with hashpack. the hashConnect instance, hedera network, hashConnect topic, hashConnect state, and the state holding the paired or to-be-paired user's account id.
💡 Notice that another prerequisite is to have next-auth session context set up.
💡 Import HashConnect instance from this path:
import { HashConnect } from "hashconnect/dist/esm/hashconnect";
useHashpackAuthentication hook
returns authenticate function & error state. when authenticate function is called it initiate the hashpack authentication flow, for example by clicking on a button.
useHashpackAuthentication(
    hashConnect, // the hashConnect instance
    network
    hashConnectTopic, // hashConnect's connection topic state
    pairedAccountId, // paired or to be paired account id state
    singInOptions, // Optional - next-auth sign-in options
    authInitializerApiRoute ,// Optional the route that initialize the authentication, as mentioned above the default path is `pages/api/auth/hashpack.ts`
    onSuccess // a callback to run when the authentication succeeded
)
💡 use this hook when you want to completely create a new UI for the sign-in options, otherwise next-auth-hashpack provides enough customizable components to satisfy every need.
HashpackButton component
default next-auth-hashpack initializer button. it accepts all the useHashpackAuthentication inputs as props and also several props for the styling purposes.
import { HashpackButton } from "next-auth-hashpack/dist/react";

<HashpackButton
    hashConnect={hashConnect}
    network={network}
    hashConnectTopic={hashConnectTopic}
    hashConnectState={hashConnectState}
    pairedAccountId={pairedAccountId}
    signInOptions={signInOptions}
    authInitializerApiRoute={authInitializerApiRoute}
    onStart={() => {console.log("authentication starts")}}
    onSuccess={(accountId) => {console.log("successfully signed in")}}
    onError={(error) => {console.log(error)}}
    id="whatever" // this and the two following can be used for customizing styles
    styles="whatever"
    className="whatever"
    />
the content of the button also can be replace.
import { HashpackButton } from "next-auth-hashpack/dist/react";
 <HashpackButton
    hashConnect={hashConnect}
    network={network}
    hashConnectTopic={hashConnectTopic}
    hashConnectState={hashConnectState}
    pairedAccountId={pairedAccountId}
    signInOptions={signInOptions}
    authInitializerApiRoute={authInitializerApiRoute}
    id="whatever" // this and the two following can be used for customizing styles
    styles="whatever"
    className="whatever"
> Custom sign in content </HashpackButton>
if you want to handle the authentication error (showing below the button) yourself, give the button an onError callback, it receives the error as its input.
import { HashpackButton } from "next-auth-hashpack/dist/react";
 <HashpackButton
    ...
    onError={(error: string) => console.log(error)}
    ...
> Sign in </HashpackButton>
💡 If you need to use this button to show it alongside other providers in your custom way, you need it get the providers from next-auth manually and construct them, otherwise just use
ProvidersCard.
ProvidersCard component
shows the hashpack button alongside the other providers for sign-in. good for the case which sign-in through several providers is available. e.g: hashpack and google or ...
import { ProvidersCard } from "next-auth-hashpack/dist/react";

<ProvidersCard
    hashConnect={hashConnect}
    network={network}
    hashConnectTopic={hashConnectTopic}
    hashConnectState={hashConnectState}
    pairedAccountId={pairedAccountId}
    signInOptions={signInOptions}
    authInitializerApiRoute={authInitializerApiRoute} />
💡 other providers button have the css class
next-auth-provider-button, use it to customize their style.
ProvidersCard component
use this component when you just want a boilerplate default sign-in page.
import { SignInSection } from "next-auth-hashpack/dist/react";

<SignInSection
    hashConnect={hashConnect!}
    network={network}
    hashConnectTopic={hashConnectTopic}
    hashConnectState={hashConnectState}
    pairedAccountId={pairingData?.accountIds[0]!}
    signInOptions={signInOptions}
    authInitializerApiRoute={authInitializerApiRoute}/>
some notes about configurations
changing user structure
by default next-auth user object just have id, name, email and image properties, which among them a string id is mandatory. but if there is case of extending this object, do as follow:
...
    callbacks: {
        async jwt({ token, user, account, profile, isNewUser }: any) {
            if (user?.accountId) {
                // add what ever properties you want to the token
                token.accountId = user?.accountId;
            }
            return Promise.resolve(token);
        },
        async session({ session, token, user }: any) {
            if (token?.accountId) {
                // add the token properties to the session
                session.user.accountId = token?.accountId;
            }
            return Promise.resolve(session)
        }
    },
...
This way, the session in the front-end contains the user properties you want
Do not forget the jwt secret
set environment variable NEXTAUTH_SECRET or do it in the [...nextauth].ts:
...
    jwt: {
        secret: "a strong phrase"
    }
...2 years ago
3 years ago
3 years ago
3 years ago
3 years ago
3 years ago
3 years ago
3 years ago
3 years ago
3 years ago
3 years ago
3 years ago
3 years ago
3 years ago
3 years ago
3 years ago
3 years ago
3 years ago
3 years ago
3 years ago
3 years ago
3 years ago
3 years ago
3 years ago
3 years ago
3 years ago
3 years ago
3 years ago
3 years ago
3 years ago
3 years ago
3 years ago
3 years ago
3 years ago
3 years ago
3 years ago
3 years ago
3 years ago
3 years ago
3 years ago
3 years ago