ngvforlib v0.0.9
Virtualization of ngFor — Welcome to the pure ngFor replacement — ngVFor !
We love the Angular framework at Alpha Chi Technology. It’s a fantastic framework that really does expose most of what we need. We have been using it since version 1 to produce some of the most complex, deep systems around. BIG systems. But — this is a big caveat — creating these large applications with lots of large data comes with a number of technical challenges.
Let’s look at the challenge of showing a list that contains hundreds of thousands of items. One of the most common ways to approach it is to use an infinite scroll directive, loading the data on demand as you near the end. That works well in simple situations but has its obvious limitations: repeated scrolling down to find something, complex sorts that preclude this approach. You may find your nice application come crawling to a stop, maybe even becoming totally unresponsive.
The reason for this is the ngFor directive. This directive exists pretty well everywhere. Even in some sort of scrolling container, it loads every entry into the DOM. So, if you have hundreds of thousands of items, you are going to have hundreds of thousands of DOM objects for every entry. Argh — slow down ahead.
The correct way to solve it is to use a virtualization container, so only the items actually showing on the screen (the viewport) are rendered into the DOM. This means no matter how much data you throw at your list, the only effect is that your scroll handles get smaller.
There are a couple of virtualization containers for Angular out there. We know, my team has tried or used most of them at one time or another (Rinto Joses’ is the best one — our container measure used this as its starting point, and it contains a good explanation of how a viewport works. It’s a great read to understand basic virtualization). But, even the new virtualization container in Angular CDK experimental 6.2 has a number of critical limitations. Namely:
· They don’t support changes nicely. Either they re-render the whole viewport or they don’t support changes to the collection at all. Basically, every one we have found creates a buffer array by slicing out the items in viewport, and then have a ngFor on that buffer. That means new data occurring inside the viewport doesn’t get updated.
· They don’t perform well with variable sized elements, if they support it all (and we are not talking about just the elements that have been already rendered).
· They all need some sort of container to work. You can’t just do a global replace on ngFor then add the containers as you need them.
Our team created a new directive that doesn’t have any of those limitations. Welcome to ngVFor!
You can find the npm here, and the github with the source, here.
Let’s start with a simple example using the existing ngFor directive, then expand it to use the new ngVFor. Once we have done that, look towards the end of the article for an explanation of how it all works.
We will create an example that highlights the problem we want to solve: a contained area with scrollbars and an ngFor over 100,000 items of data.
Let’s look at the sample, in our case we did ng new projectName and then added the data to the app.component.ts, the container style to the app.component.css, and the container and ngFor into the app.component.html
So, they look like:
app.component.ts
import { Component } from '@angular/core';

@Component({
  selector: 'app-root',
  templateUrl: './app.component.html',
  styleUrls: ['./app.component.css']
})
export class AppComponent {
  title = 'lib-tester';

  testData = new Array<string>();

  constructor() {
    for (let loop = 0; loop < 100000; loop++) {
      this.testData.push('Testing ' + loop);
    }
  }
}
app.component.css
.data-list-container {
    height: 100%;
    flex:1;
    overflow-y: auto;
    position: relative;
}
app.component.html
<div style="text-align:center">
  <h1>
    Welcome to {{ title }}!
  </h1>
</div>
<div style='height: 600px; width: 400px'
     class='data-list-container'>
  <div class='data-list-items-container'
       *ngFor='let row of testData'>
    <body>{{row}}</body>
  </div>
</div>
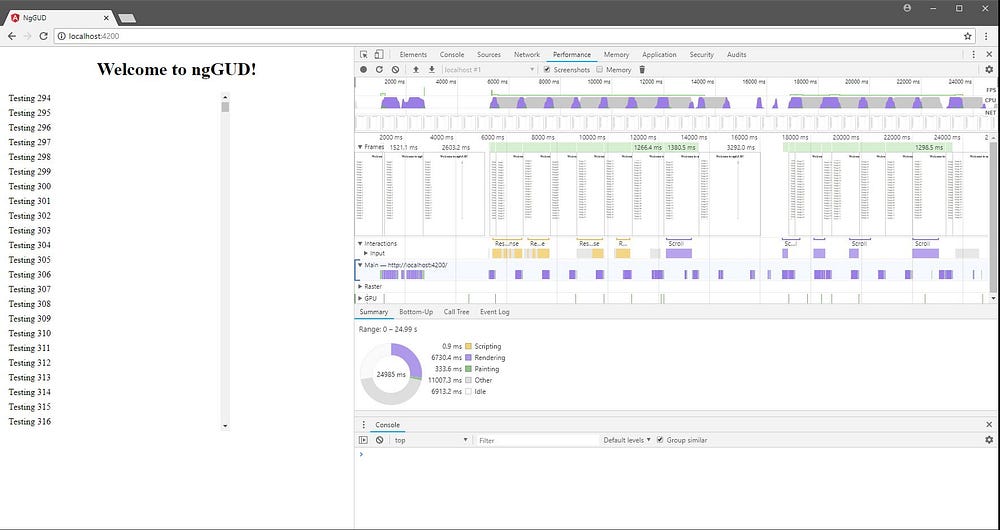
Now let’s run it. Use the scroll bar to (try to) scroll down to the 300th item. As you can see, the performance is horrid. I nearly gave up waiting for it to even render at all in Microsoft Edge, although once it does eventually load, the scroll performance is better than Chrome.
Here is the performance profile on Chrome. Basically, it locks up the process for about five seconds per jump on the scrollbar. Yup, that’s a framerate of 1/5 FPS — one fifth of a frame per second.
 Figure 1 - Using just ngFor Chrone output with 100,000 items
Adding in ngVFor
Time for some improvements. First we need the npm package with the virtual ngVFor implementation.
npm install ngvforlibAnd then import and add to the imports section the NgGUDCoreModule into
app.module.ts something like this
import { BrowserModule } from '@angular/platform-browser';
import { NgModule } from '@angular/core';
import { AppComponent } from './app.component';
import { NgGUDCoreModule } from 'ng-vfor-lib';

@NgModule({
  declarations: [
    AppComponent
  ],
  imports: [
    BrowserModule,
    NgGUDCoreModule
  ],
  providers: [],
  bootstrap: [AppComponent]
})
export class AppModule { }
Note: Why the name ? The non github version of NgGUDCoreModule contains a lot of other unique development that we didn’t include in the free-to-use version : virtual trees and paginated data sources that support client-side edits just to name a couple, plus a host of super-fast enterprise controls to produce large scale systems. Ping us if you need them or want to use our services.
NgGUD -> Angular Grown Up Data.
Now its time to introduce the ngVFor directive. It should be noted that
ngVForis 100% compatible with ngFor, so we can simply do a global replace
of ‘ngFor’ with ‘ngVFor’ in all the HTML if we want to.
In our case, the app.component.html ends up as:
<div style="text-align:center">
  <h1>
    Welcome to {{ title }}!
  </h1>
</div>
<div style='height: 600px; width: 400px'
     class='data-list-container'>
  <div class='data-list-items-container'
    <div style='width: 100%'
         *ngVFor='let row of testData'>
      <body>{{row}}</body>
    </div>
  </div>
</div>
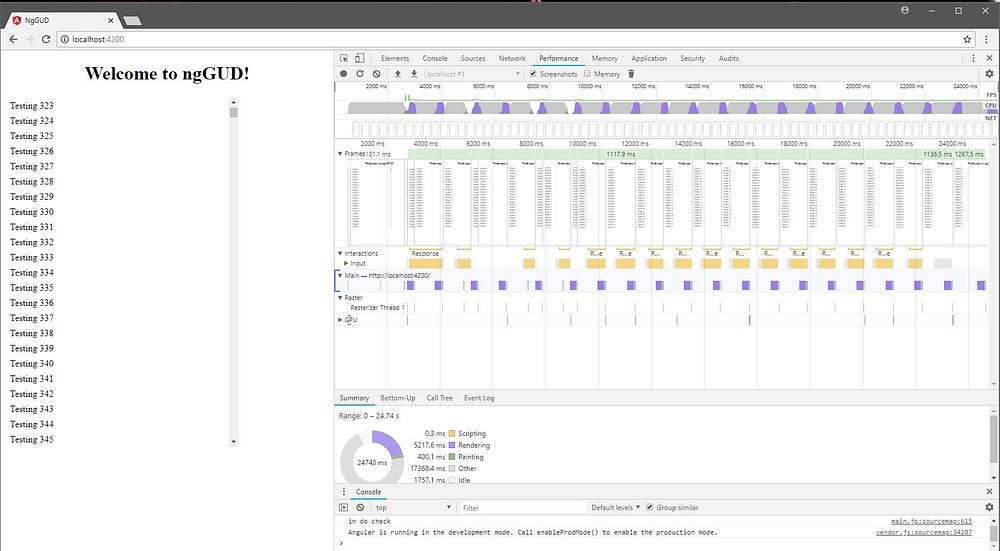
Now let’s debug it again. When you run it this time you will notice little difference, maybe the scroll jumps move a tad faster, maybe 1/3 FPS, but the scroll into the 300’s is still terrible.
Note: If you get a lot of adds/deletes in your data source, the ngVFor will actually perform considerably faster as it reuses the templates rather than recreating them each time.
The Chrome performance stats show this:
 Figure 2 - Just changing the ngFor to an ngVFor
Adding a Virtualization container
Now let’s add a virtualization scroll container. This will speed things up a
lot. In our case the container is a component nggud-items-control this manages
the scroll and measuring of the viewport — which is then supplied down to the
ngVFordirective to manage the visible viewport.
In this case its as simple as bracing the ngVFor in the app.component.html
<div style="text-align:center">
  <h1>
    Welcome to {{ title }}!
  </h1>
</div>

<div style='height: 600px; width: 400px'>
  <nggud-items-control>
    <div style='width: 100%'
         *ngVFor='let row of testData'>
      <body>{{row}}</body>
    </div>
  </nggud-items-control>
</div>
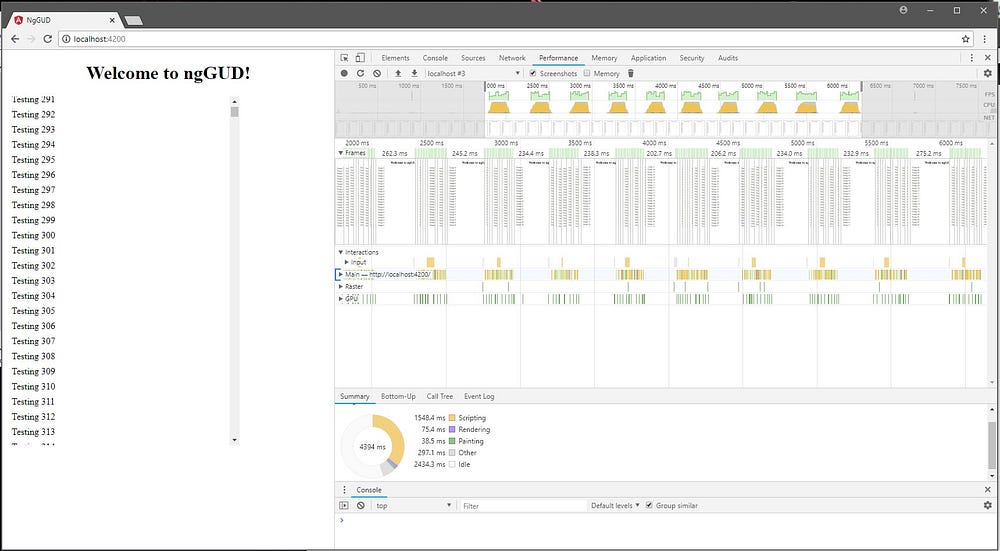
Run it again, you will notice a couple of things: 1) It loads way faster, 2) The scrolling is way faster. The performance stats confirm this: the rendering has gone from 6700ms and 1/5 frame per second to 75ms and about 50 frames per second — basically a 90 times speed improvement:
 Figure 3 - ngVFor and container running on Chrome
The one and only limitation of the nggud-items-controlis that the container
must be expanded to it’s target size, rather than be allowed to either expand
automatically, or just have a maxheight for example.
nggud-items-control @Inputs
The container control has a couple of useful inputs that allow configuration.
scrollTop: This is the current top position of the viewport. If you want to support navigation away from a view, and when you return to it, the scroll position is retained, then you will want to bind this.scrollbarWidth: Override when you have a overridden scrollbar visual implementation.scrollbarHeight: Override when you have a overridden scrollbar visual implementation.customSize: Function that allows you to deal with custom size elements. This is going to be covered in the next part of the article.
Ok, that’s it on how to use it, now lets move on to how it works.
Coming soon — part 2