ngx-favicon v4.1.0
NgxFaviconDemo

Setup
Install the library into your project:
npm i ngx-faviconPut your favicon(s) somewhere into your project (/src for example) and don't forget to add them into angular.json file:
{
  ...
  "projects": {
    "[YOUR PROJECT NAME]": {
      ...
      "architect": {
        ...
        "build": {
          ...
          "options": {
            ...
            "assets": [
              "src/favicon.ico",
+             "src/favicon-success.ico",
+             "src/favicon-error.ico",
              "src/assets"
            ],
          }
        }
      }
    }
  }
}
Create a new file called (for example) favicon.config.ts and put into it the following code:
// enum all your different favicons
// (for type safety)
export enum CustomFavicon {
  FAVICON_SUCCESS = 'faviconSuccess',
  FAVICON_ERROR = 'faviconError',
}

export type AvailableCustomFavicons = { [key in CustomFavicon]: string };

// -------------------------------------------------------------
// @warning do not forget to add your favicons to your bundle
// you should double check into angular.json file
// -------------------------------------------------------------
// map all the types of favicon to their href
export const customFavicons: AvailableCustomFavicons = {
  // for some reason, impossible to use the syntax
  // [CustomFavicon.FAVICON_SUCCESS]: 'favicon-success.ico',
  // otherwise we end up with an AOT ERROR
  faviconSuccess: 'favicon-success.ico',
  faviconError: 'favicon-error.ico',
};
Open index.html file and add an ID to the link tag defining the favicon:
<!DOCTYPE html>
<html lang="en">
  <head>
    <meta charset="utf-8" />
    <title>NgxFaviconDemo</title>
    <base href="/" />

    <meta name="viewport" content="width=device-width, initial-scale=1" />
-    <link rel="icon" type="image/x-icon" href="favicon.ico" />
+    <link id="favicon" rel="icon" type="image/x-icon" href="favicon.ico" />
  </head>
  <body>
    <app-root></app-root>
  </body>
</html>
Import the NgxFaviconModule with forRoot method and define your own config once only:
+ import { NgxFaviconModule } from 'ngx-favicon';
+ import { customFavicons, AvailableCustomFavicons } from './favicon.config';

@NgModule({
  ...
  imports: [
    ...
+   NgxFaviconModule.forRoot<AvailableCustomFavicons>({
+     faviconElementId: 'favicon',
+     defaultUrl: 'favicon.ico',
+     custom: customFavicons,
+   }),
  ],
  providers: [],
  bootstrap: [AppComponent],
})
export class AppModule {}
How to use it
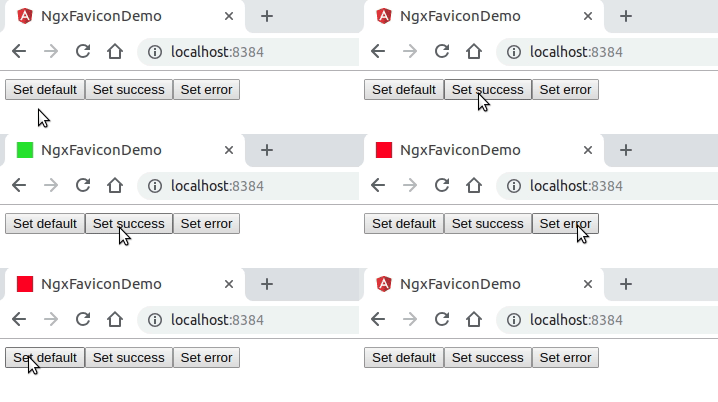
Once everything is setup, you can inject the NgxFaviconService and use either the setDefaultFavicon, setCustomFavicon or setFaviconByUrl methods.
Example from a component:
.ts file:
@Component({
  selector: 'app-root',
  templateUrl: './app.component.html',
  styleUrls: ['./app.component.scss'],
})
export class AppComponent {
+  public CustomFavicon: typeof CustomFavicon = CustomFavicon;

+  constructor(private ngxFaviconService: NgxFaviconService<CustomFavicon>) {}

+  public setDefaultFavicon(): void {
+    this.ngxFaviconService.setDefaultFavicon();
+  }

+  public setCustomFavicon(faviconName: CustomFavicon): void {
+    this.ngxFaviconService.setCustomFavicon(faviconName);
+  }

+  public setFaviconByUrl(faviconUrl: string): void {
+    this.ngxFaviconService.setFaviconByUrl(faviconUrl);
+  }
}
.html file:
+ <button (click)="setDefaultFavicon()" data-btn-default>Set default</button>
+ <button (click)="setCustomFavicon(CustomFavicon.FAVICON_SUCCESS)" data-btn-success>
+   Set success
+ </button>
+ <button (click)="setCustomFavicon(CustomFavicon.FAVICON_ERROR)" data-btn-error>
+   Set error
+ </button>
+ <button (click)="setFaviconByUrl('https://en.wikipedia.org/static/favicon/wikipedia.ico')" data-btn-url>
+   Set by URL
+ </button>
A complete example using the app is available in this repo, feel free to take a look into it (/src) and the source code of the library is located in /projects/ngx-favicon.
How to contribute
If you're willing to contribute to that project, feel free to do so.
- Fork the project
- Go into the repo and install dependencies by running
yarn - Create a branch ex:
git checkout -b /feat/my-featureorgit checkout -b /fix/my-fix - Make some changes
- Run
yarn run prettier:writeto make sure formatting is fine - Run
yarn run lib:build:prodto build the library - Run
yarn run demo:testto make sure all the tests are passing - Commit your changes using the Angular commit message conventions
- Open a pull request
Thanks!