node-red-contrib-generic-ble-arcom v3.1.21
node-red-contrib-generic-ble
A Node-RED node for providing access to generic BLE devices via GATT.
Supported operations are as follows:
- Read
- Write
- Write without Response
- Notify
How to use
How to configure a new BLE peripheral
At first, drag either a generic ble in node or a generic ble out node to the workspace from the node palette and double-click the node. And you can find the following dialog. Here, click the pencil icon (1) to add a new BLE peripheral or edit the existing one.
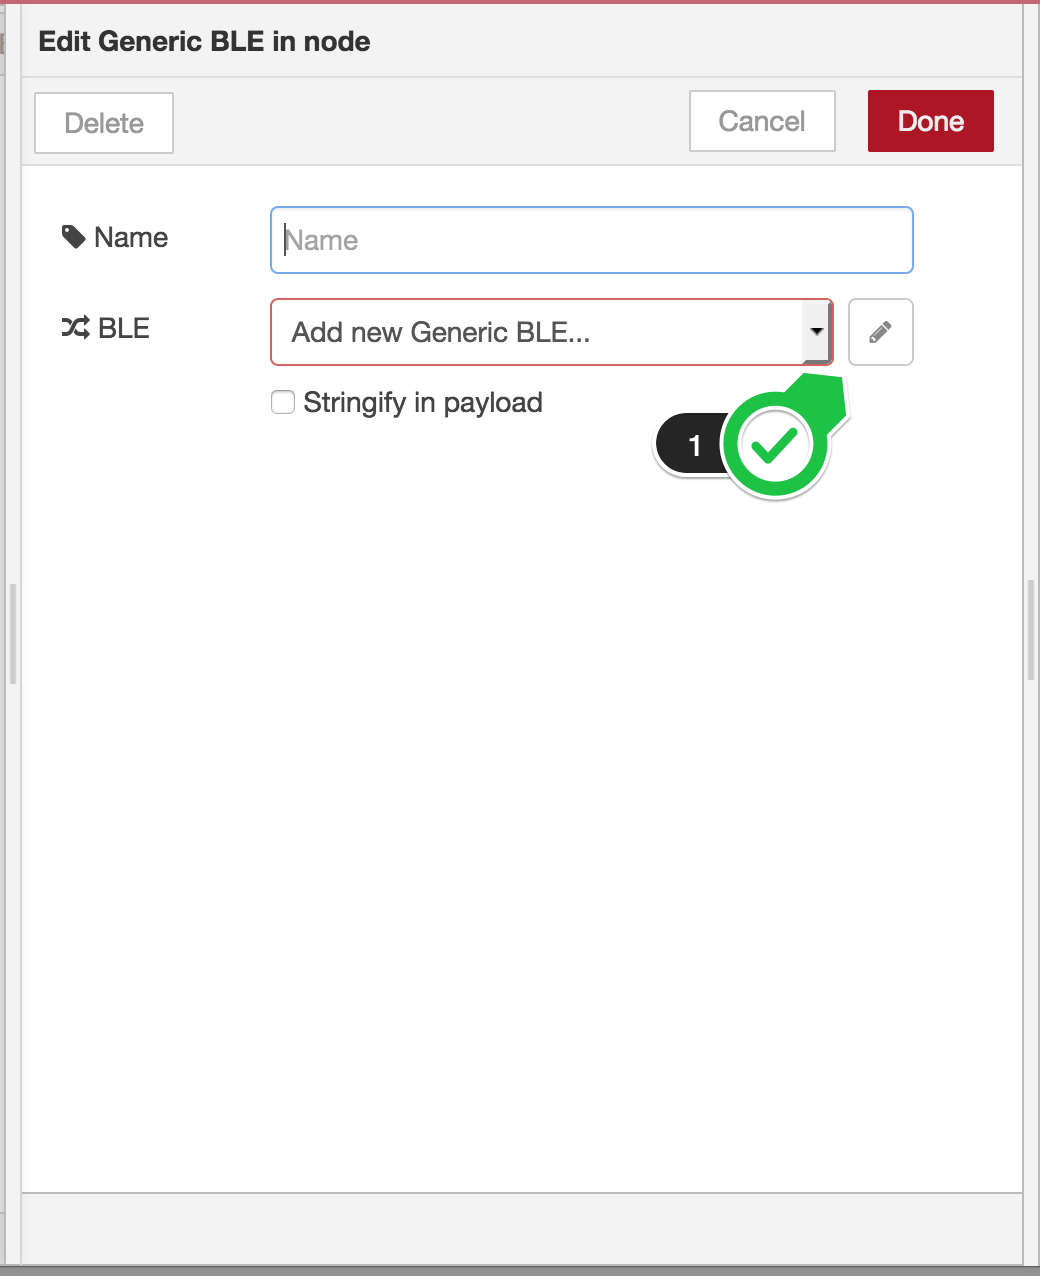
Then the new config node dialog appears like this.
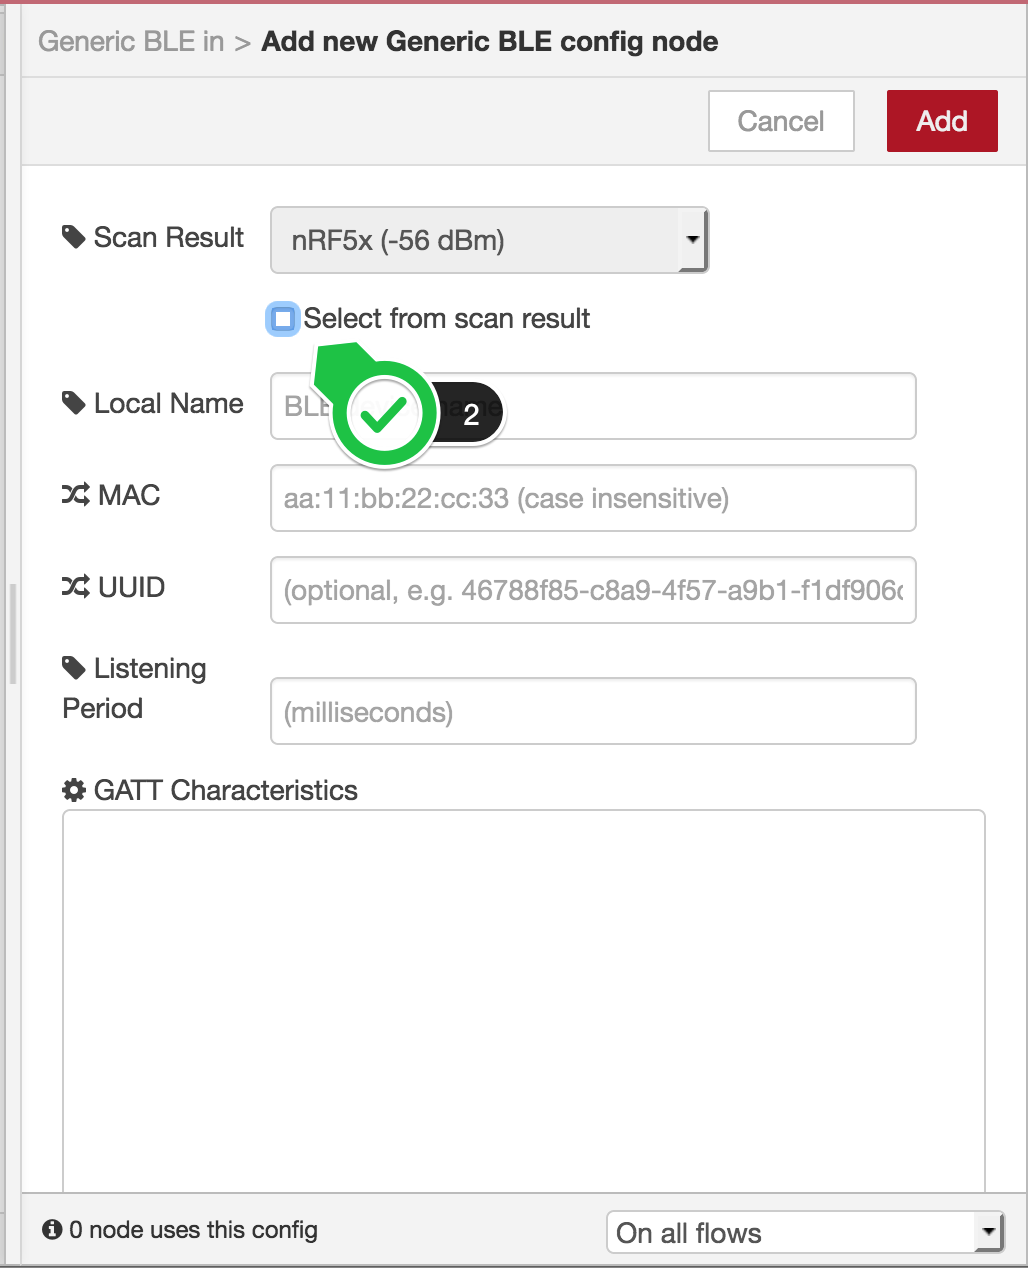
The Scan Result shows the scanned BLE peripherals. It can be empty when no peripherals are found.
In order for the dialog to list your device, turn BLE on prior to open the dialog. Close the dialog then re-open it if you'd like to get the latest scan result.
By default, you have to enter either MAC address or UUID manually to configure your BLE peripheral. However, by checking Select from scan result(2), you can choose the peripheral if it exists in the scan result.
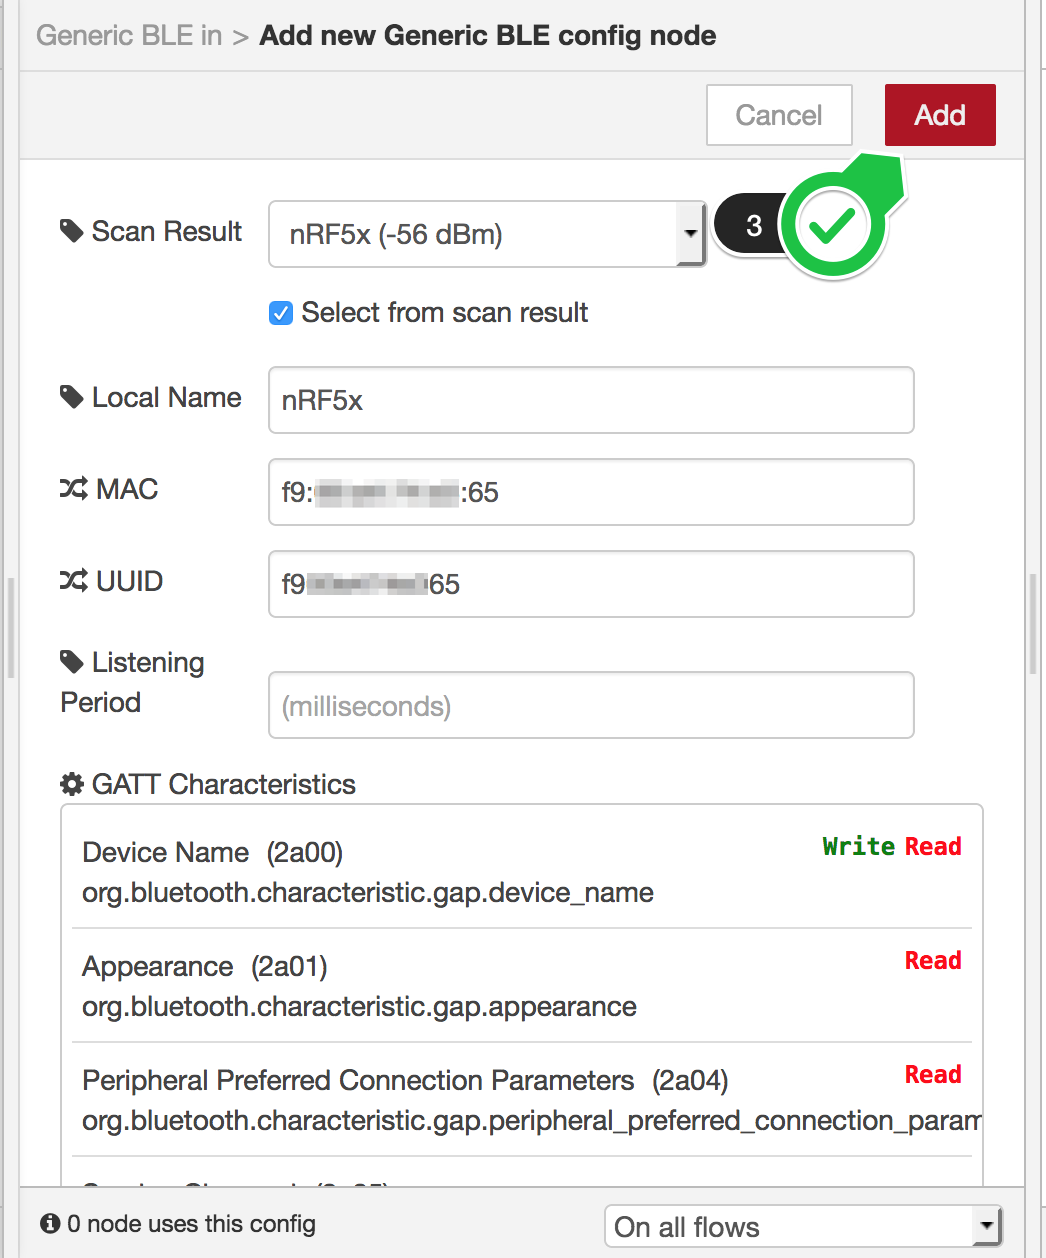
When you choose the peripheral, GATT Characteristics shows all characteristics discovered in it, and Local Name, MAC and UUID are automatically resolved as well.
If you cannot find your peripheral in the Scan Result, you can reload the result by closing this dialog and re-opening it as described above.
Click Add (3) when the information on the dialog looks good.
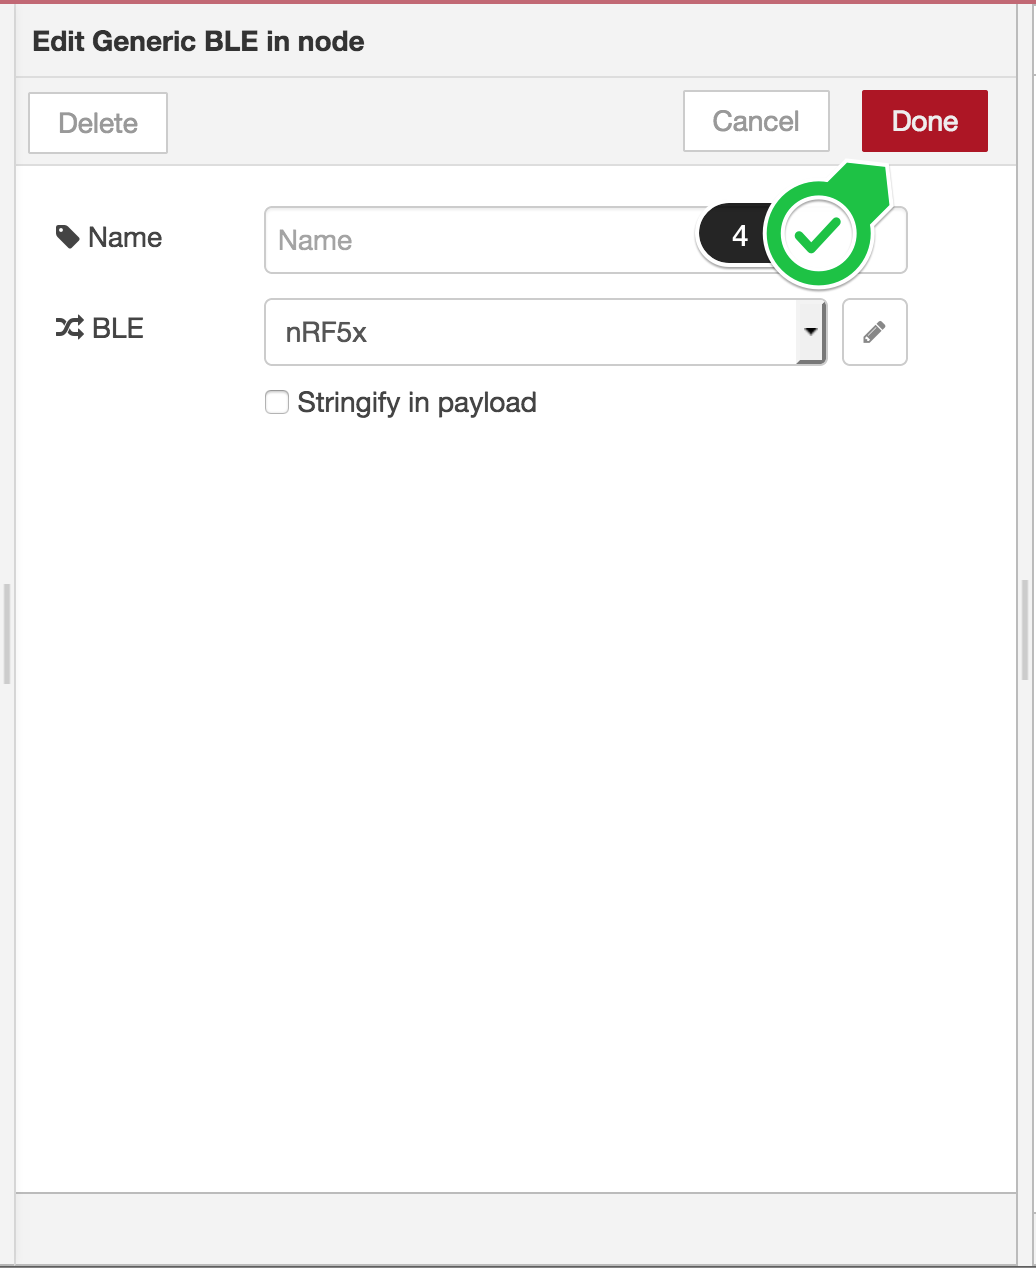
Click Done (4) to finish the ble in node settings.
How to translate gatttool command into flow
In this example, we show how to describe gatttool commands for characteristic value write and read with Generic BLE nodes.
Characteristics Value Write
The following simple command line just issues a characteristic write request to the handle 0x0027, which the BLE peripheral associates with the characteristic uuid f000aa02-0451-4000-b000-000000000000(uuids and handles can be listed by gatttool -b 88:99:00:00:FF:FF --characteristics command).
$ gatttool -b 88:99:00:00:FF:FF --char-write-req --handle=0x0027 --value=ca
Characteristic value was written successfully
In this tutorial, we translate the above command into Node-RED flow.
First of all, we use the following nodes.
injectnode to trigger a write requestGeneric BLE outnode to perform the write request
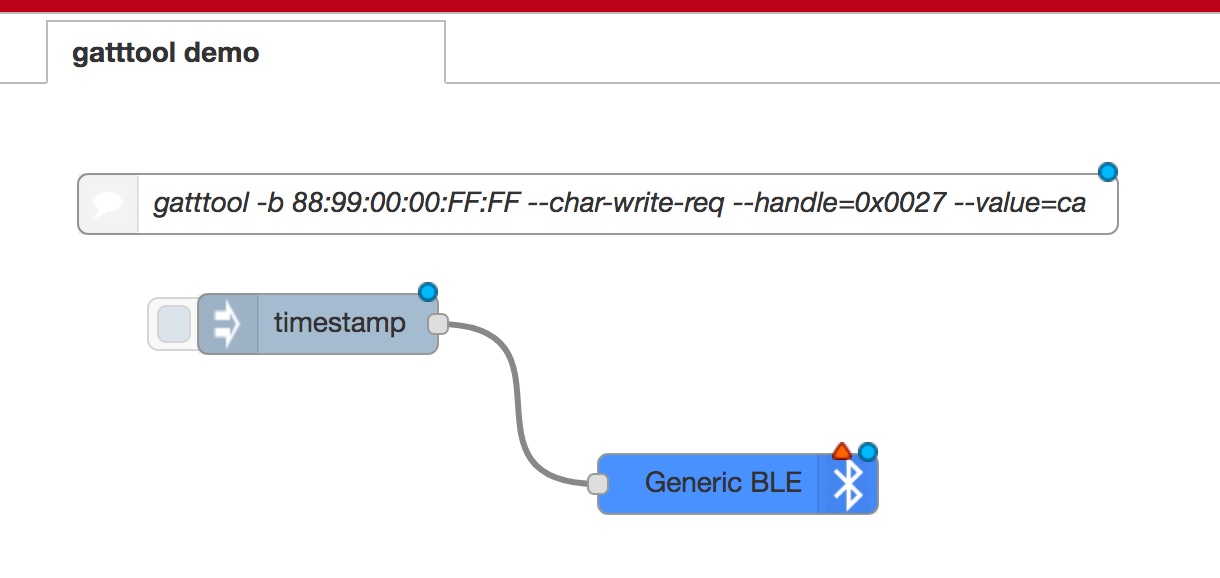
So the first step to create a flow is to place the above nodes on the workspace and connect them as shown above.
Next, open the inject dialog so that you can provide the write request parameters, the characteristic uuid and the value.
Important!) Unlike gatttool, Generic BLE nodes NEVER use handles. Always use uuids instead.
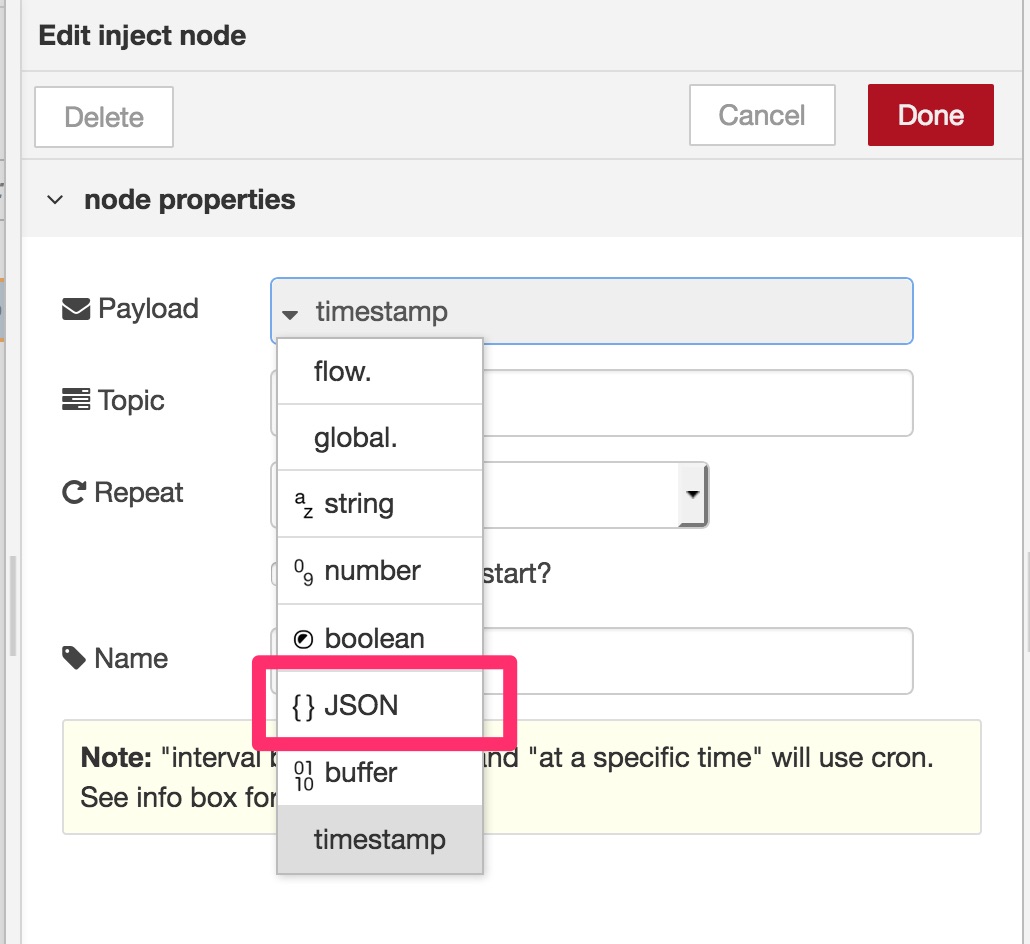
In this dialog, choose JSON at Payload input item since Generic BLE out node accepts a JSON object as its input value. See Inputs in the node description shown in the info tab for detail.
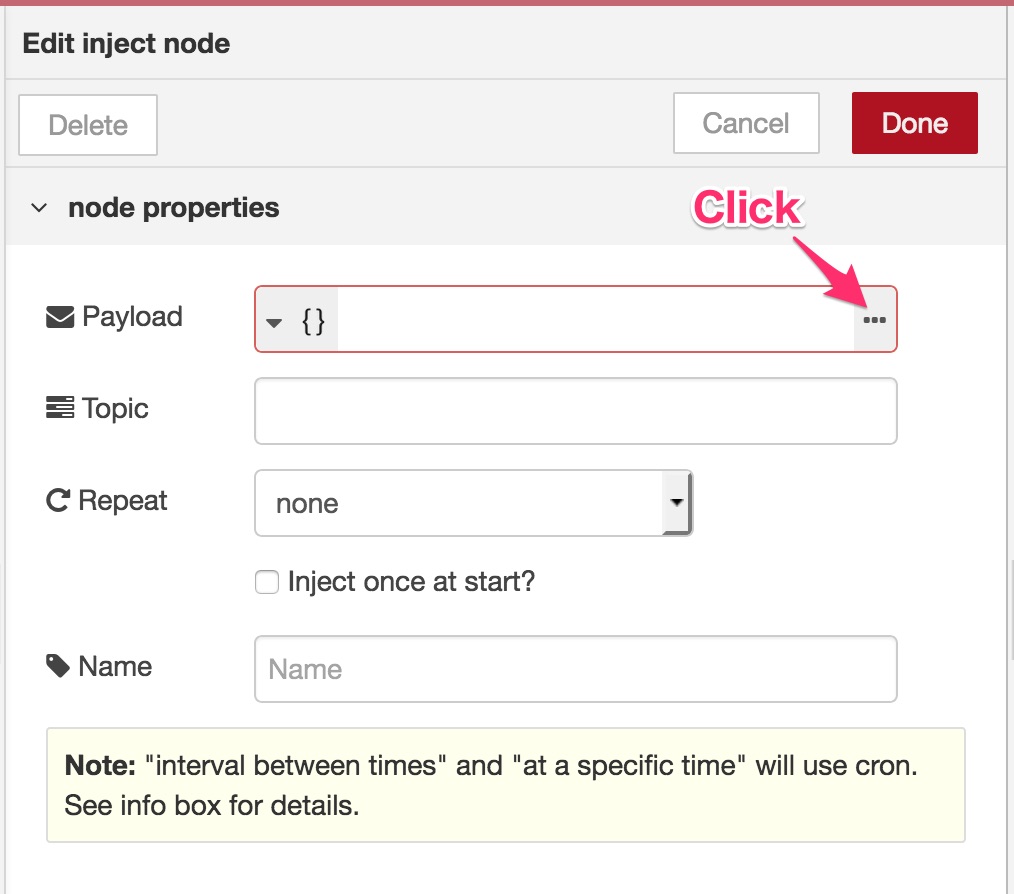
Click/tap ... to launch JSON value editor and populate the following JSON text.
{
    "f000aa0204514000b000000000000000": "ca"
}
The property f000aa0204514000b000000000000000 is a characteristic uuid. However, unlike gatttool, you must strip hyphens from the original uuid value. Generic BLE nodes doesn't accept gatttool style uuid format.
The value ca is a hex string to be written, which is identical to the above command line.
So you'll see the following image.
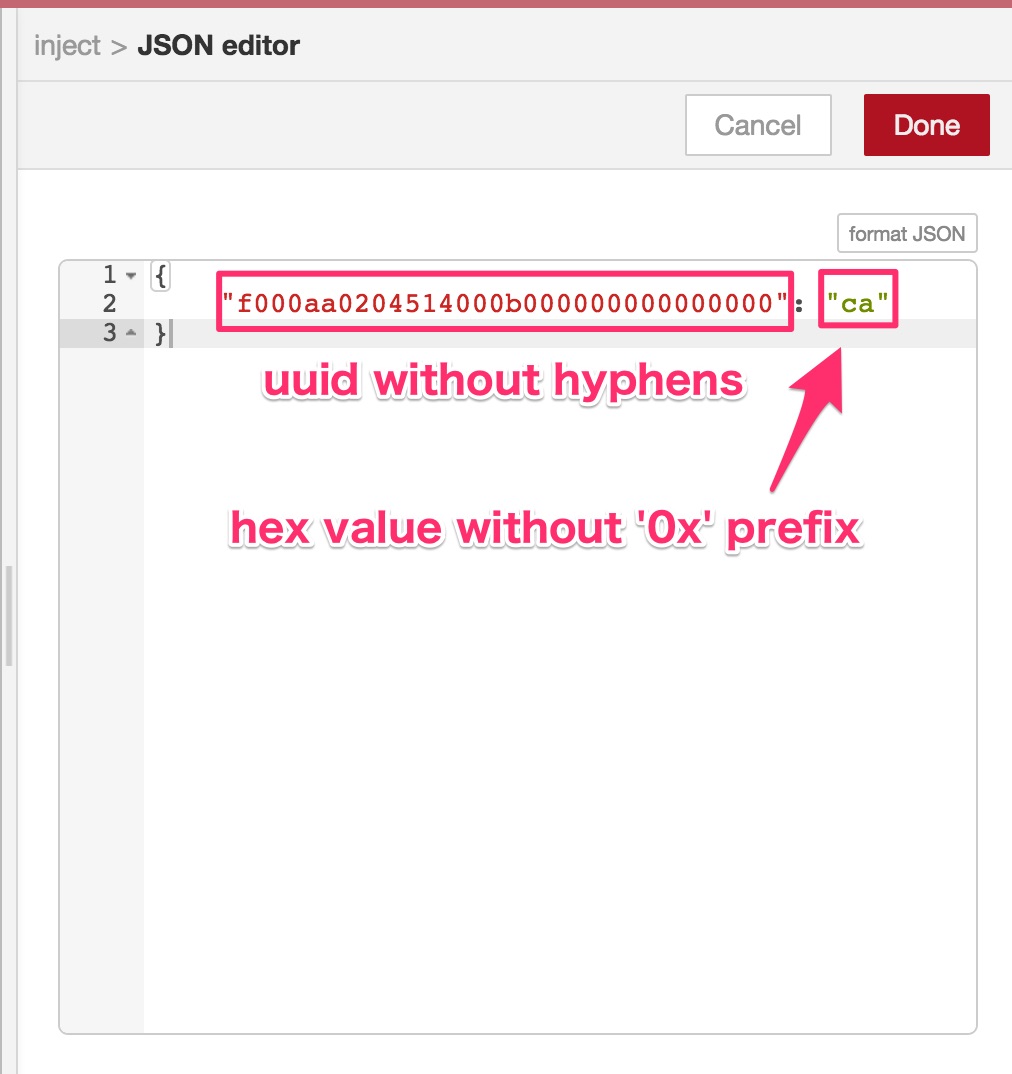
Close the dialog by clicking Done button after entering the JSON text.
Configure Generic BLE out node for your BLE peripheral (This step is already introduced above so we don't describe here. See How to configure a new BLE peripheral).
Now you're ready to issue a characteristic write request to your BLE peripheral. Click Deploy and click inject node to issue a characteristic write request.
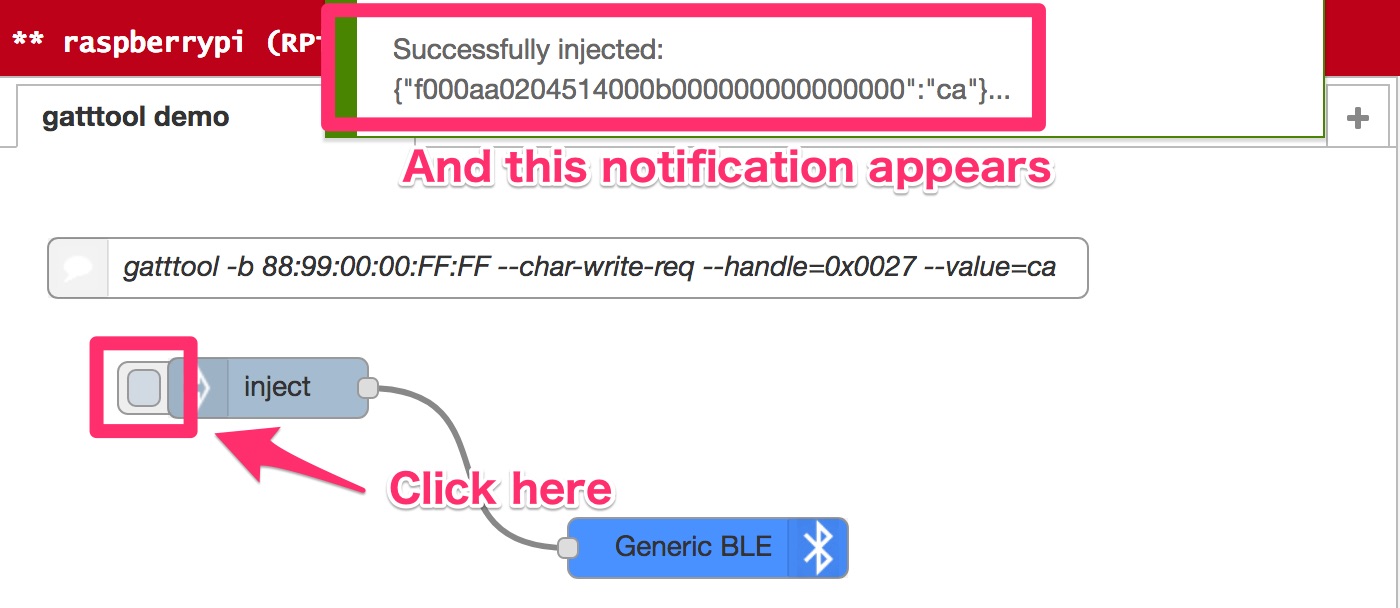
Node-RED shows the notification message after your write request is performed successfully.
Here in this tutorial, we use inject node to create characteristic write request parameters. However, this isn't the only way to do so. You can use other nodes than inject node. All you need is to prepare a valid JSON object for Generic BLE out node and provide it to the node.
In order to retrieve the written value from your BLE peripheral, go to the next step.
Characteristics Value Read
The both commands perform characteristic value read commands and return the same result, the characteristic value of the uuid f000aa02-0451-4000-b000-000000000000.
$ gatttool -b 88:99:00:00:FF:FF --char-read -u f000aa02-0451-4000-b000-000000000000
handle: 0x0027 	 value: ca

$ gatttool -b 88:99:00:00:FF:FF --char-read --handle=0x0027
Characteristic value/descriptor: ca
In this tutorial, we translate the above commands into Node-RED flow.
We use the following nodes this time.
injectnode to trigger a read commandGeneric BLE innode to perform the read commanddebugnode to show the read value
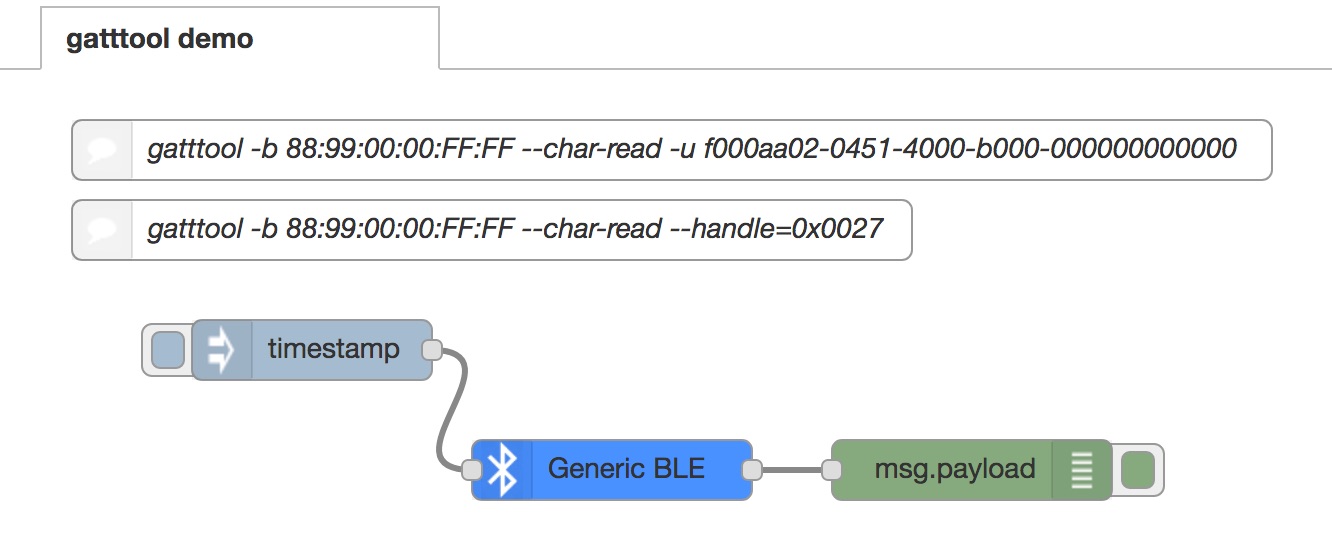
Put the above nodes onto your workspace and add connectors like above.
Open inject node dialog and enter the characteristic uuid at Topic input box. Leave default values other than Topic since Generic BLE in sees only the topic value.
You can also leave Topic empty when you want to retrieve all characteristics values.
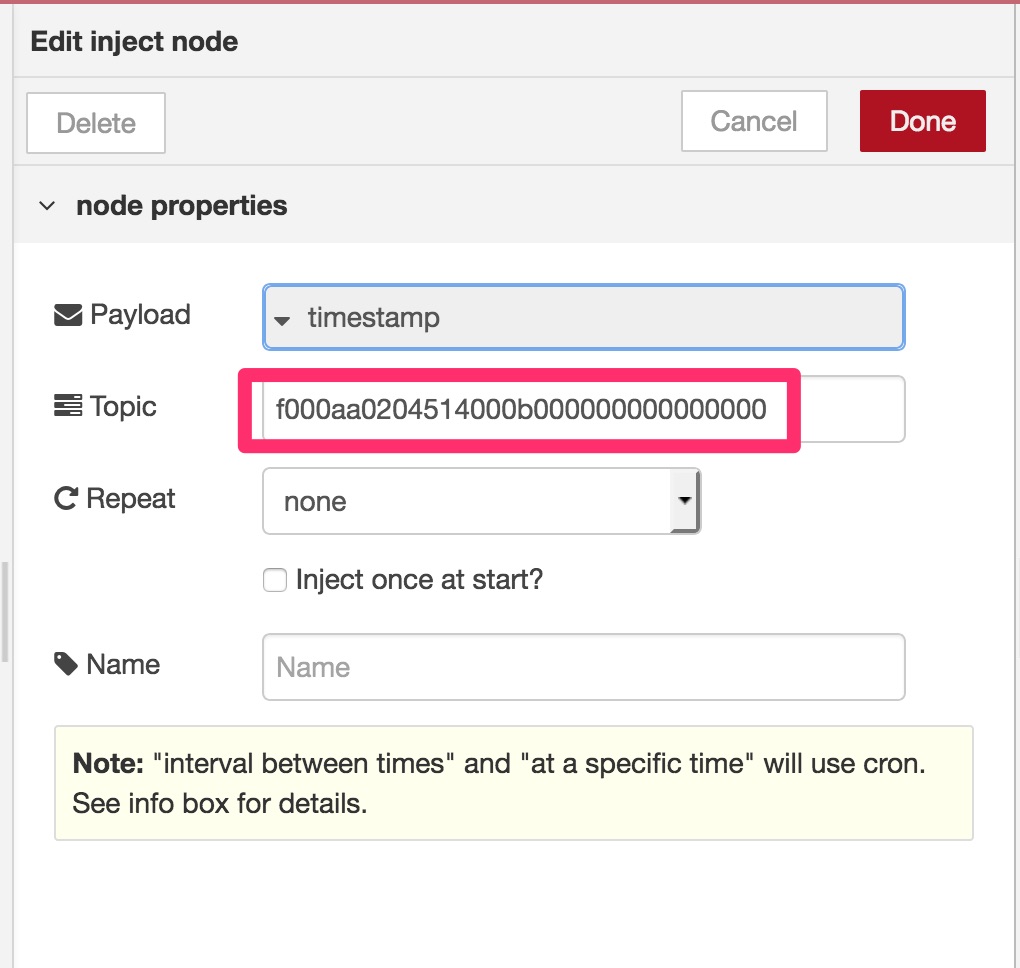
Click Done after entering the uuid to close the dialog. You need to configure Generic BLE in node to use your BLE peripheral but we skip to mention here as the instruction is described above (See How to configure a new BLE peripheral for detail).
Click Deploy to function the flow.

Let's read the characteristic value by clicking inject node pedal. The read result will be displayed on the debug tab.
BLE in and out nodes
See info tab for detail on the editor UI.
Example Flow
You can import the example flow on Node-RED UI. You need to change Generic BLE config node named nRF5x or add a new config node for your device.
How to install
This will take approx. 3 minutes on Raspberry Pi 3.
Node-RED users
Run the following commands:
cd ~/.node-red
npm install node-red-contrib-generic-ble
Then restart Node-RED process.
CANDY RED users
Run the following commands:
cd $(npm -g root)/candy-red
sudo npm install --unsafe-perm node-red-contrib-generic-ble
Then restart candy-red service.
sudo systemctl restart candy-redAppendix
How to build
# build
$ NODE_ENV=development npm run build
# package
$ NODE_ENV=development npm pack
HCI Dump Debugging (Raspbian/Ubuntu/Debian)
sudo apt-get update
sudo apt-get install bluez-hcidump
then
sudo hcidump -t -xEnabling trace log
Set GENERIC_BLE_TRACE=true on starting Node-RED and you can find the precise log in /var/log/syslog.
Revision History
3.1.0
- Support Node.js v10.x LTS (Fix #14 and #17)
3.0.0
- Refactor entire architecture
- Peripheral connections are retained until it disconnects
- Characteristic subscriptions are retained while the ongoing flows are running (will be unsubscribed on stopping them though)
- The max number of concurrent BLE connections is 5 or 6 according to this document
2.0.4
- Fix an issue where this node don't work with noble@1.9.x
2.0.3
- Fix an issue where noble looses a reference to a peripheral after it is disconnected
2.0.2
- Fix an issue where Write operation cannot be performed properly (#4)
2.0.1
- Fix an issue where
Select from scan resultfailed to list characteristics
- Fix an issue where
2.0.0
- Add
Poll Notify Eventsmessage support so that Generic BLE out node can start to subscribe the given characteristic events - Support characteristic query by one or more uuids
- Add
Mute Notify EventstoGeneric BLEconfig node for this node to avoid unnecessary device connection for event subscription - Replace
RED.logfunctions with node logging functions as possible to offer precise logging control via UI - Add
Operation TimeouttoGeneric BLEconfig node to set the waiting time for Read/Write/Notify response per characteristic rather than per device GENERIC_BLE_OPERATION_WAIT_MSis introduced for defaultOperation Timeoutvalue- Remove
Listening PeriodfromGeneric BLEconfig node GENERIC_BLE_NOTIFY_WAIT_MSis removed
- Add
1.0.2
- Improve README
- Add an example flow file available from the editor UI
1.0.1
- Fix an issue where custom characteristics cannot be listed on the Generic BLE config node dialog
1.0.0
- Fix an issue where some devices cannot be discovered within a specific time window even after they can be connected
- Fix an issue where the Scan Result select widget didn't show the same item as the stored device info
- Update Scan Result option list whenever Local Name is resolved
- Improve stability by fixing minor bugs
0.1.0
- Initial Release (alpha)
node-redkeyword is not yet added
6 years ago
6 years ago
6 years ago
6 years ago
6 years ago
6 years ago
6 years ago
6 years ago
6 years ago
6 years ago
6 years ago
6 years ago
6 years ago
6 years ago
6 years ago
6 years ago
6 years ago
6 years ago
6 years ago
6 years ago
6 years ago