react-native-otp-receiver v1.5.5
React Native OTP Receiver
- React Native OTP Receiver
Introduction
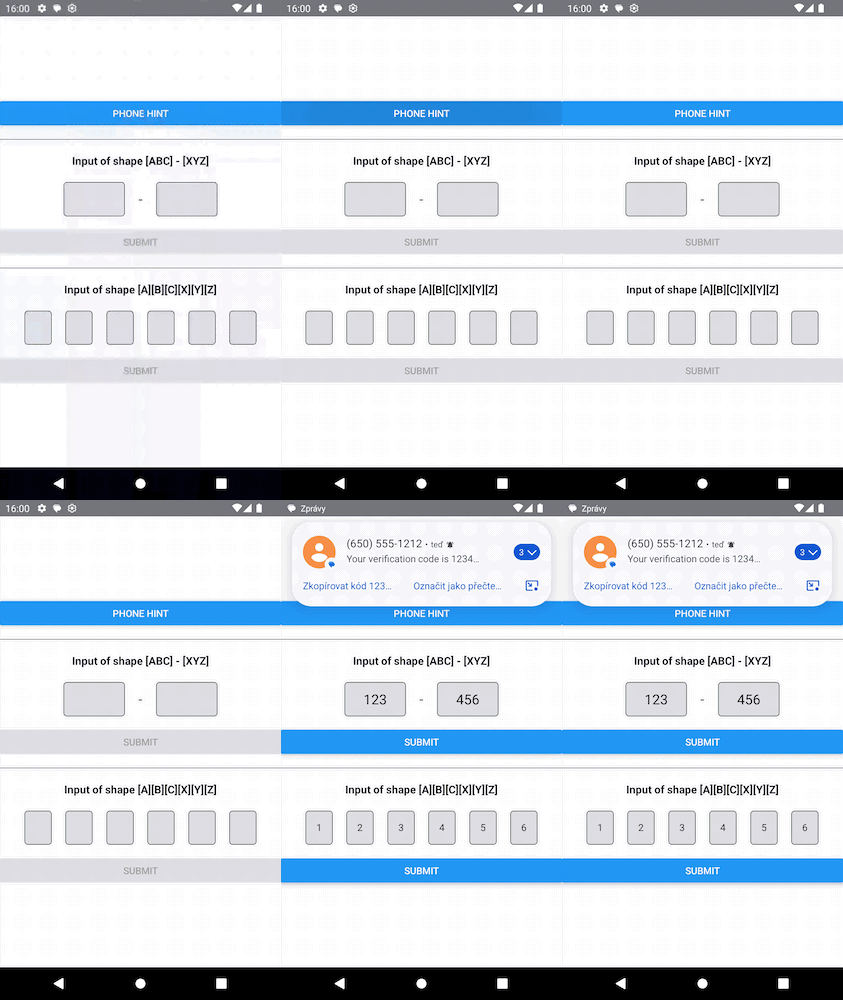
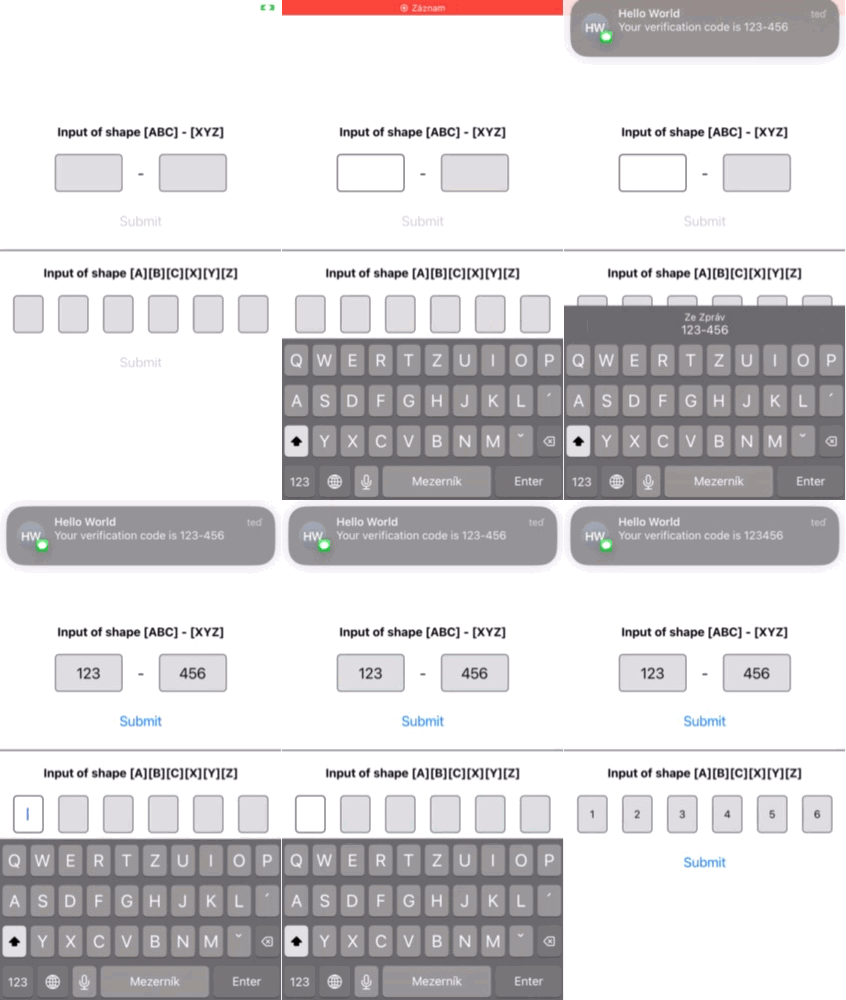
This package handles receiving and filling OTP from SMS message. While automatically filling the input from incoming SMS is only available for Android, we handle user pressing the autofill button on iOS keyboard.
!IMPORTANT
For everything to work correctly, you must send SMS in correct format and setup associated domains for iOS
| Android | iOS |
|---|---|
 |  |
Supported Versions
This libs is currently available only for the new arch.
Installation
yarn add @pavelgric/react-native-otp-receiverUsage
We offer various ways of integration, what could be call low-level and high-level.
In low-level, you can use methods exported for Android to capture incoming SMS and handle iOS your own way
In high-level you use one of the prepared components (you are still responsible for rendering the UI) to easily access and render the OTP. This also has iOS integration ready.
low-level usage (Android only)
This works in two steps. You register a listener for incoming SMS and then call a method that you are expecting a SMS.
onSMSReceived
A listener for incoming SMS.
import { onSMSReceived } from 'react-native-otp-receiver';

useEffect(() => {
  const listener = onSMSReceived((sms: SMSData) => {
    // handle the oncoming sms
  });
  return () => {
    listener.remove();
  };
}, []);
the listener receives SMSData with:
{
  message?: string;
  error?: string;
}
The error could be because of timeout, see expectSMSWithOTP
expectSMSWithOTP
After calling this function, you will get notified about incoming message via the onSMSReceived listener. SMS must be correctly formatted, otherwise you won't receive it from the onSMSReceived.
There is a time window to receive the message (around 5 mins) after calling expectSMSWithOTP, after this time window passes, onSMSReceived will receive "error": "TIMEOUT", after that no message will be captured and you may want to start expectSMSWithOTP again.
After calling expectSMSWithOTP, the onSMSReceived will capture only one message. If it's not the message you expected, call expectSMSWithOTP again (but for this to happen, user would have to receive SMS containing the app hash at end, it doesn't matter if user receives any other SMS).
import { expectSMSWithOTP } from 'react-native-otp-receiver';

const res = await expectSMSWithOTP()
// the res is boolean indicating whether the listener was started successfully
requestPhoneHint
Calling this function will display prompt for user to select his phone number.
import { requestPhoneHint } from 'react-native-otp-receiver';

const res = await requestPhoneHint()
// the res is a string containing the phoneNumber. This call may fail (e.g. user dismisses the prompt)
high-level usage
We try to assume as little as possible about what your code looks like and you should be able to configure following components to your needs.
With OTPProvider
Props
| Prop | Required | Type | Description | Default |
|---|---|---|---|---|
| codeInputShape | Yes | number[] | Shape for the code input. Number values in the array say how many characters are in each input cell.E.g. 1,1,1,1 is 4 cells with single char in each cell. 3, 3 are 3 chars in two cells | - |
| children | No | ReactNode | The UI to render | - |
| onCodeEntered | No | (data: OnCodeEnteredData) => void | Function called after user fills in the code in it's full length | - |
| onSubmitCode | No | (data: OnSubmitCodeData) => void; | Function called after user fills in the code in it's full length. In this callback you should do your code validation | - |
| onCodeChanges | No | (code: string) => void | Called whenever the code value changes | - |
| parseSMS | No | (sms: string) => string \| null \| undefined | (Android only) Function called when user receives the SMS and expects you to return the code extracted from it | - |
| expectSMSOnMount | No | boolean | Whether to automatically call expectSMSWithOTP. If not set to true, you must call expectSMSWithOTP manually | - |
| value | No | string | Use to set the code input value manually | - |
| parseEnteredCodeChar | No | (char: string) => string | Modify the entered char that user enters via keyboard. E.g. to capitalize it | - |
| parsePastedCode | No | (code: string, codeInputShape: number[]) => string[]; | When user pastes copied (or suggested) value, here you can parse the value into input cells. E.g. to parse ABC-XYZ into ['ABC', 'XYZ'] | Function that separates string into the input shape |
| validateCodeChar | No | CodeCharValidator | Each time the code changes, you can validate it. This code runs for each entered character. E.g. to only accept numbers | - |
| onSMSError | No | (error: string) => void | Called when onSMSReceived returns error | - |
Example:
import { View, Button } from 'react-native';
import { OTPInputCell, OTPProvider } from 'react-native-otp-receiver';
import { useOTPContext } from '../../src/components/OTPProvider';
import styles from './styles';

const getCodeFromSMS = (sms: string) => {
  // find 6 digit code
  return sms.match(/\d{6}/)?.[0] || '';
};

export default function OTPProviderExample() {
  return (
    <OTPProvider
      codeInputShape={[1,1,1,1]} // 4 cells, each holds single char
      onCodeEntered={(code) => { /*  */ }}
      onSubmitCode={(data) => { /*   */}}
      parseSMS={getCodeFromSMS}
    >
      <CodeInputRenderer />
    </OTPProvider>
  );
}

function CodeInputRenderer() {
  const { codeInputs, isCodeValid, submitCode } = useOTPContext();

  return (
    <>
      <View style={styles.otpContainer}>
        {codeInputs.map((index) => {
          return <CodeInputComponent key={index} index={index} />;
        })}
      </View>
      <Button title="Submit" disabled={!isCodeValid} onPress={submitCode} />
    </>
  );
}

function CodeInputComponent({ index }: { index: number }) {
  return <OTPInputCell index={index} />;
}
Full example in the example app
With OTPInputHandler
Wraps the OTPProvider, some may prefer this implementation over using the provider.
Props
Provider props and:
| Prop | Required | Type | Description |
|---|---|---|---|
| children | Yes | (props: RenderProps) => ReactNode | The UI to render |
| CodeInputCellComponent | Yes | (otpHandles: CodeInputCellComponentProps) => ReactElement | The UI component to render as an input cell |
import { View, Button, TouchableOpacity } from 'react-native';
import {
  OTPInputHandler,
  OTPInputCell,
  type CodeInputCellComponentProps,
} from 'react-native-otp-receiver';
import styles from './styles';

const getCodeFromSMS = (sms: string) => {
  return sms.match(/\d{6}/)?.[0] || '';
};

export default function OTPInputHandlerExample() {
  return (
    <OTPInputHandler
      codeInputShape={[1,1,1,1]}
      CodeInputCellComponent={CodeInputComponent}
      onCodeEntered={(code) => { /*  */ }}
      onSubmitCode={(code) => { /*  */}}
      parseSMS={getCodeFromSMS}
    >
      {({ renderOTPInput, submitCode, isValid }) => (
        <>
          <View style={styles.otpContainer}>{renderOTPInput()}</View>
          <Button title="Submit" disabled={!isValid} onPress={submitCode} />
        </>
      )}
    </OTPInputHandler>
  );
}

function CodeInputComponent(inputHandles: CodeInputCellComponentProps) {
  return <OTPInputCell {...inputHandles} />;
}
Full example in the example app
OTPInputCell
The cell that handles input of the code value. It's a wrapper around TextInput
Props
TextInput props and:
| Prop | Required | Type | Description |
|---|---|---|---|
| index | Yes | number | Index of the input cell |
hooks
useOTPInputCell
Returns handles to control TextInput component to capture key presses, text changes and others. Only useful if you do not use OTPInputCell component
useOTPInputCellState
Returns input cell state (like value, isFocused) and useful handles e.g. to focus input.
Generating app hash
You can get the app hash by running this command yarn react-native-otp-receiver get-app-hash. It will ask you for package name, path to your keystore file and the keystore password.
This means you will have two separate app hashes, one for debug and one for production key.
Message content
Android
SMS must include app-hash at the end of the message, otherwise you won't receive it from the onSMSReceived. Other than that, the message content may be anything. It is up to you to retrieve the code value from the message content, based on what you send.
Example:
Your verification code is 123456

GawQ12fcSiS
iOS
You must set up associated domains for your app and add it to the SMS content. Than the message content must by as they say in apple docs
You can present any information at the start of the SMS message, in any format. The last line of your message needs your DNS domain name, prefixed by an at sign (@), and the one-time code, prefixed by a hash symbol (#). Separate the two components using a space. For example:
After receiving this SMS, user will will see a suggestion above their keyboard to fill this code. If you use high-level usage, pressing this code will be captured and filled automatically.
Example:
Your Example code is 123456.


@example.com #123456
iOS shortcomings
iOS doesn't have API for neither reading received SMS messages, nor to get own phone number
Contributing
See the contributing guide to learn how to contribute to the repository and the development workflow.
License
MIT
Made with create-react-native-library