2.0.4 • Published 4 years ago
react-ref-form v2.0.4
项目名称
react-ref-form
点击试试demos
简介
所有组件都可配置式,且渲染效率提升,只会在自身和自身依赖项变化时重新渲染 自定义组件提供了丰富的表单功能
功能详情
1、快速构造的form表单
默认谁变化谁渲染,支持自定义组件和组件库通用组件(各个私有组件库)
const designInfo = [
    {label: '换热站设计流量1', key: 'stationDesignedG0', rules: [{pattern: /\w+/g, message: '请输入内容'}], required: true, component: Input, filter: e => e.target.value},
    {label: '换热站设计流量2', key: 'stationDesignedG1', rules: [{pattern: /\w+/g, message: '请输入内容'}], component: Input, filter: e => e.target.value},
    {label: '换热站设计流量3', key: 'stationDesignedG2', rules: [{pattern: /\w+/g, message: '请输入内容'}], component: Input, filter: e => e.target.value},
    {label: '换热站设计流量4', key: 'params', value: FiledsTable},
];

// tsx
<RefItem
    colCount={1}
    options={designInfo}
    form={form}
/>
2、添加渲染依赖项
使用后deps属性后,当依赖项变化时也会跟着重新渲染
const designInfo = [
    {label: '换热站设计流量1', key: 'stationDesignedG', rules: [{pattern: /\w+/g, message: '请输入内容'}], required: true, component: Input, filter: e => e.target.value},
    {label: '换热站设计流量2', key: 'stationDesignedG1', rules: [{pattern: /\w+/g, message: '请输入内容'}], component: Input, filter: e => e.target.value, deps: ['stationDesignedG']},
    {label: '换热站设计流量3', key: 'stationDesignedG2', rules: [{pattern: /\w+/g, message: '请输入内容'}], component: Input, filter: e => e.target.value, deps: DEPS.ALL},
    {label: '换热站设计流量4', key: 'params', value: FiledsTable},
];
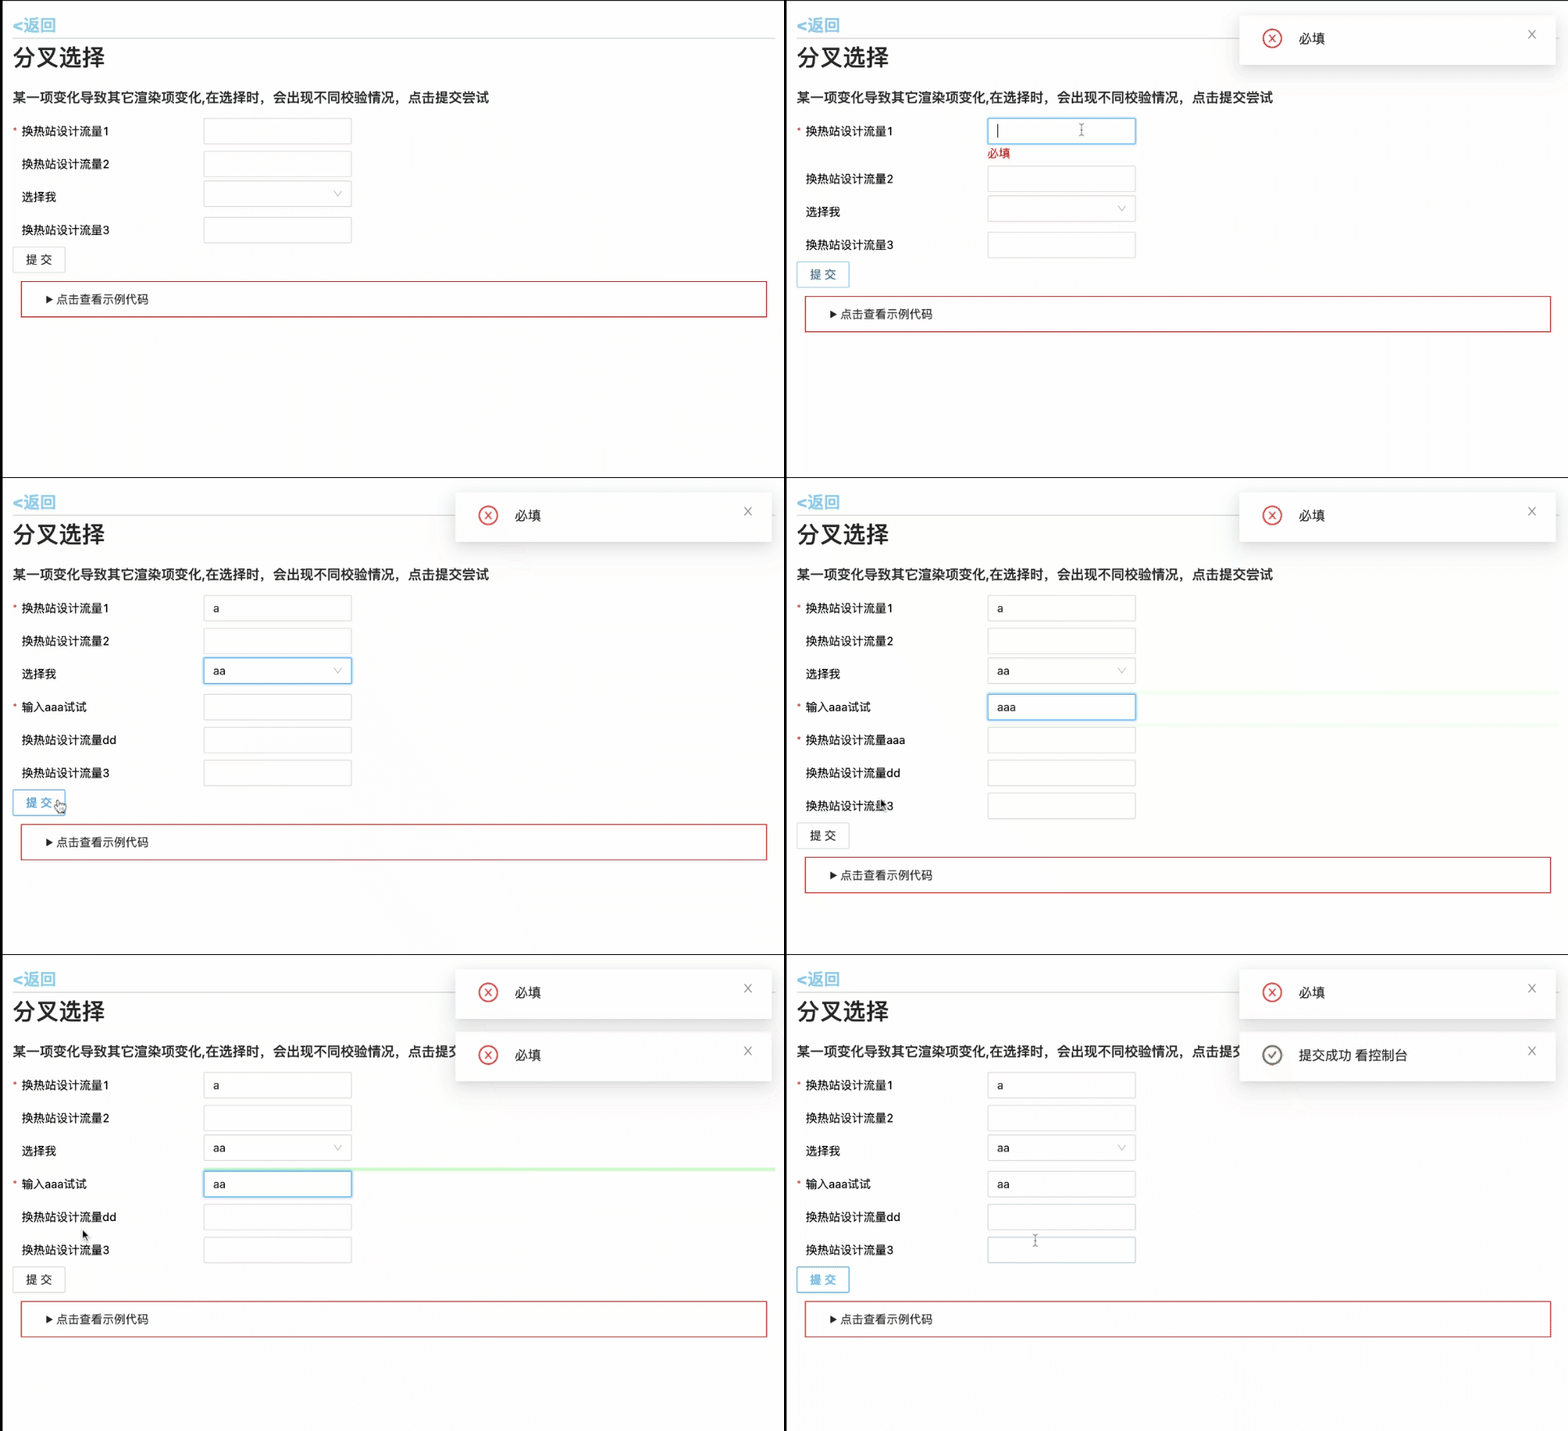
3、分叉渲染
很常见的场景是 当我选择某一表单项时,其他表单项会变化
const designInfo = [
    {
        label: '换热站设计流量1',
        key: 'stationDesignedG1',
        required: true,
        rules: [{required: true, message: '必填'}],
        value: Input
    },
    {
        label: '换热站设计流量2',
        key: 'stationDesignedG2',
        value: Input
    },
    {
        label: '选择我',
        key: 'stationDesignedG4',
        component: Select,
        options: [{label: 'aa', value: 'aa'}, {label: 'bb', value: 'bb'}],
        oneOf: {
            'aa': [{
                label: '输入aaa试试',
                key: 'stationDesignedGcc',
                className: '123',
                required: true,
                rules: [{required: true, message: '必填'}],
                value: Input,
                oneOf: {
                    'aaa': [{
                        label: '换热站设计流量aaa',
                        key: 'stationDesignedGaaa',
                        className: '123',
                        required: true,
                        rules: [{required: true, message: '必填'}],
                        value: Input,
                    }]
                }
            }, {
                label: '换热站设计流量dd',
                key: 'stationDesignedGdd',
                value: Input
            }],
            'bb': [{
                label: '换热站设计流量bb',
                key: 'stationDesignedGbb',
                value: Input
            }]
        }
    },
    {
        label: '换热站设计流量3',
        key: 'stationDesignedG3',
        value: Input
    },
];
更多请看 demos
快速上手
对于使用者只需知道四个东西
- form对象 - 来自于useForm
- options的配置 - 表单项的配置列表
- \ 的配置 - form渲染的标签 将form和options连接
- 自定义组件
大体样子
import {useForm} from 'react-ref-form';

export default () => {
    const form = useForm();

    const submit = () => {
        form.validateFields((err, value) => {
            if(err){
                console.log('err:', err);
            }else{
                console.log('value:', value);
            }
        })
    }
    return (
        <>
            <RefItem form={form} options={options} />
            <Button onClick={submit}>提交</Button>
        </>
    )
}
1、form 属性
form是一个ref钩子,里面包含了我们表单的所有数据、报错信息、校验函数、提交函数等。
1.1 创造
const form = useForm(); 一句话即可
1.2 内置属性 Form
| Property | Description | Type | Default |
|---|---|---|---|
| data | 表单数据 | Record<string, any> | {} |
| error | 表单错误 | Record<string, any> | {} |
| validateFields | 提交时校验函数 | ( func: (error: null | string[], value: Record<string, any>) => void, shouldValid?: ShouldValid) => void; | () => {} |
| setFormValue | 设置form表单值 | ( newData: Record<string, any> | ((e: Record<string, any>) => Record<string, any>)) => void; | () => {} |
| *validators | 校验函数集合【默认不使用】 | Record<string, Record<string, (value: any, shouldValid?: boolean) => null |string>>; | {} |
2、options 表单配置项
2.1 options表单API
| Property | Description | Type | Default | Required |
|---|---|---|---|---|
| label | 表单项标签值 | Form | - | ✓ |
| key | 表单项的key | string | - | ✓ |
| value | 渲染组件 - 配合自定义组件 | (props: CustomComponent) => ReactElement | ||
| component | 组件库组件 | ReactElement | any | ||
| deps | 依赖项(#3.2 deps依赖项) | string[] | DEPS | ||
| required | 是否必填 | boolean | ||
| rules | 校验规则 | RuleType[] | ||
| key: string | 组件所需props会被透传 | Record<string, any> |
2.2 deps依赖项
目的: 当A变 -> B变时,ref是无法监测数值变化的,因此使用dep项表示当前表单项依赖于其他哪些表单项
可以直接依赖表单项的key值、也可以写DEPS.All 表示依赖表单所有项
DEPS枚举 - All 所有枚举项
enum DEPS {
    ALL
}

// 例如
import {DEPS, OptionProps} from 'react-ref-form';

options: OptionProps = [
    {
        ...
        deps: ['name', 'age']
    },
    {
        ...
        deps: DEPS.All
    }
];
2.3 RuleType校验规则
用户可以自己使用regex配置校验规则
required校验规则默认优先级最高
interface RuleType {
    message: string;
    required?: boolean;
    pattern?: RegExp;
};

// 例如
import {OptionProps} from 'react-ref-form';

options: OptionProps = [
    {
        ...
        rules: [{required: true, message:'必填'}, {pattern: /^\d+$/, message:'只能输入整数'}]
    }
];
3、\
作为表单的入口,控制表单渲染样式和内容
- form(form表单数据) 和 options(表单项) 是渲染表单项必填的,其他都是样式方面的渲染,在此进行最终组合
| Property | Description | Type | Default | Required |
|---|---|---|---|---|
| form | 通过useForm生成的对象 | Form | - | ✓ |
| options | 通过配置表单项渲染列表 | OptionProps [] | - | ✓ |
| labelColSpan | label所占宽度份数 (0 ~ 24) | number | 3 | |
| withColon | label后是否要跟冒号 | boolean | true | |
| colCount | 一行几列 | number | 2 | |
| position | 单个表单项在固定空间中所处位置 | 'start'| 'center' | 'end' | 'start' | |
| contentDisplay | 内容表现形式<br> inline - 元素本身大小 block - 撑满剩余大小 | 'inline'| 'block' | 'inline' |
样式类具体可参考 demo
4、自定义组件
对于pm脑袋里的表单项千奇百怪,因此必定需要一个可以自定义组件的地方
4.1 组件配置&使用方法
对于自定义组件可以将其放在options.value
// 基础使用
import {CustomComponent} from 'react-ref-form';

const options = [
  {
    label: "换热站设计流量1",
    key: "stationDesignedG1",
    required: true,
    value: CustomInput
  }
];

const CustomInput = ({ value, onChange, error }: CustomComponent) => (
  <div style={{ display: "flex", flexDirection: "column" }}>
    <Shine key={Math.random()} />
    <Input onChange={(e) => onChange(e.target.value)} value={value} />
    <div style={{ color: "red" }}>{error}</div>
  </div>
);
4.2 CustomComponent
自定义组件提供丰富的props,供给使用
interface CustomComponent {
    [key: string]: any;
    // onChange函数
    onChange?: (
        // 可直接填入变化值也可以使用回调函数形式(基于之前的值变化函数)
        e: ((val: any) => any) | any,
        // 子项key,默认不写 修改当前项
        subKey?: string,
        options?: {
          // 校验前提函数(目的是为了)在满足某些情况下不校验。
          // 比如:若当电话号码没输入到11位时不校验,否则影响体验
          prevValidate?: (e?: string) => boolean;
          // atTop: 是否从form第一级寻找key
          // 比如: 当修改某一项时 不止需要修改当前项还要修改表单其他项的值。那么subKey无法找到,这时就可以通过配置atTop去从顶端寻找
          atTop?: boolean;
        }
    ) => void;
    // 表单赋值
    setFormValue?: (e: any | ((val: any) => any), key: string) => void;
    // 自定义校验函数
    validate?: (func: (val: string) => string | undefined, key?: string) => void;
    // 根据key获取错误信息、atTop: 是否从form第一级寻找key
    getError?: (subKey?: string, atTop?: boolean) => any;
    // 根据key获取value值、atTop: 是否从form第一级寻找key
    getValue?: (subKey?: string, atTop?: boolean) => any;
    // 当前表单项的key
    key?: string;
    //** rxjs的广播对象,理论上不会使用
    subject?: Subject<string>;
    // 当前表单值
    value?: any;
    // 当前错误值
    error?: any;
}1.1.5
4 years ago
2.0.3
4 years ago
2.0.2
4 years ago
2.0.4
4 years ago
2.0.1
4 years ago
2.0.0
4 years ago
1.1.4
4 years ago
1.1.3
4 years ago
1.1.2
4 years ago
1.1.1
4 years ago
1.1.0
4 years ago
1.0.9
4 years ago
1.0.8
4 years ago
1.0.7
4 years ago
1.0.6
4 years ago
1.0.5
4 years ago
1.0.4
4 years ago
1.0.3
4 years ago
1.0.2
4 years ago
1.0.1
4 years ago
1.0.0
4 years ago