README
The s7k-widgets-core package is crafted to empower developers in enhancing user experiences by allowing customization of information display.
This package is transitioning to using PrimeVue. Readme.md does not currently reflect this! Check: https://github.com/RunbookSolutions/GUI for implementation references.
Background
This package originated from the necessity to present a large volume of data within a project to users. Given the size and complexity of the available data, creating different pages solely for displaying data based on user preferences or roles was impractical. Instead, this package was developed with the objective of componentizing the data and enabling users to select what data to display based on their preferences and needs.
Recognizing the diverse nature of data within our application, we also acknowledged the importance of being vendor-friendly. This led to the decision not only to include widgets within the built application but also to allow end-users to introduce their own widgets.
Key Features
- User-Centric: Provide sensible defaults and default widgets, then empower the user to take control.
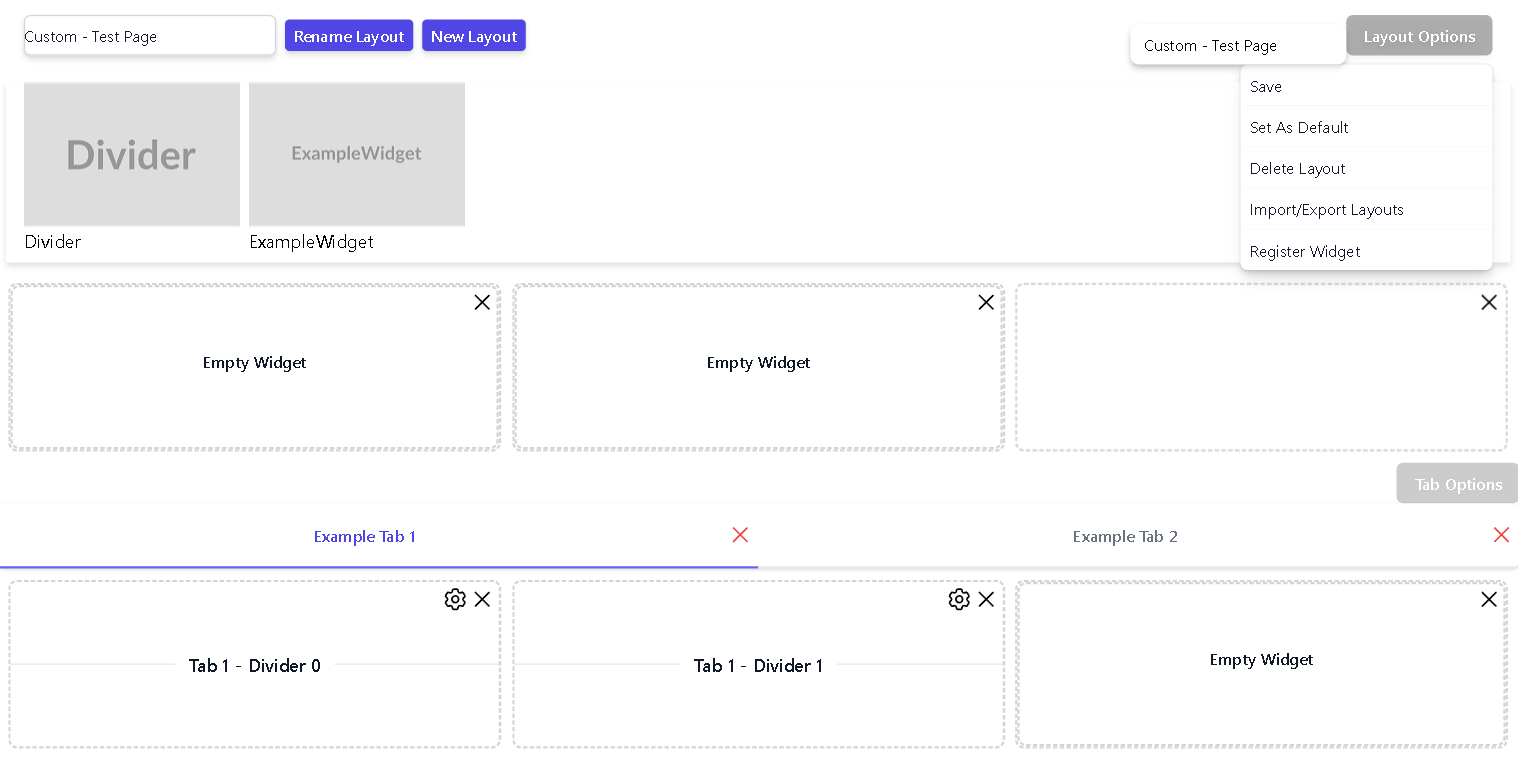
- Layouts: Why limit a page to a single look? Users can create multiple custom layouts in addition to the defaults provided.
- Widgets: Similar to "Blocks" for drag-and-drop website builders but with extensive functionality.
- Shareable Layouts: Users can import and export layouts to share with co-workers.
- User Supplied Widgets: In addition to widgets included in your application, users can import their own widgets.
Getting Started
Installation
npm install s7k-wigets-coreInitialization
Follow these instructions to initialize the package within your application.
Nuxt
Create a plugins/widgets.client.ts file within your application with the following content:
// Import Plugin and Plugin Options Type
import { type WidgetsPluginOptions } from "s7k-widgets-core";
import WidgetsPlugin from "s7k-widgets-core";
import "s7k-widgets-core/dist/widgets-core.css"

// Define the Plugin Options
const WidgetsPluginOptions: WidgetsPluginOptions = {
    widgets: [
        // Widgets Registered by the Application
    ]
};

// Define the Nuxt Plugin
export default defineNuxtPlugin((nuxtApp) => {
        // Register the Plugin in Nuxt
    nuxtApp.vueApp.use(WidgetsPlugin, WidgetsPluginOptions);
})
Vue3
// Default Vue Imports
import { createApp } from "vue";
import App from "./App.vue";

const app = createApp(App);

// Import the Widget Plugin and Options Type Definition
import { type WidgetsPluginOptions } from "s7k-widgets-core";
import WidgetsPlugin from "s7k-widgets-core";
import "s7k-widgets-core/dist/widgets-core.css"

// Define the Plugin Options
const WidgetsPluginOptions: WidgetsPluginOptions = {
    widgets: [
        // Widgets Registered by the Application
    ]
};

// Register the plugin with your defined options
app.use(WidgetsPlugin, WidgetsPluginOptions);

app.mount("#app");
Defining Widgets
To define widgets available in an application, register them in the options defined during the installation step.
Here's an example of using a widget created within your application or provided by another package.
// Type Reference
import type { AllTypes as T } from "s7k-widgets-core";

// Import your widgets
import WidgetDivider from "./components/widgets/divider.vue";

const dividerWidget = {
    // Name of the widget displayed to the user.
    name: "Divider",
    // A Unique ID to identify this widget
    id: "a6d8771b-2eef-4ae7-a61a-cd28a6ab4e3b",
    // The Imported Component / Widget
    as: WidgetDivider,
    // Default Settings/Props to pass to the widget
    defaultProps: {
        label: ""
    },
    // The image Thumbnail
    thumbnail: "https://placehold.co/600x400?text=MyCustomDivider",
    // Height of the widget
    height: 1,
    // Width of the widget
    width: 3,
    // List of pages this widget is available to (Regex based matching)
    pages: [
        // All Pages
        ".*",
    ],
} as T.ManagedWidget;

const WidgetsPluginOptions: WidgetsPluginOptions = {
    widgets: [
        // Your Defined Widgets
        dividerWidget
    ]
};
It is also possible to set
asto the string of a properly compiled widget in.umd.min.jsformat. This will create a script tag on the HTML body to load the widget Example:
{
    as: "https://gist.githack.com/.../TestWidget.umd.min.js",
    // as: "TestWidget.umd.min.js" // Local to the application's root
}
If going this route (same applies to user-imported plugins), It is recommended to include the base64 of the script. Not providing the base64 may cause the widget not to load instantly when the page is loaded.
{
    as: "TestWidget.umd.min.js",
    // Base64 of the Script
    b64: "BASE_64_OF_TestWidget.umd.min.js",
    // Base64 of the thumbnail
    thumbnail64: "BASE64_OF_THUMBNAIL_IMAGE"
}
Usage
Usage is simple.
<template>
    <!-- ... -->

    <!-- "page" should be a string that identifies this page from other pages. -->
    <!--        should be used to group widgets/layouts based on data being displayed.  -->
    <WidgetsPage
        page="atoms-in-the-universe"
        :default-layouts="layouts"
    />

    <!-- ... -->
</template>
<script setup lang="ts">
    // Import LayoutPage type
    import { LayoutPage } from "s7k-widgets-core";
    import { v4 as uuidv4 } from "uuid";
    // NOTE: This can be defined and imported from a seperate file.
    const layouts: LayoutPage[] = [
        // Define Default Layouts for this page
        {
            // ...
        }  as LayoutPage,
    ];
</script>
Defining Layouts
// Type Reference
import type { AllTypes as T } from "s7k-widgets-core";

const gridItem = {
    // The name of the widget - Does not need to match
    name: "Empty Widget",
    // The ID of the widget that was registered
    widgetID: "d287d3bc-94e9-4b6d-91ce-ef4bfced75ff",
    // Widget X position on the grid
    x: 0,
    // Widget Y position on the grid
    y: 0,
    // Widget Widgth
    w: 1,
    // Widget Height
    h: 1,
    // Unique ID of this particular widget
    i: uuidv4(),
    // Just cause?
    moved: false,
} as T.LayoutWidget;

const widgetTab = {
    // Unique ID of this particular tab
    id: uuidv4(),
    // The name of the tab
    name: "Tab"
    // The widget grid for this tab
    grid: {
        // ID of the Grid
        id: "0000-000-000-0000",
        // Items on the Grid
        items: [
            gridItem
        ]
    }
} as T.LayoutTab;

const myLayout = {
    // ID of the Layout
    id: "0000-000-000-0000",
    // Name of the layout - displayed to user as ('Default - ' + name)
    name: "Test Page",
    // Is this the 'default' layout provided by the application for this page
    default: false,
    // The widget Grid
    grid: {
        // ID of the Grid
        id: "0000-000-000-0000",
        // Items on the Grid
        items: [
            gridItem
        ]
    }
    // Does this layout have tabs?
    hasTabs: true,
    // The tabs for this layout
    tabs: [
        // Layout Tabs
    ],
} as T.LayoutPage;
Default Vite README
Recommended IDE Setup
VSCode + Volar (and disable Vetur) + TypeScript Vue Plugin (Volar).
Type Support for .vue Imports in TS
TypeScript cannot handle type information for .vue imports by default, so we replace the tsc CLI with vue-tsc for type checking. In editors, we need TypeScript Vue Plugin (Volar) to make the TypeScript language service aware of .vue types.
If the standalone TypeScript plugin doesn't feel fast enough to you, Volar has also implemented a Take Over Mode that is more performant. You can enable it by the following steps:
- Disable the built-in TypeScript Extension
- Run
Extensions: Show Built-in Extensionsfrom VSCode's command palette - Find
TypeScript and JavaScript Language Features, right click and selectDisable (Workspace)
- Run
- Reload the VSCode window by running
Developer: Reload Windowfrom the command palette.
Customize configuration
See Vite Configuration Reference.
Project Setup
npm installCompile and Hot-Reload for Development
npm run devType-Check, Compile and Minify for Production
npm run buildRun Unit Tests with Vitest
npm run test:unitLint with ESLint
npm run lint