simplewikijs v1.0.0
Demo
Click here to see the demo
Getting Started
Using git
Use the command
git clone https://github.com/melwinalm/simpleWikiJS.gitto create a copy of the repo on your local machine.Cd to the local directory, and run
npm installto install all the npm packages.Once the packages are downloaded, use
npm startto start the local server. You could also usenodemon startif you have nodemon installed on your local.Now open
localhost:3000in your browser.
Using npm
npm install simplewikijsto download the package.Once the packages are downloaded, use
npm startto start the local server. You could also usenodemon startif you have nodemon installed on your local.Now open
localhost:3000in your browser.
Customizing the site
Make changes to config.json and wiki.json files to suite your requirements.
Customizing config.json
This file defines the properties, templates and navigation information about the site.
Follow the following rules to edit config.json file.
- Main Settings

"main": {
        "title": "Simple Wiki JS Documentation",
    },
title - Title of the page. This will remain same in every page, even when you navigate to other pages.
- Navigation Settings


"navigation": {
        "title": "Simple Wiki JS",
        "items": [
            {"title": "HOME", "url": "/"},
            {"title": "NPM", "url": "https://npmjs.com/package/simplewikijs"},
            {"title": "ISSUES", "url": "https://github.com/melwinalm/simplewikijs/issues"},
            {"title": "GITHUB", "url": "https://github.com/melwinalm/simplewikijs"}
        ],
        "template": "navigation/navigation.ejs"
    },
title - Text to be displayed in the navigation bar.
items - This is an array of objects, each object containing information about navigation item.
template - Specifies the design template for navigation bar. Customize existing ones or create new ones in this folder - \templates\navigation\.
title - Text to be displayed for the navigation item.
url - URL of the navigation item.
- Wiki Settings
"wiki": {
        "template": "wiki/wiki.ejs",
        "defaultfolder": "pages"
},template- Specifies the design template for wiki navigation. Customize existing ones or create new ones in this folder - \templates\wiki\.
defaultfolder - Specifies the folder location where the content(MD) files are available.
- Content Settings
"content": {
        "template": "content/content.ejs"
    },
template - Specifies the design template for content part. Customize existing ones or create new ones in this folder - \templates\content\.
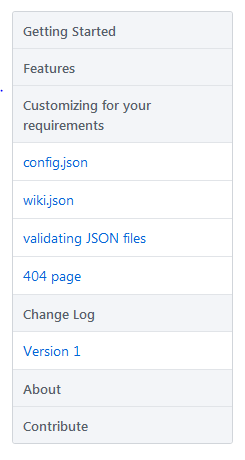
Customizing wiki.json
This file defines the left navigation of the page. See the below image.

Follow the following rules to edit wiki.json file.
{
    "homepageurl": "getting-started"
homepageurl - Specifies the default page url of the site. The value of this key should always be be part of items array in wiki.json file.
"items": [
        {
            "title": "Getting Started",
            "url": "getting-started",
            "filelocation": "getting-started.md",
            "subitems": [
                {
                    "title": "Installation",
                    "url": "installation",
                    "filelocation": "installation.md"
                },
items and subitems - Should be an array of objects. This defines the structure of wiki navigation present on the top-left of every page.
title - Title of display name of the page.
url - Any random string can be used here. This string will be used in the url bar on navigating to this item page. This url value is used in the homepageurl key discussed above.
filelocation - name of the markdown file, to be rendered on the page.
Validating JSON files
Once all the changes are done, run the command node validate.js to validate the config files, errors will be logged to the console. Fix the errors accordingly and re-run the command. Once all the errors are fixed go ahead and start the server.
Customizing 404 page
Navigate to templates folder location and modify the 404.ejs file to customize the 404 page. The 404 page is designed using EJS (Embedded JavaScript). Learn more about the EJS templating engine here.
Contribute
There are no set of rules to be followed. If you want to make a contribution, just go ahead and create a pull request here. If you find that there is an issue, or want to request for a new feature, create a new issue here. Always make sure that you provide proper information, screenhots etc. when contributing.
I will make sure to respond to the issues and pull requests as soon as possible.
Happy open sourcing!!!
7 years ago