![]()
TensorSpace.js
Present Tensor in Space
English | 中文
![]()
![]()
![]()
![]()
![]()

![]()
TensorSpace is a neural network 3D visualization framework built using TensorFlow.js, Three.js and Tween.js. TensorSpace provides Keras-like APIs to build deep learning layers, load pre-trained models, and generate a 3D visualization in the browser. From TensorSpace, it is intuitive to learn what the model structure is, how the model is trained and how the model predicts the results based on the intermediate information. After preprocessing the model, TensorSpace supports to visualize pre-trained model from TensorFlow, Keras and TensorFlow.js.
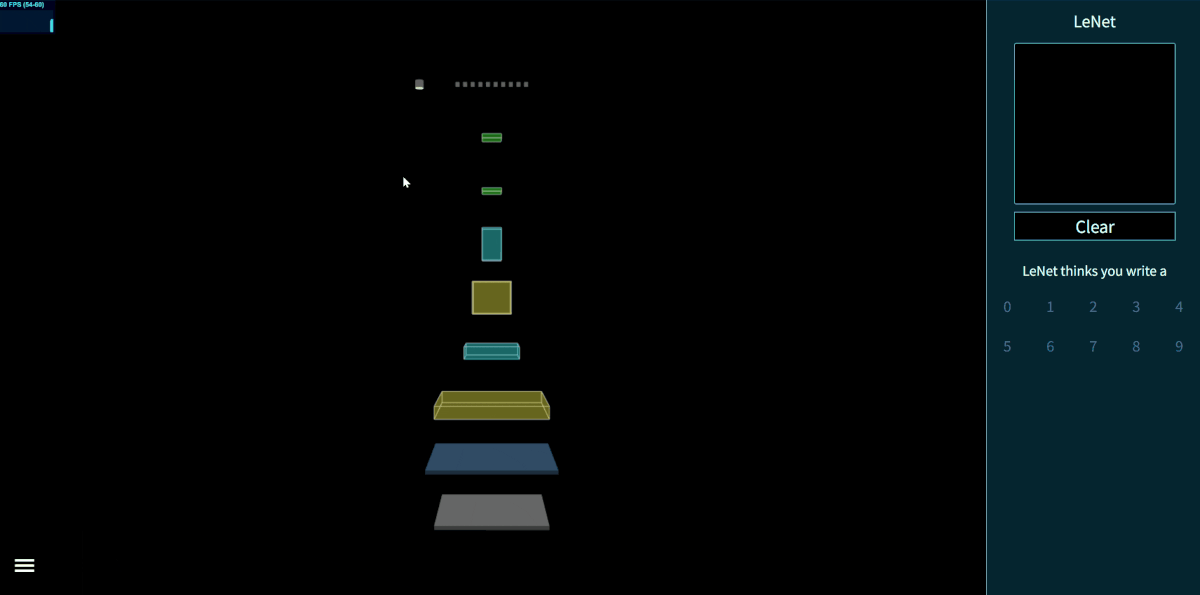
Fig. 1 - Interactive LeNet created by TensorSpace
Table of Content
- Motivation
- Getting Started
- Awesome TensorSpace
- Example
- Documentation
- Changelog
- Contributors
- Contact
- License
- Next Episode
Motivation
TensorSpace is a neural network 3D visualization framework designed for not only showing the basic model structure, but also presenting the processes of internal feature abstractions, intermediate data manipulations and final inference generations.
By applying TensorSpace API, it is more intuitive to visualize and understand any pre-trained models built by TensorFlow, Keras, TensorFlow.js, etc. TensorSpace introduces a way for front end developers to be involved in the deep learning ecosystem. As an open source library, TensorSpace team welcomes any further development on visualization applications.
- Interactive -- Use Layer API to build interactive model in browsers.
- Intuitive -- Visualize the information from intermediate inferences.
- Integrative -- Support pre-trained models from TensorFlow, Keras, TensorFlow.js.
Getting Started
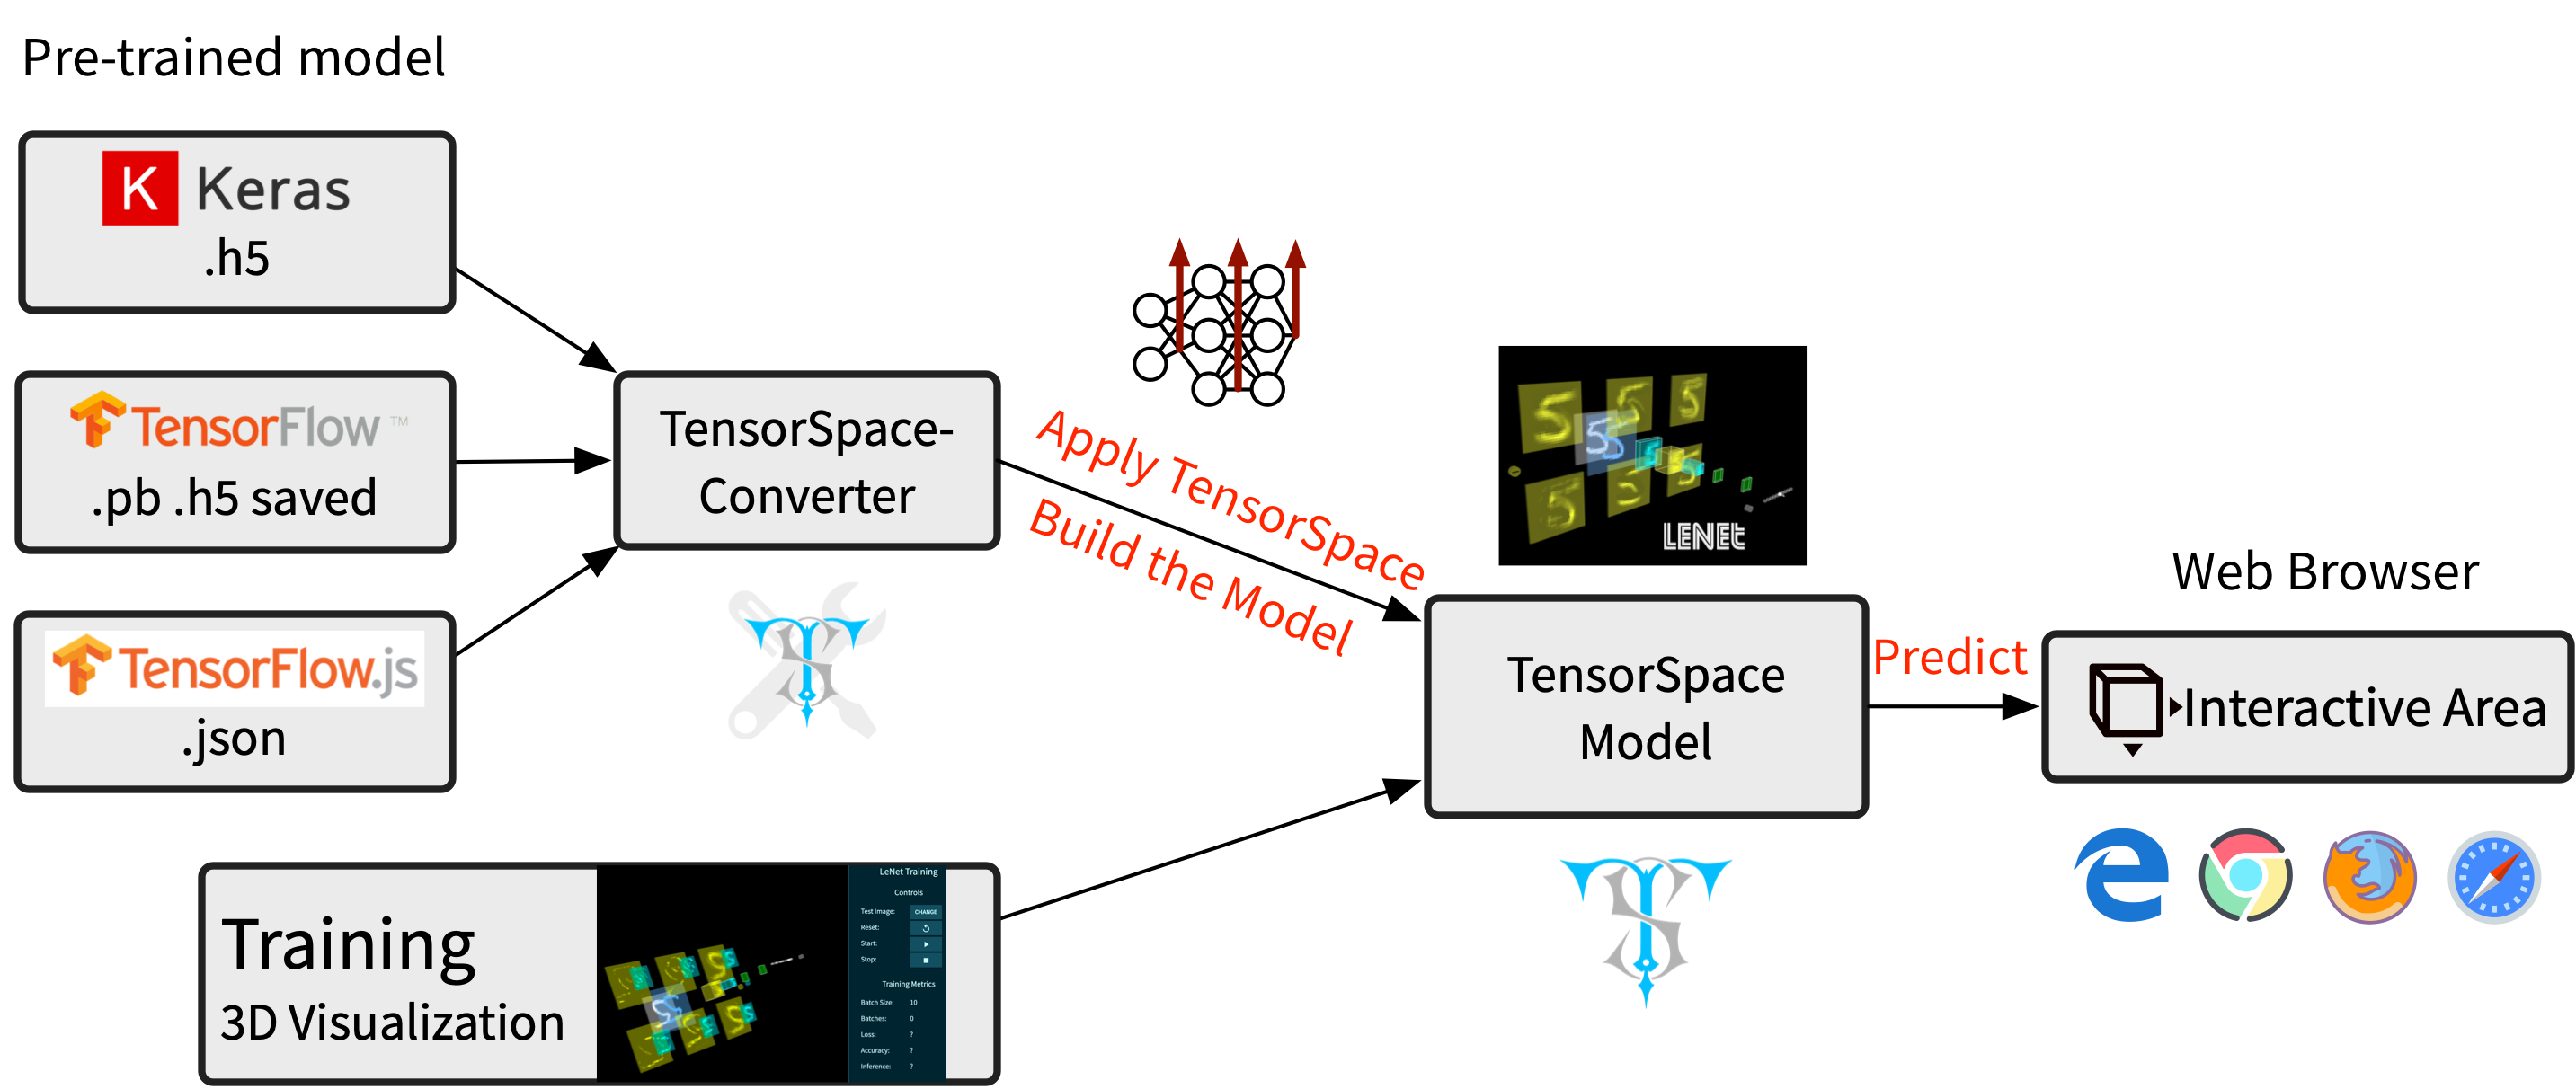
Fig. 2 - TensorSpace Workflow
1. Install TensorSpace
Install in the Basic Case
- Step 1: Download Dependencies
Download dependencies build files TensorFlow.js (tf.min.js), Three.js (three.min.js), Tween.js (tween.min.js), TrackballControls (TrackballControls.js).
- Step 2: Download TensorSpace
Download TensorSpace build file tensorspace.min.js from Github, NPM, TensorSpace official website or CDN:
<!-- Replace "VERSION" with the version you want to use. -->
<script src="https://cdn.jsdelivr.net/npm/tensorspace@VERSION/dist/tensorspace.min.js"></script>- Step 3: Include Build Files
Include all build files in web page.
<script src="tf.min.js"></script>
<script src="three.min.js"></script>
<script src="tween.min.js"></script>
<script src="TrackballControls.js"></script>
<script src="tensorspace.min.js"></script>
Install in the Progressive Framework
Step 1: Install TensorSpace
- Option 1: NPM
npm install tensorspace- Option 2: Yarn
yarn add tensorspaceStep 2: Use TensorSpace
import * as TSP from 'tensorspace';Checkout this Angular example for more information.
2. Preprocess the Pre-trained Model
Before applying TensorSpace to visualize the pre-trained model, there is an important pipeline - TensorSpace model preprocessing ( Checkout this article for more information about TensorSpace preprocessing ). We can use TensorSpace Converter to quickly complete the TensorSpace Preprocessing.
For example, if we have a tf.keras model in hand, we can use the following TensorSpace-Converter conversion script to convert a tf.keras model to the TensorSpace compatible format:
$ tensorspacejs_converter \
    --input_model_from="tensorflow" \
    --input_model_format="tf_keras" \
    --output_layer_names="padding_1,conv_1,maxpool_1,conv_2,maxpool_2,dense_1,dense_2,softmax" \
    ./PATH/TO/MODEL/tf_keras_model.h5 \
    ./PATH/TO/SAVE/DIR
Note:
- Make sure to install
tensorspacejspip package, and setup a TensorSpace-Converter runtime environment before using TensorSpace-Converter to preprocess the pre-trained model. - Based on different training libraries, we provide different preprocessing tutorials: TensorFlow Tutorial, Keras Tutorial, TensorFlow.js Tutorial.
- Checkout TensorSpace-Converter Repo for more information about TensorSpace-Converter.
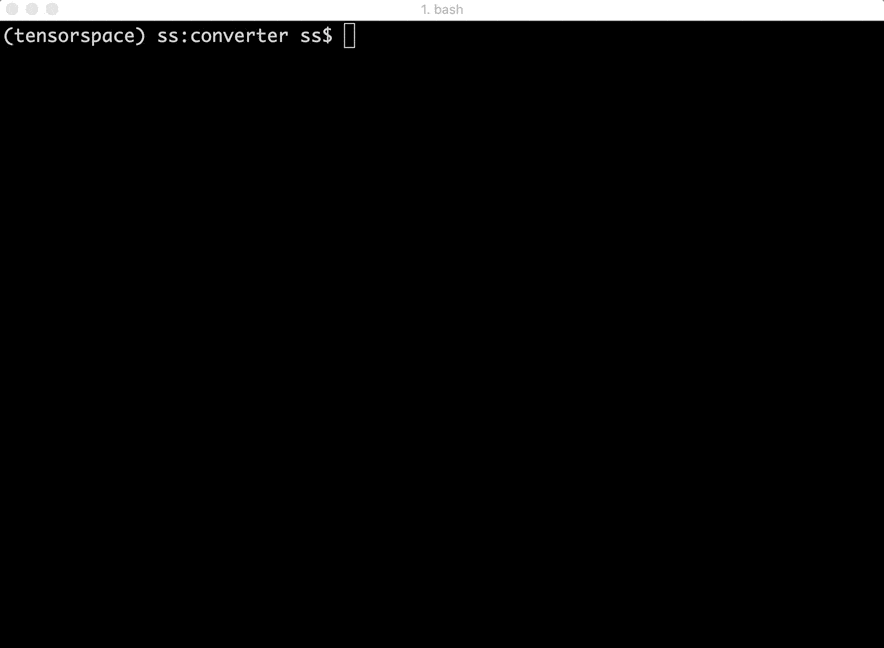
Fig. 3 - TensorSpace-Converter Usage
3. Using TensorSpace to Visualize the Model
If TensorSpace is installed successfully and the pre-trained deep learning model is preprocessed, let's create an interactive 3D TensorSpace model.
For convenience, we will use the the resources from this repository's HelloWorld directory, which includes preprocessed TensorSpace compatible LeNet model and sample input data ("5") as an example to illustrate this step. All source code can be found in helloworld.html.
First, we need to new a TensorSpace model instance:
let container = document.getElementById( "container" );
let model = new TSP.models.Sequential( container );
Next, based on the LeNet structure: Input + Padding2D + 2 X (Conv2D & Maxpooling) + 3 X (Dense), build the Topology of the TensorSpace model:
model.add( new TSP.layers.GreyscaleInput() );
model.add( new TSP.layers.Padding2d() );
model.add( new TSP.layers.Conv2d() );
model.add( new TSP.layers.Pooling2d() );
model.add( new TSP.layers.Conv2d() );
model.add( new TSP.layers.Pooling2d() );
model.add( new TSP.layers.Dense() );
model.add( new TSP.layers.Dense() );
model.add( new TSP.layers.Output1d({
    outputs: ["0", "1", "2", "3", "4", "5", "6", "7", "8", "9"]
}) );
Last, we should load our preprocessed TensorSpace compatible model and use init() method to create the TensorSpace model:
model.load({
    type: "tensorflow",
    url: './PATH/TO/MODEL/model.json'
});
model.init(function(){
    console.log("Hello World from TensorSpace!");
});
We can get the following Fig. 3 model in the browser if everything looks good.
![]()
Fig. 4 - LeNet model without any input data
We provide a extracted file which is a handwritten "5" as the input of our model: (online demo)
model.init(function() {
    model.predict( image_5 );
});
We put the predict( image_5 ) method in the callback function of init() to ensure the prediction is after the initialization complete.
Click the CodePen logo to try it in CodePen: 
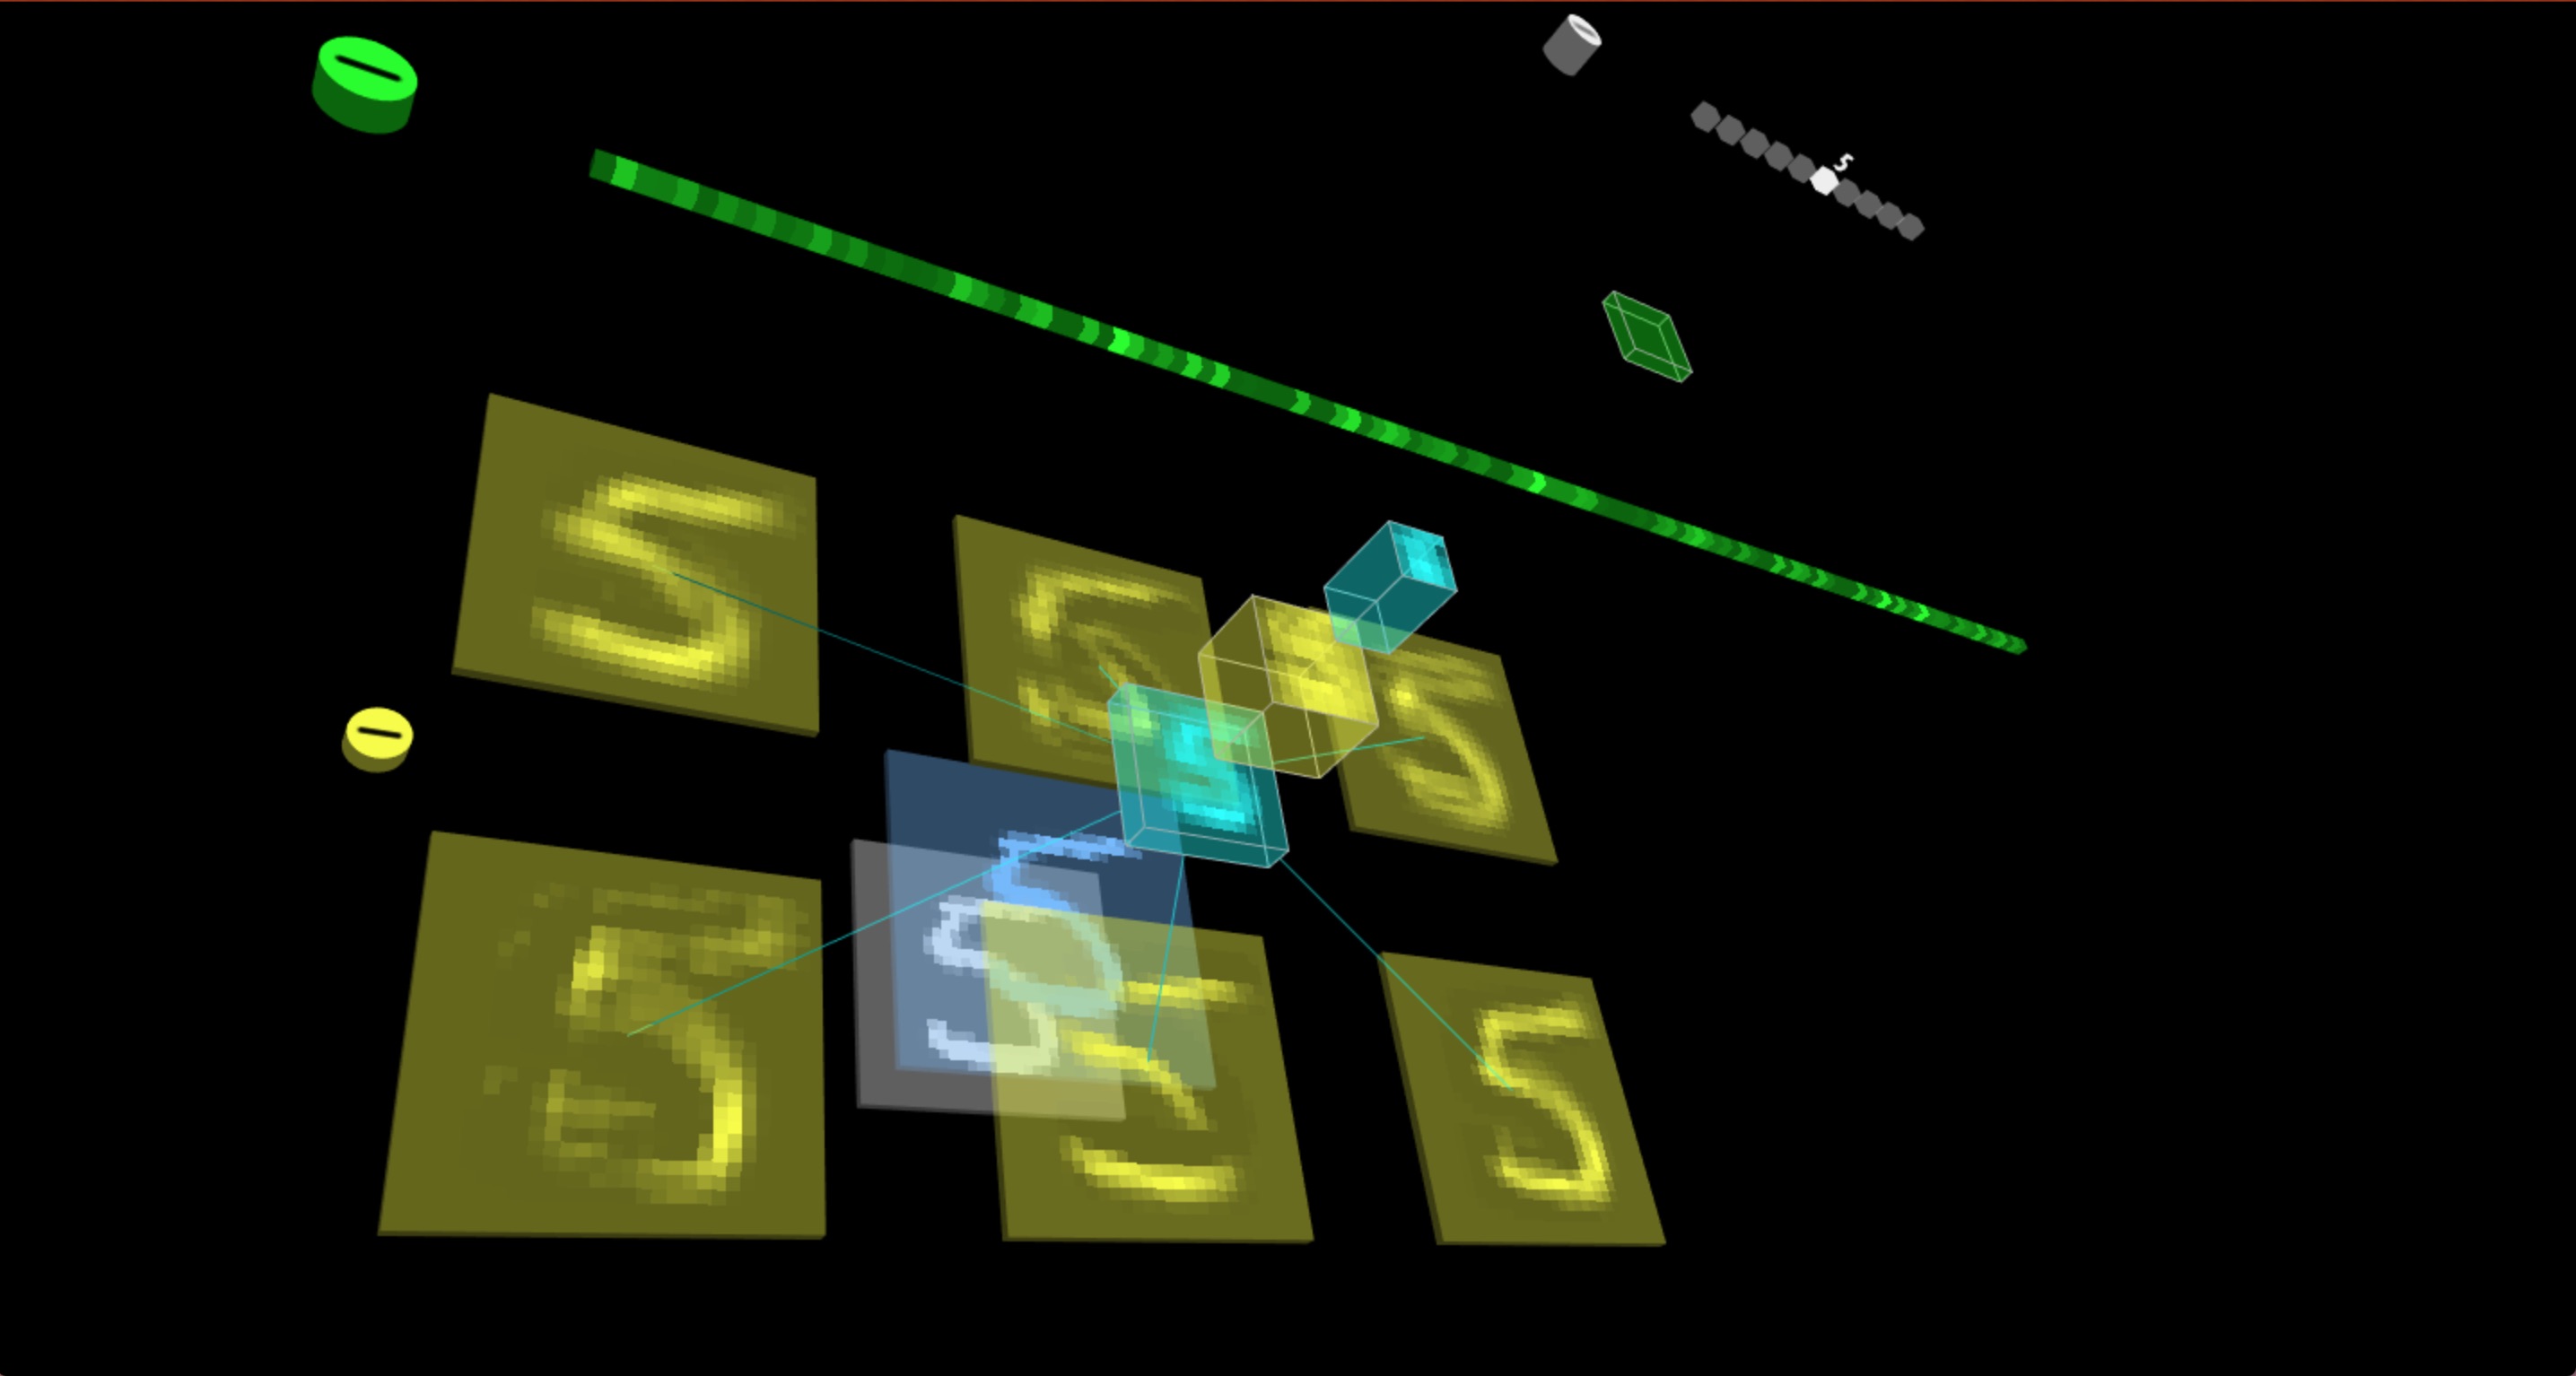
Fig. 5 - LeNet model with input data "5"
Example
- LeNet [ TensorFlow.js model ]
Fig. 6 - Interactive LeNet created by TensorSpace
- AlexNet [ TensorFlow model ]
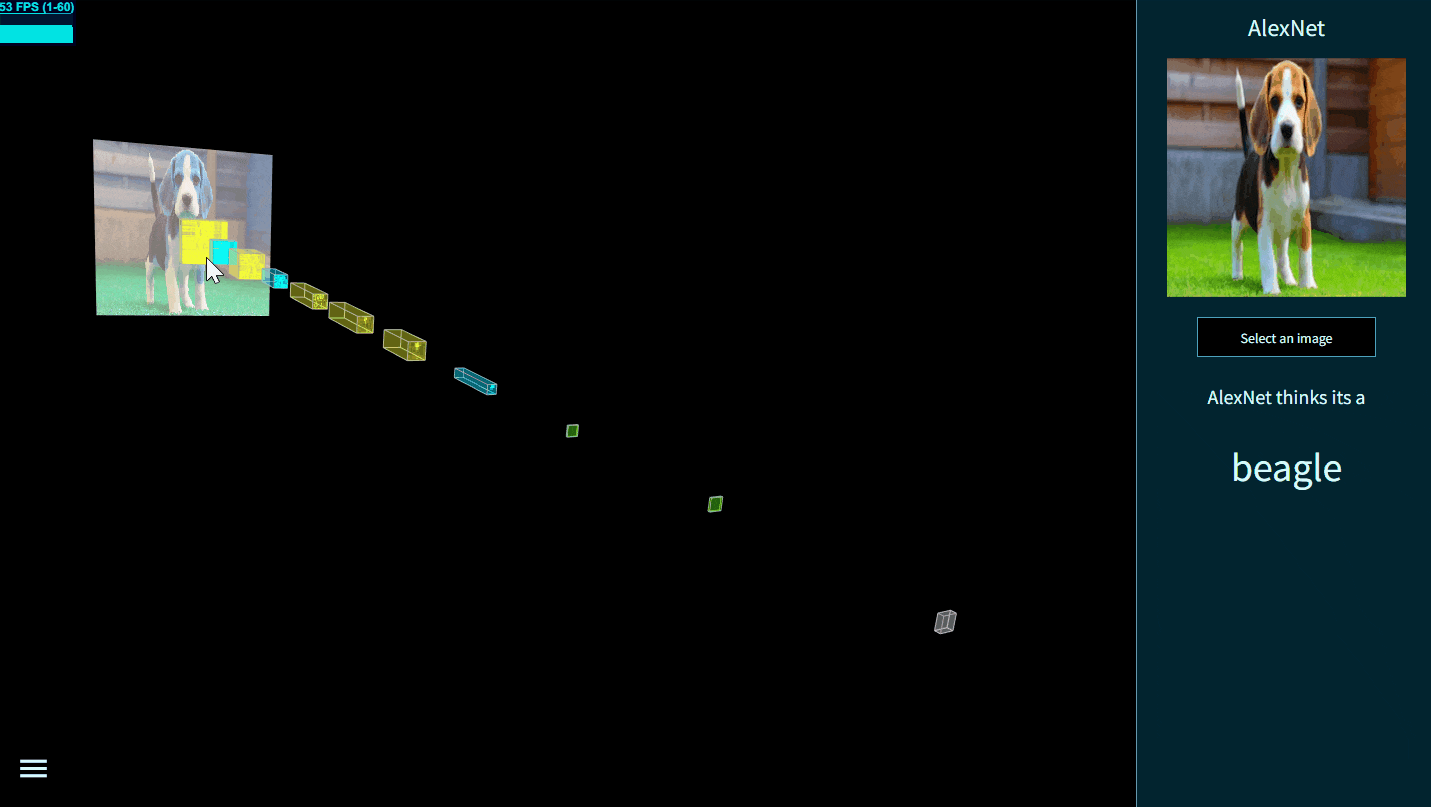
Fig. 7 - Interactive AlexNet created by TensorSpace
- Yolov2-tiny [ TensorFlow model ]
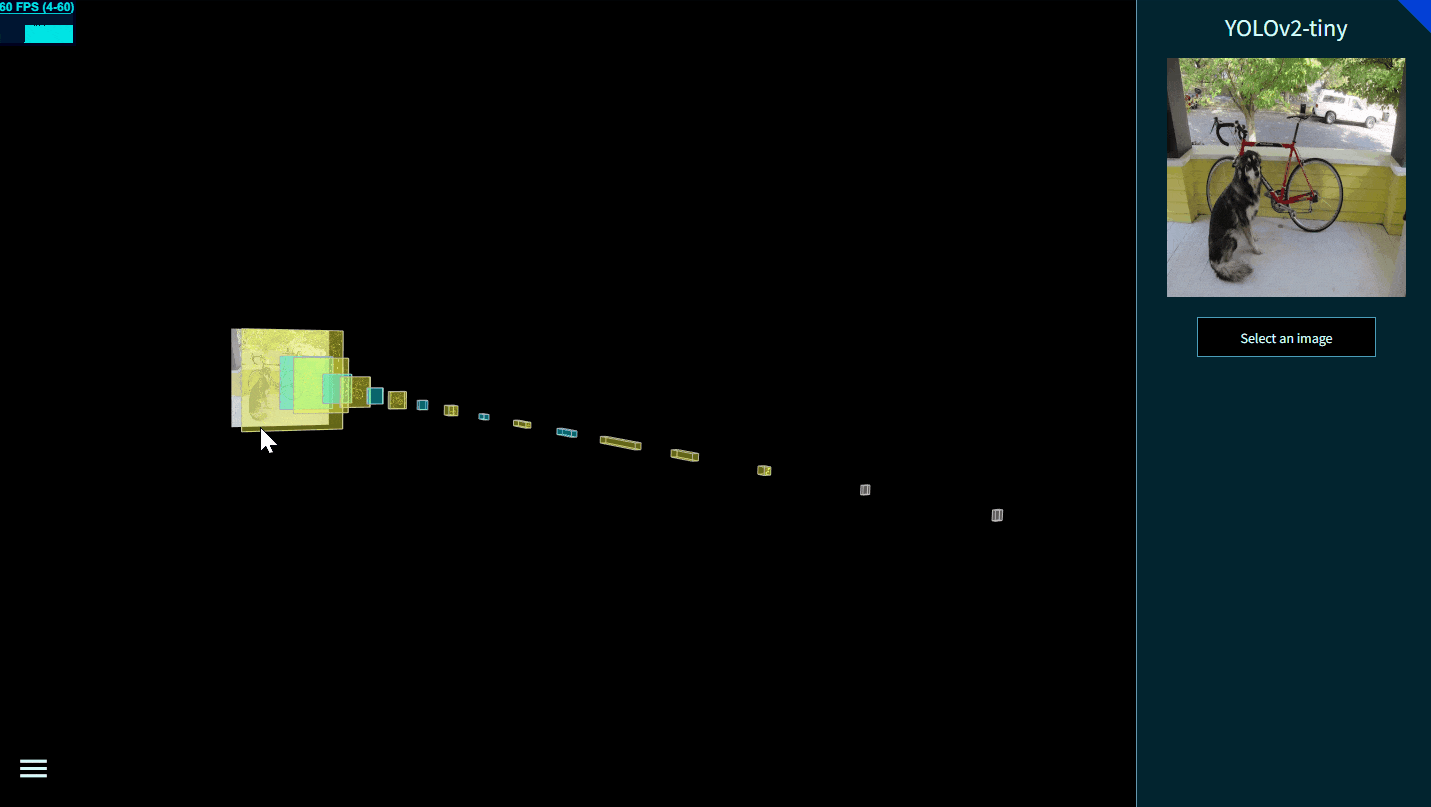
Fig. 8 - Interactive Yolov2-tiny created by TensorSpace
- ResNet-50 [ Keras model ]

Fig. 9 - Interactive ResNet-50 created by TensorSpace
- Vgg16 [ Keras model ]
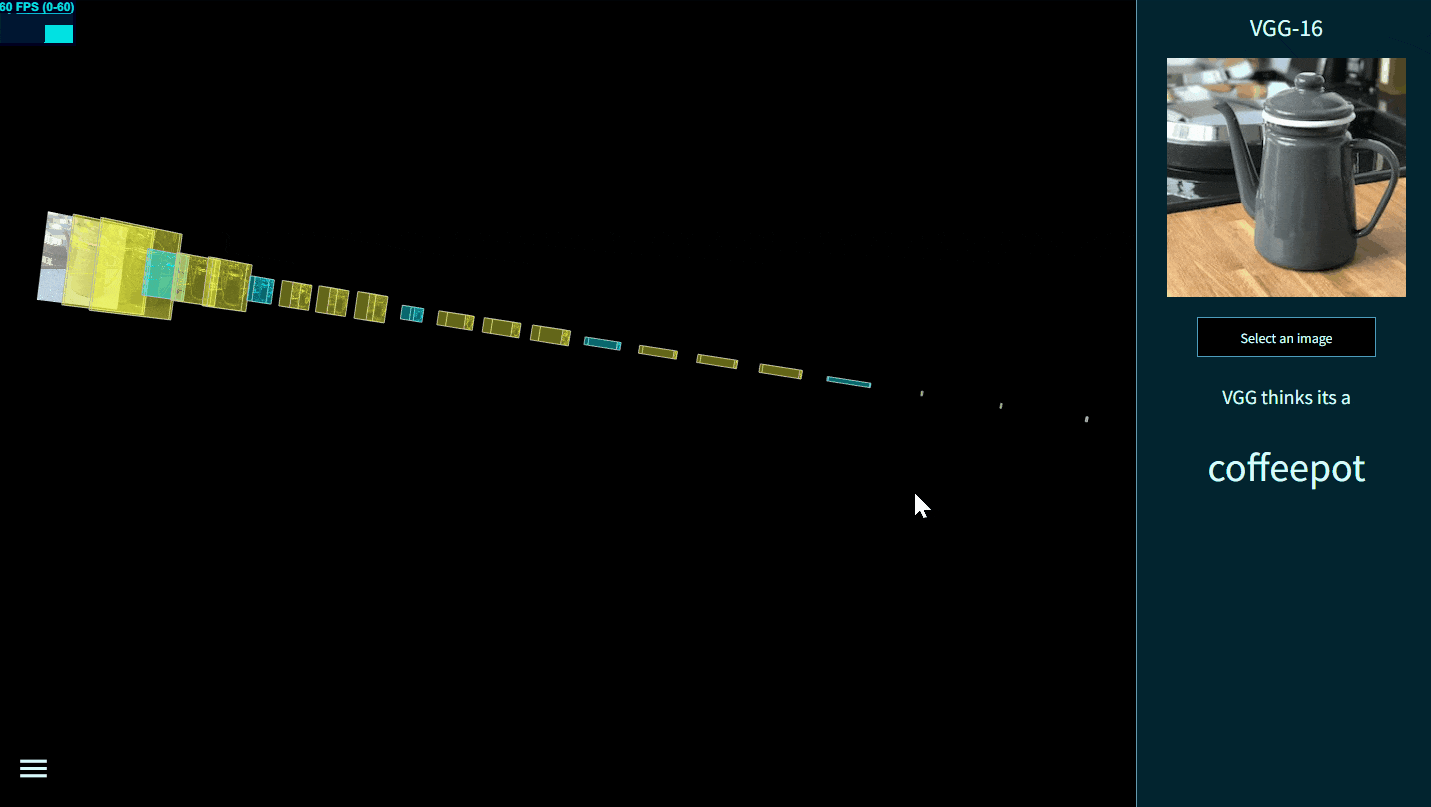
Fig. 10 - Interactive Vgg16 created by TensorSpace
- ACGAN [ Keras model ]
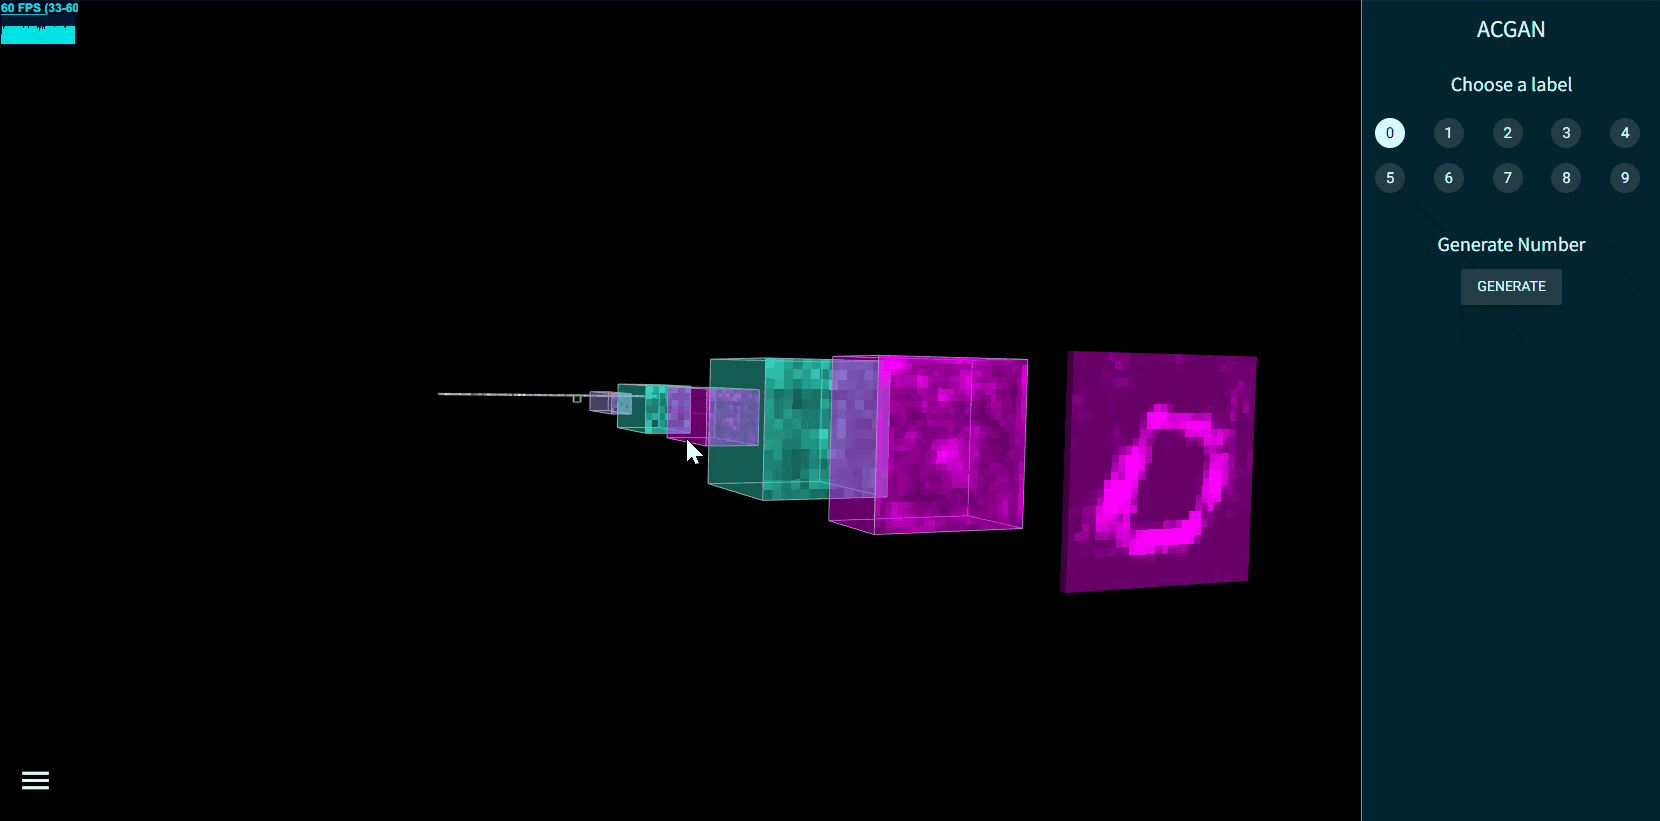
Fig. 11 - Interactive ACGAN created by TensorSpace
- MobileNetv1 [ Keras model ]

Fig. 12 - Interactive MobileNetv1 created by TensorSpace
- Inceptionv3 [ Keras model ]
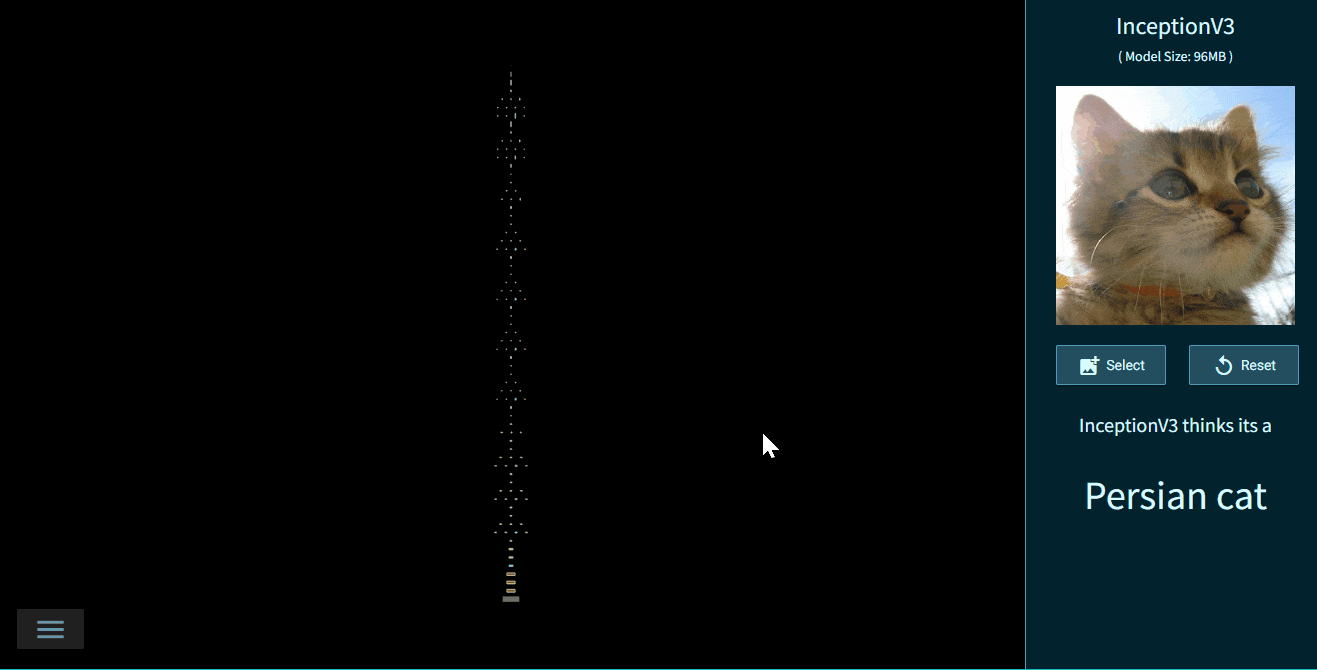
Fig. 13 - Interactive Inceptionv3 created by TensorSpace
- LeNet Training Visualization [ TensorFlow.js dynamic model ]
Visualize the LeNet Training Process with TensorSpace.js and TensorFlow.js.
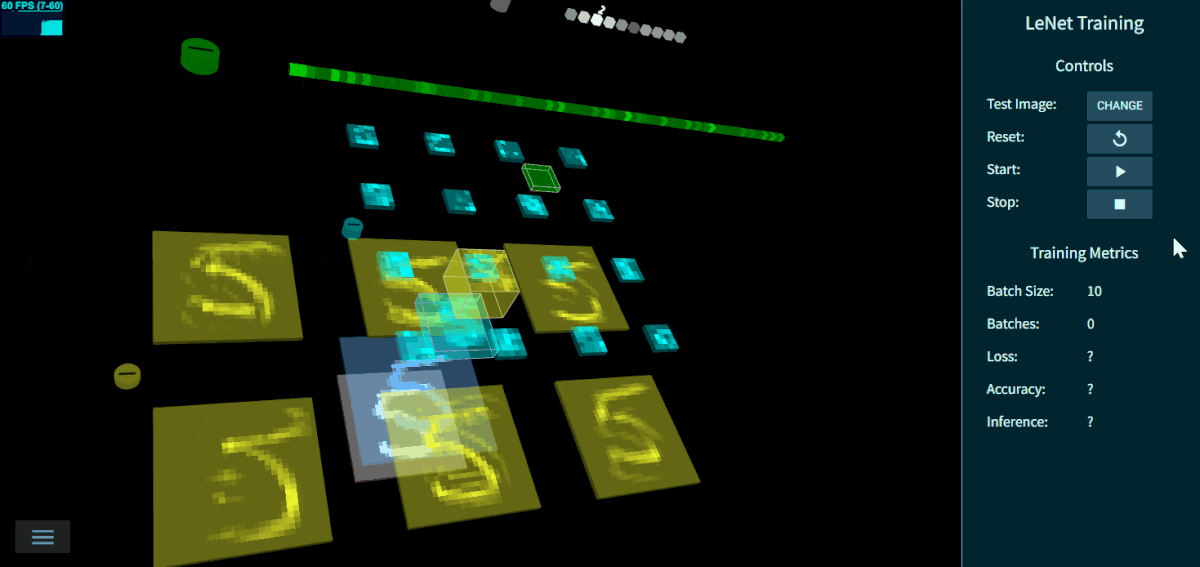
Fig. 14 - LeNet Training 3D Visualization
View models locally
As some models above are extremely large, view them locally may be a good choice.
- Step 1:
cloneTensorSpace Repo
git clone https://github.com/tensorspace-team/tensorspace.git- Step 2:
Open "html" file in examples folder in local web server.
Documentation
- For a quick start, checkout Getting Start
- To learn more about the Basic Concepts
- To process a deep learning model, checkout Model Preprocessing, TensorSpace-Converter
- To learn core components: Models, Layers and Merge Function
- Checkout the official website TensorSpace.org for more about TensorSpace.
Contributors
Thanks goes to these wonderful people (emoji key):
 syt123450 |
 Chenhua Zhu |
 YaoXing Liu |
 Qi(Nora) |
 Dylan Schiemann |
 BoTime |
 Kamidi Preetham |
|---|---|---|---|---|---|---|
 Wade Penistone |
Contact
If you have any issue or doubt, feel free to contact us by:
- Email: tensorspaceteam@gmail.com
- GitHub Issues: create issue
- Slack: #questions
- Gitter: #Lobby
License
Next Episode
![]()
TensorSpace-VR
Present Neural Network in VR
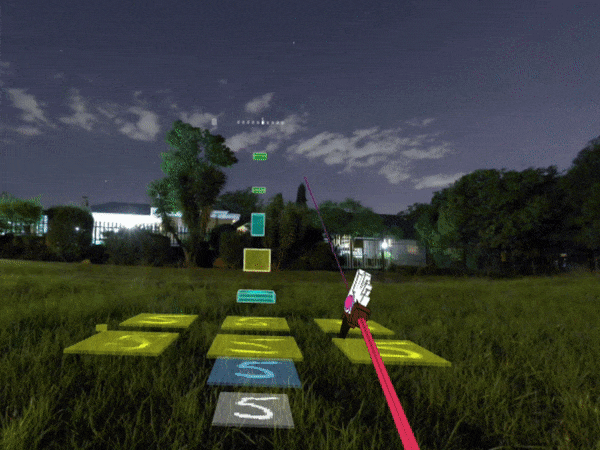
Fig. 15 - TensorSpace VR Demo