th-gate v0.3.6-beta
Gate Manager
Install Instructions
Download the latest Raspbian Lite here: https://downloads.raspberrypi.org/raspbian_lite_latest and extract the zip file to reveal a single .img file.
Plug in the SD card to the computer, open terminal, and type: diskutil list
Identify the disk (not partition) of your SD card. e.g. disk4 (not disk4s1). You can check the sizes to find the one which looks correct.
Now run diskutil unmountDisk /dev/disk# (replace # with your disk number e.g. diskutil unmountDisk /dev/disk4) to unmount the drive.
Type: sudo dd bs=1m if=
Now without hitting enter find the arc linux download image from your downloads folder and drag it into your terminal. It should input the full file name and leave a space at the end.
Eg: sudo dd bs=1m if=/Users/bartosz/Downloads/2020-02-13-raspbian-buster-lite
You will end up with a long command in your terminal window, something like:
sudo dd bs=1m if=/Users/bartosz/Downloads/2020-02-13-raspbian-buster-lite.img of=/dev/rdisk4 && echo ok
Now hit enter, type in your password, and hit enter again. Note when typing in your password it will not respond with any masked characters, just keep typing as normal. Now wait a LONG TIME. You can press Ctrl + t to see the progress. When the operation completes you'll see a final "ok" written in the terminal.
When that's finished, mount the disk with diskutil mountDisk /dev/disk# and create
the file named 'ssh' on the boot partition of the SD card, with command touch /Volumes/boot/ssh
When that's finished, eject the SD card by running diskutil eject disk# (replacing # like before).
Now make sure you have the raspberry pi plugged into your router via ethernet cable, then plug the SD in and turn it on.
Wait about 30 seconds for the device to boot up. Now log into the admin panel of your router and find a list of connected devices. You need to establish the IP Address for the pi, it will have a hostname of "raspberrypi".
Now with the IP Address ( e.g. 192.168.0.15) go back to the terminal and run: ssh pi@192.168.0.15
If you're asked to confirm the computer's identity, just type "yes" and hit enter. You will be then prompted for a password. The password will be raspberry.
Now you will provided with a new prompt like so: [pi@raspberrypi ~]#
Just run the following command: curl -ksSL https://gist.githubusercontent.com/bblimke/74a78b84b8f1af03c94b2361ff2cd258/raw/install.sh | bash and watch it go.
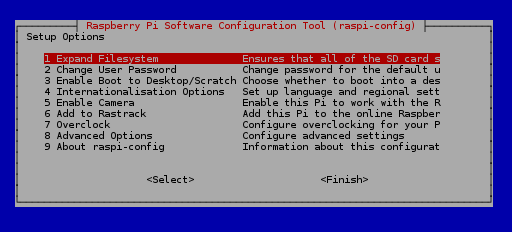
At the end of the process you'll be presented with a screen that looks like this:

You first need to Expand Filesystem, and when it asks if you want to restart say NO. Now back on the main menu, go to Interfacing Options -> SPI -> Enable, then go back, go to Finish and let the system reboot.
Then everything should be complete.
5 years ago
5 years ago
5 years ago
5 years ago
5 years ago
5 years ago
5 years ago
5 years ago
5 years ago
5 years ago
9 years ago
9 years ago
9 years ago
9 years ago
9 years ago
9 years ago
10 years ago
10 years ago
10 years ago
10 years ago
10 years ago
10 years ago
10 years ago
10 years ago
10 years ago