1.0.1 • Published 3 years ago
vue-squadpay v1.0.1
GTCO Squad Payment Vue3 Library
Squad Payment is a comprehensive payments solution powered by GTCO that enables all types of businesses to make and receive payments from anywhere in the world.
Note: Before you proceed, signup for a Sandbox account at Squad Sandbox platform to obtain necessary public and private keys.
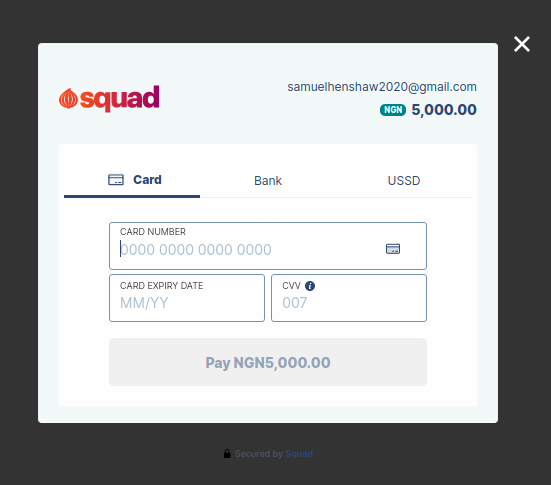
Payment Modal

Installation
To install, run:
npm install vue-squadpay Usage
Template
 <template>
    <SquadPay text="Pay now" :params="params" class="btn btn-primary" @err="onError" @close="onClose" @success="onSuccess" @loaded="onLoad" />
</template>
Script for Composition API
<script setup lang="js">
import SquadPay from "vue-squadpay"
import {ref} from 'vue'

const params = ref({
    key: "test_pk_sample-public-key-1",
    email: "example@mail.com", // from HTML form
    amount: 5000, // no need to multiply by 100 for kobo, its taken care for you
    currencyCode: "NGN",
    reference: Date.now().toString(),
  })

  const onSuccess = (data) => {
    console.log(data)
  }

  const onLoad = () => {
    console.log("module loaded")
  }

  const onError = () => {
    console.log("Error occured")
  }

   const onClose = () => {
    console.log("Widget Closed")
  }
</script>
Script for Composition API with Typescript
<script setup lang="ts">
import SquadPay, { SquadParams} from "vue-squadpay"
import {ref} from 'vue'

const params = ref<SquadParams>({
    key: "test_pk_sample-public-key-1",
    email: "example@mail.com", // from HTML form
    amount: 5000, // no need to multiply by 100 for kobo, its taken care for you
    currencyCode: "NGN",
    reference: Date.now().toString(),
  })

  const onSuccess = (data): void => {
    console.log(data)
  }

  const onLoad = (): void => {
    console.log("module loaded")
  }

  const onError = (): void => {
    console.log("Error occured")
  }

   const onClose = (): void => {
    console.log("Widget Closed")
  }
</script>
Script for Options
<script >
import SquadPay from "vue-squadpay"
export default {
  components: {
    SquadPay
  },
  data(){
    return {
      params:{
          key: "test_pk_sample-public-key-1",
          email: "example@mail.com", // from HTML form
          amount: 5000, // no need to multiply by 100 for kobo, its taken care for you
          currencyCode: "NGN",
          reference: Date.now().toString(),
      }
    }
  },
  methods: {
    onSuccess(data){
      console.log(data)
    }

    onLoad(){
      console.log("module loaded")
    }

    onError(){
      console.log("Error occured")
    }

    onClose(){
      console.log("Widget Closed")
    }
  }
}
</script>
Note:
amount should be the actual amount, that is, if payment is N1,000 enter N1000 as the amount. conversion to kobo is automatically handled.- There is an error notifier alert included
Parameters
Below is a list of all the SquadPay official supported parameters.
| Parameters | Data Type | Required | Description |
|---|---|---|---|
| key | string | true | This can be found on your dashboard. |
| payItemID | string | true | Your Squad public key. Use the test key found in your Sandbox account in test mode, and use the live key found in your Squad dashboard in live mode.. |
| string | true | Customer's email address. | |
| amount | number | true | The amount you are debiting customer. (Kobo conversion is handled automatically) |
| currencyCode | string | true | The currency you want the amount to be charged in. Allowed value is NGN or USD |
| transactionRef | string | false | Unique case-sensitive transaction reference. If you do not pass this parameter, Squad will generate a unique reference for you. |
| paymentChannels | string[] | false | An array of payment channels to control what channels you want to make available for the user to make a payment with. Available channels include; ['card', 'bank' , 'ussd','bank_transfer']. |
| customerName | string | false | Name of Customer. |
| callbackUrl | string | false | The url you want the user to be redirected to after a transaction. sample: https://example.com/pay-callback |
| metadata | object | false | Object that contains any additional information that you want to record with the transaction. The custom fields in the object will be returned via webhook and the payment verification endpoint. |
| passCharge | boolean | false | It takes two possible values: true or false.It is set to false by default. When set to true, the charges on the transaction is computed and passed on to the customer(payer). But when set to false, the charge is passed to the merchant and will be deducted from the amount to be settled to the merchant. |
Response Sample
After a transaction, a sample response from the onSuccess function will be:
{
    "Customer_name": null,
    "access_token": undefined,
    "amount": 100000,
    "auth_url": undefined,
    "callback_url": null,
    "config_meta": {
        "browser_screen_height": 948,
        "browser_screen_width": 1307
    },
    "currency_code": "NGN",
    "email": "example@mail.com",
    "formattedTransactionAmount": "1,000.00",
    "is_recurring": false,
    "key": "test_pk_sample-public-key-1",
    "merchant_id": undefined,
    "merchant_logo": undefined,
    "metadata": null,
    "pass_charge": false,
    "payment_channels": null,
    "recurring": {
        "type": 0
    },
    "transaction_amount": 100000,
    "transaction_ref": null
}
SquadPay component props and Events
Below are list of the props of the <SquadPay /> component.
| Parameters | Data Type | Required | Description |
|---|---|---|---|
| text | string | false | It specifies the text to display on the button. |
| params | object | true | object to set squad pay parameters. refer to parameter list above |
| @success | event | false | Event fires when payment is successful. it returns a parameter that represent the details of payment in object |
| @loaded | event | false | Event fires when the Payment Modal Widget loads |
| @close | event | false | Payment fires when the Payment Modal Widget closes |
| @err | event | false | Payment fires when the Payment Modal Widget closes |
Go Live
to go live refer to the Squad API documentation section for live payment
You can check out Squad Documentation for other guides and options.
For Contributions
- Fork the repo
- Create a branch for the new feature or suggestion:
git branch feature-name - Checkout to feature branch:
git checkout feature-name - Commit your changes:
git commit -m "commit-type: commit-message". Please specify a commit type - Push to the feature branch:
git push origin feature-name - Submit a pull request
Thanks!
Samuel Henshaw
License
The MIT License (MIT). Please see License File for more information.


