
@dynatrace/react-native-plugin

Dynatrace React Native Plugin
The Dynatrace React Native plugin helps auto-instrument your React Native app with Dynatrace OneAgent for Android and iOS and also provides an API to add manual instrumentation.
If you want to start using this plugin and are not a Dynatrace customer yet, head to dynatrace.com and sign up for a free trial. For an intro you can also check out our announcement blog post.
Supported features
- Auto-instrumentation using OneAgent for Android and iOS
- User actions for application start and native controls
- Web requests
- Crashes
- React-native Auto-instrumentation
- User actions for onPress and onLongPress (Touchables, Buttons, Pressable, Switch, RefreshControl, Picker)
- User actions for class and functional components (lifecycle events such as render(), didMount() and didUpdate())
- Reporting React Native errors
- Tracking navigation via
react.navigation.enabled - UI Interaction feature toggle via
react.userInteraction(enable/disable user interaction capturing at runtime)
- Manual instrumentation
- Typescript bindings to add manual instrumentation
- New React-Native architecture
Requirements
- React v16.8 or newer
- React Native v0.60 or newer
- For Android users:
- SDK version 23+
- Gradle version 8.1.1+ (How to update?)
- Android Gradle plugin version 7.0+
- Java 17
- Kotlin 2.0.21 - see Kotlin Compatibility Note
- Jetpack Compose 1.4 - 1.10 - see Compose Compatibility Note
- For iOS users: Minimum iOS 15
- NodeJS 16.0.0+ since our dependencies require NodeJS 16.0.0
Agent Versions
These agent versions are configured in this plugin:
- Android Agent: 8.343.1.1038
- iOS Agent: 8.343.1.1007
Quick Setup
- Install plugin
- Setup configuration
- Register babel plugin
- Register jsx-runtime
- Build and run your app
Advanced topics
- Manual OneAgent Startup
- Manual instrumentation
- Plugin Startup
- Monitor a Component
- Create Custom Action
- Cancel Actions
- Manual Web Request Tagging
- Report Values
- Report Stacktrace
- Identify User
- End Session
- Crash Reporting
- User Privacy Options
- Report GPS Position
- Business event capturing
- Platform independent reporting
- Set beacon headers
- Exclude Individual JSX Elements
- New RUM experience
- NPX Commands
- Customizing paths for configuration
- Manual adding iOS Agent to project
- Setup for tvOS
- Configuration structure
- How does Dynatrace determine the user action name?
- How does Dynatrace automatically report crashes?
- React Automatic Runtime
- Using a second transformer besides the dynatrace transformer
- Upgrading project to Gradle 7
- Kotlin Compatibility Note
- Compose Compatibility Note
- Maven Central in top-level gradle file
- Configuration of standalone React Native project
- Instrumentation Overhead
- Typescript Setup for dtActionName and dtActionIgnore
Troubleshooting
Quick Setup
Note: If you are upgrading to React Native v0.70 (or newer) or using the @react-native-community/cli 9.x+ version, be aware that our automated script running before every start/run-android/run-ios command is no longer working. When your dynatrace.config.js changed be sure to execute
npx instrumentDynatracebeforehand.
1. Install the plugin
- Install the plugin by calling
npm install @dynatrace/react-native-plugin - iOS only : If you use pods, you need to go into your
iosdirectory and executepod installto install the new Dynatrace dependency to your xCode project.
Troubleshooting
- Expo: Make sure you actually have platform folders like
android/and/orios/so the plugin can do the configuration correctly. Furthermore you need to trigger the configuration manually as the plugin is only automatically working with the React Native CLI. This means every time the configuration changes you need to callnpx instrumentDynatrace. - Standalone Project: If you are using React Native standalone and embed it in your native project have a look here.
- If for some reason (e.g. seperate native projects)
react-native linkdoesn't work as expected, manually add the iOS agent to your project.
2. Setup dynatrace.config.js
Note: If you are upgrading from a previous version of this plugin, you'll notice that the file format has changed. Your old configuration is still available in
dynatrace.configand you have to copy your values to the newdynatrace.config.js.
Define a mobile app in Dynatrace and open the Mobile app instrumentation settings. In the settings you will see a dynatrace.config.js file which can be downloaded for React Native. Download and copy this file into the root folder of your application. If you are not sure you can always use npx configDynatrace to create a default configuration file.
Note: Define the components that you want to see lifecycle instrumented (example). This is important as you will only see Application startup and Touches out of the box.
For more details about the configuration, see Advanced topics.
3. Register our babel plugin in babel.config.js
Add the Dynatrace babel plugin to your babel.config.js:
module.exports = {
  ...
  plugins: [..., '@dynatrace/react-native-plugin/instrumentation/BabelPluginDynatrace'],
};
This plugin handles the auto-instrumentation of your React Native code at build time.
Note: We recently moved our auto-instrumentation from a custom Metro transformer to a babel plugin for much faster bundling, independence of Metro and correct sourcemaps. The code shown above is the new and recommended way to add our auto-instrumentation to your project by adding the babel plugin directly. However, our plugin is backwards compatible in a sense that we keep supporting auto-instrumentation via the Dynatrace Metro transformer and reporter. In short, no configuration change is needed. If you continue using the Dynatrace Metro transformer and reporter, we reroute the instrumentation logic to the babel plugin internally.
Note: Bypassing Metro by adding the Babel plugin directly allows for the use of alternative bundlers. However, please be aware that we only regularly test with the default Metro bundler; other bundlers are not explicitly supported or documented.
4. Register our jsx-runtime in babel.config.js
Depending on your version of Metro or Expo (if used), you additionally need to add our jsx-runtime to your babel configuration babel.config.js.
The changes have to be done in the following cases:
- metro v0.72.0 or newer: https://github.com/facebook/metro/releases/tag/v0.72.0
- expo v44.0.0 or newer or babel-preset-expo v9.0.0 or newer: https://github.com/expo/expo/blob/main/packages/babel-preset-expo/CHANGELOG.md#900--2021-12-03
The required changes for the versions above can be found here.
5. Build and run your app
Only for Expo: If using expo make sure that your project is containing a "android" and/or "ios" folder. This can be done by using
npx expo prebuild.Execute
npx instrumentDynatraceorreact-native instrument-dynatracein the root of your React Native project. This will configure both Android and iOS projects with the settings fromdynatrace.config.js. You can use the same custom arguments as mentioned above. Be aware this configuration step will modify your application's *.plist and build.gradle file. This modification enables auto instrumentation on Android and is writing the configuration for both platforms needed for the OneAgent.Use
react-native run-androidorreact-native run-iosto rebuild and run your app. Specify custom paths via custom arguments..Attention: Whenever you change your configuration in dynatrace.config.js please use
react-native start --reset-cacheoption. Metro caches all files and a configuration change might lead to a different situation. Not resetting the cache might result in an mixture of old and new configuration.
Advanced topics
Manual OneAgent startup
If you can't do a automated startup through the dynatrace.config.js, you can always perform a manual startup and decide values such as beaconUrl and applicationId at runtime.
Note: An automated startup usually provides you with a lifecycle application start-up event. A manual startup on the other hand occurs later, thereby causing you to miss everything, including this application startup event, until the startup occurs.
A manual startup requires the following two steps:
- Deactivate the automated startup in
dynatrace.config.js:
module.exports = {
    react: {
        autoStart: false,
        // ...
    },
    android: {
        config: `
        dynatrace {
            configurations {
                defaultConfig {
                    autoStart.enabled false
                }
            }
        }
        `
    },
    ios: {
        config: `
        <key>DTXAutoStart</key>
        <false/>
        `
    },
};- Make the start-up call with at least
beaconUrlandapplicationId:
Example of a startup call:
import { Dynatrace, ConfigurationBuilder } from '@dynatrace/react-native-plugin';

await Dynatrace.start(new ConfigurationBuilder("beaconUrl", "applicationId").buildConfiguration());
For more details see the section about startup API.
Note: If you don't deactivate the automated startup with the dynatrace.config.js file, the beaconUrl and applicationId values have no impact and are thrown away.
Manual instrumentation
To use the API of the React Native plugin, import the API:
import { Dynatrace } from '@dynatrace/react-native-plugin';Plugin startup
The manual startup of the plugin is triggered via the start(configuration: IConfiguration) method. If you configured dynatrace.config.js for manual startup then the plugin doesn't send any data when not calling this function. Besides the application id and the beacon URL, there are several optional configuration parameters, which are shown in the table below.
import { Dynatrace, ConfigurationBuilder, LogLevel } from '@dynatrace/react-native-plugin';

const configurationBuilder = new ConfigurationBuilder("beaconUrl", "applicationId");

configurationBuilder.withCrashReporting(true)
  .withErrorHandler(true)
  .withReportFatalErrorAsCrash(true)
  .withLogLevel(LogLevel.Info)
  .withLifecycleUpdate(false)
  .withUserOptIn(false)
  .withActionNamePrivacy(false)
  .withActionNamePreference('any')
  .withActionNameAlgorithm('depth-first');

await Dynatrace.start(configurationBuilder.buildConfiguration());Info: The value used in the function calls for the parameters is also their default value.
| Property name | Type | Default | Description |
|---|---|---|---|
| beaconUrl | string | undefined | Identifies your environment within Dynatrace. This property is mandatory for manual startup. OneAgent issues an error when the key isn't present. |
| applicationId | string | undefined | Identifies your mobile app. This property is mandatory for manual startup. OneAgent issues an error when the key isn't present. |
| reportCrash | boolean | true | Reports crashes. |
| errorHandler | boolean | true | Enables the error/crash handler. |
| reportFatalErrorAsCrash | boolean | true | Reports an unhandled fatal error as a crash or an error. |
| logLevel | LogLevel | LogLevel.Info | Allows you to choose between LogLevel.Info and LogLevel.Debug. Debug returns more logs. This is especially important when something is not functioning correctly. |
| lifecycleUpdate | boolean | false | Decide if you want to see update cycles on lifecycle actions as well. This is per default false as it creates a lot more actions. |
| userOptIn | boolean | false | Activates the privacy mode when set to true. User consent must be queried and set. The privacy settings for data collection and crash reporting can be changed via OneAgent SDK for Mobile as described under Data privacy. The default value is false. |
| actionNamePrivacy | boolean | false | Activates a privacy mode especially for onPress. Setting this option to true means that a name for the control will no longer be shown, e.g. "Touch on Button". When setting a dtActionName onto the component this setting will be ignored. |
| actionNamePreference | string | 'any' | Controls which type of child element is preferred when searching the component tree for the name of an onPress action. 'text' prefers text and falls back to any match. 'icon' prefers ReactNative.Image and custom Icons and falls back to any match. 'any' accepts the first match regardless of type (text, image, or custom icon). |
| actionNameAlgorithm | string | 'depth-first' | Controls the traversal algorithm used when searching the component tree for the name of an onPress action. 'depth-first' follows the first child branch fully before trying siblings. 'breadth-first' visits all siblings at a level before going deeper, returning the shallowest match first. |
| bundleName | string | undefined | Should be used only if you have a multiple bundle setup where you load several .bundle files within your React Native application. Enter the name of your bundle. This should be unique in comparison to your other bundle names. This will ensure that actions coming from different bundles will not interfere with each other. |
Attention:
- Keep in mind that configuration within the
dynatrace.config.jsfile is the basis, even for manual startup. When we look at the lifecycleUpdate property: Per default if not used, it is false. If enabled (set to true) indynatrace.config.jsfile, this will be also true if manual startup is used. You can still override this behavior by callingConfigurationBuilder.withLifecycleUpdate(false). - Please use those parameters only when doing a manual startup. If you want to do an automated startup, please configure the properties via the auto startup configuration. You will find a list which explains all the counterparts for the available options here.
Monitor a Component
A component can be either monitored automatically or manually. The auto instrumentation is handled via the dynatrace.config.js file. If you want to manually instrument a component you can use the API call withMonitoring.
- Example with Functional Component:
import { Dynatrace } from '@dynatrace/react-native-plugin';
import { FunctionComponent } from 'react';

export const MyFunctionalComponent: FunctionComponent<{}> = () => {
  return null;
}

Dynatrace.withMonitoring(MyFunctionalComponent, "MyFunctionalComponent");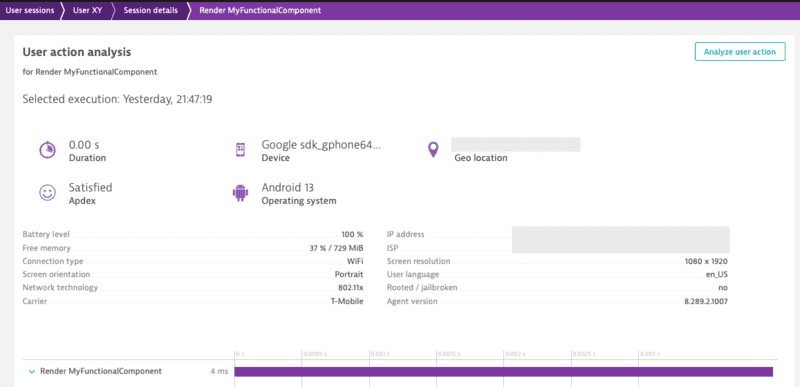
The String "MyFunctionalComponent" is optional as the name of the component can be retrieved through different properties.
Combining manual and auto instrumentation should not be a problem. As they're running the same execution, the manual instrumentation will only override the content of auto instrumentation happening through the transformer.
Create custom actions
There are two options to create an action. Either using enterAutoAction (the previous enterAction) or enterManualAction:
Important: Action names are limited to 250 characters and will be truncated if they exceed this limit.
enterAutoAction- Creates an Action which will be automatically handled by the plugin (This is the type of action which is internally used by the plugin when monitoring components and touchables). This means that the plugin decides about the hierarchy of this action. If there is no open action, the following action will be a root action. All other actions created by this method, while a root action is open, will be automatically inserted as a child action. Furthermore the plugin will automatically link webrequest (if they are not tagged manually) to the open root action. Be aware that the timeout/wait time for sub actions or web requests cannot be modified on the Android side for React Native Auto actions. The timeout is fixed to a 1000ms.
import { Dynatrace } from '@dynatrace/react-native-plugin';

const myAction = Dynatrace.enterAutoAction("MyButton tapped");
//Perform the action and whatever else is needed.
myAction.leaveAction();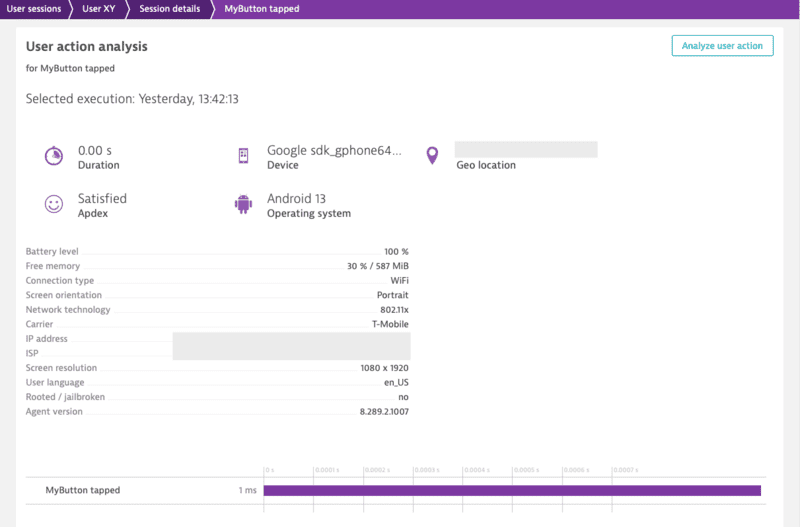
enterManualAction- Creates an Action which will NOT be handled by the plugin. This means that you have full control about the hierarchy of your actions. This function will create a root action for you, which has the ability to create child actions viaenterAction. Be aware, because of the full manual approach the plugin will not link webrequest automatically. Webrequest have to be manually tagged by using the tag provided by the action viagetRequestTag.
import { Dynatrace } from '@dynatrace/react-native-plugin';

const myAction = Dynatrace.enterManualAction("MyButton tapped");
//Perform the action and whatever else is needed.
myAction.leaveAction();
To create a custom action named "MyButton tapped", use the following code. The leaveAction closes the action again. To report values for this action before closing, see Report Values.
import { Dynatrace } from '@dynatrace/react-native-plugin';

const myAction = Dynatrace.enterAutoAction("MyButton tapped");
//Perform the action and whatever else is needed.
myAction.leaveAction();
Create custom sub actions
You can create a single custom action as well as sub actions. The MyButton Sub Action is automatically put under the MyButton tapped. As long as MyButton tapped is open, it gathers all the web requests.
Important: Action names are limited to 250 characters and will be truncated if they exceed this limit.
import { Dynatrace } from '@dynatrace/react-native-plugin';

const myAction = Dynatrace.enterManualAction("MyButton tapped");
const mySubAction = myAction.enterAction("MyButton Sub Action");
//Perform the action and whatever else is needed.
mySubAction.leaveAction();
myAction.leaveAction();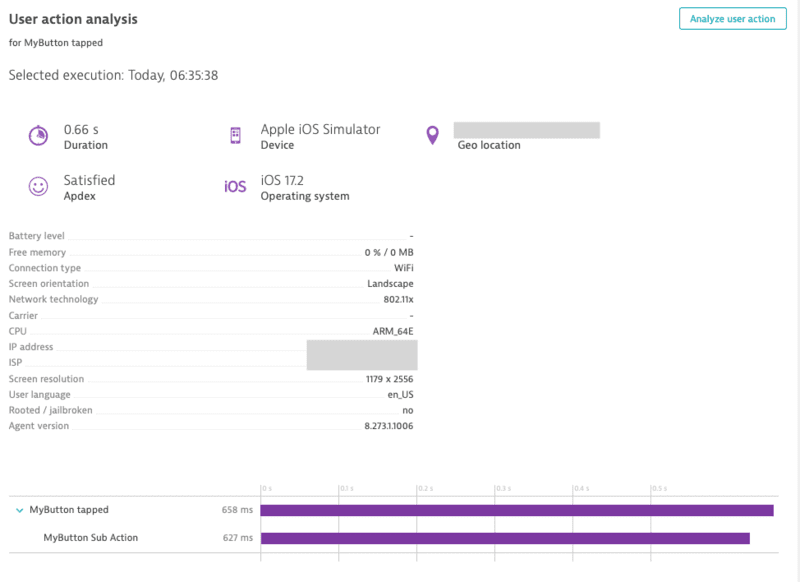
Cancel actions
Actions can be canceled. That means they will not be sent and discarded fully. This also means that any values and sub actions attached to the action will be removed.
import { Dynatrace } from '@dynatrace/react-native-plugin';

const myAction = Dynatrace.enterAutoAction("MyButton tapped");
// Action will be canceled
myAction.cancel();

// Has no impact as the action is already canceled
myAction.leaveAction();
Manual Web Request Tagging
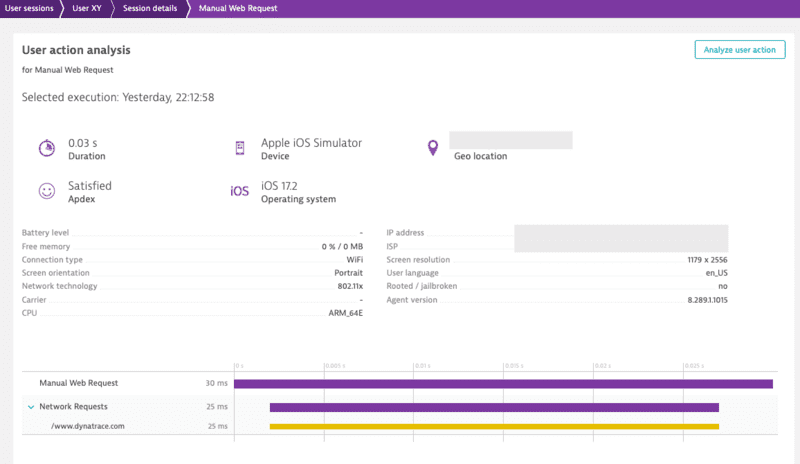
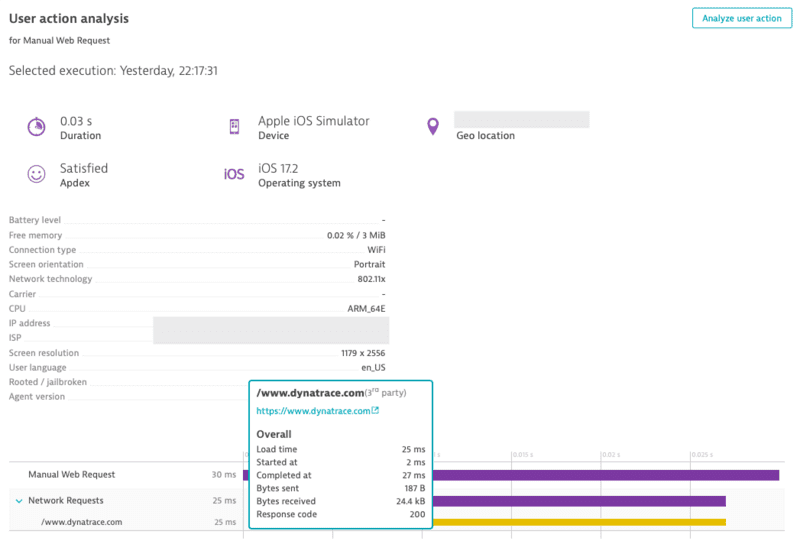
You can manually tag and time your web requests. With the API shown below, you are able to manually capture the web requests of an http framework/library.
Note: Using this API will force the request to be added to the action that is manually created.
import { Dynatrace, DynatraceWebRequestTiming } from '@dynatrace/react-native-plugin';

const action = Dynatrace.enterManualAction('API Data Fetch');
const url = 'https://api.example.com/data';
const tag = await action.getRequestTag(url);
const timing = new DynatraceWebRequestTiming(tag, url);

try {
  timing.startWebRequestTiming();
  const response = await fetch(url, {
    headers: {
      [timing.getRequestTagHeader()]: tag
    }
  });
  timing.stopWebRequestTiming(response.status, response.statusText);
} catch (error) {
  if (error instanceof Error) {
    timing.stopWebRequestTiming(-1, error.message);
  } else {
    timing.stopWebRequestTiming(-1, (error as any).toString());
  }
} finally {
  action.leaveAction();
}
There is also the option to report values for request and response size:
import { Dynatrace, DynatraceWebRequestTiming } from '@dynatrace/react-native-plugin';

const action = Dynatrace.enterManualAction('API Data Upload');
const url = 'https://api.example.com/upload';
const tag = await action.getRequestTag(url);
const timing = new DynatraceWebRequestTiming(tag, url);
const requestData = JSON.stringify({ key: 'value' });

try {
  timing.startWebRequestTiming();
  const response = await fetch(url, {
    method: 'POST',
    headers: {
      [timing.getRequestTagHeader()]: tag,
      'Content-Type': 'application/json'
    },
    body: requestData
  });
  const responseData = await response.text();
  timing.stopWebRequestTimingWithSize(
    response.status,
    response.statusText,
    requestData.length,
    responseData.length
  );
} catch (error) {
  if (error instanceof Error) {
    timing.stopWebRequestTiming(-1, error.message);
  } else {
    timing.stopWebRequestTiming(-1, (error as any).toString());
  }
} finally {
  action.leaveAction();
}
Report values
For any open action you can report certain values. The following API is available for action:
import { Platform } from '@dynatrace/react-native-plugin';

interface IDynatraceAction {
  reportDoubleValue(valueName: string, value: number, platform?: Platform): void;
  reportError(errorName: string, errorCode: number, platform?: Platform): void;
  reportEvent(eventName: string, platform?: Platform): void;
  reportIntValue(valueName: string, value: number, platform?: Platform): void;
  reportStringValue(valueName: string, value: string, platform?: Platform): void;
}
Important: All string parameters (errorName, eventName, valueName, value) are limited to 250 characters and will be truncated if they exceed this limit.
To report a string value, use the following:
import { Dynatrace } from '@dynatrace/react-native-plugin';

const myAction = Dynatrace.enterAutoAction("MyButton tapped");
myAction.reportStringValue("ValueName", "ImportantValue");
myAction.leaveAction();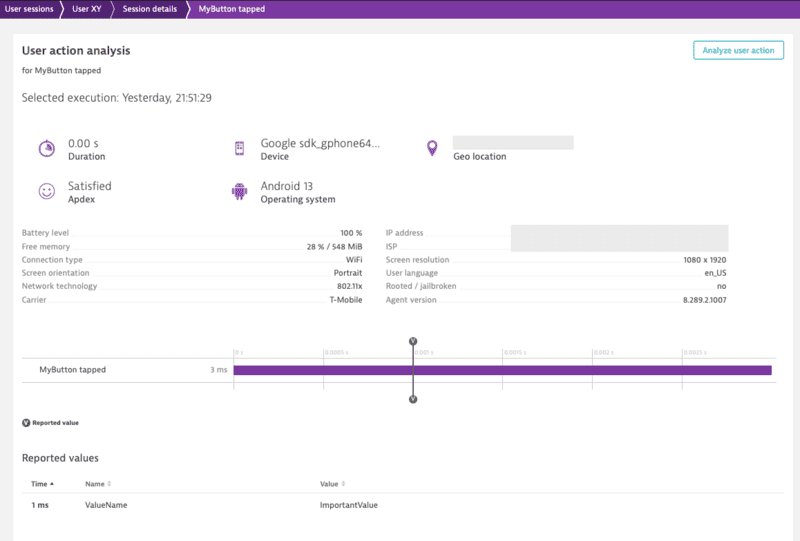
If you look at the API calls, you will see the optional parameter platform?: Platform. This parameter offers the possibility to report values only for a specific platform. to know more, see Platform independent reporting.
Report an error stacktrace
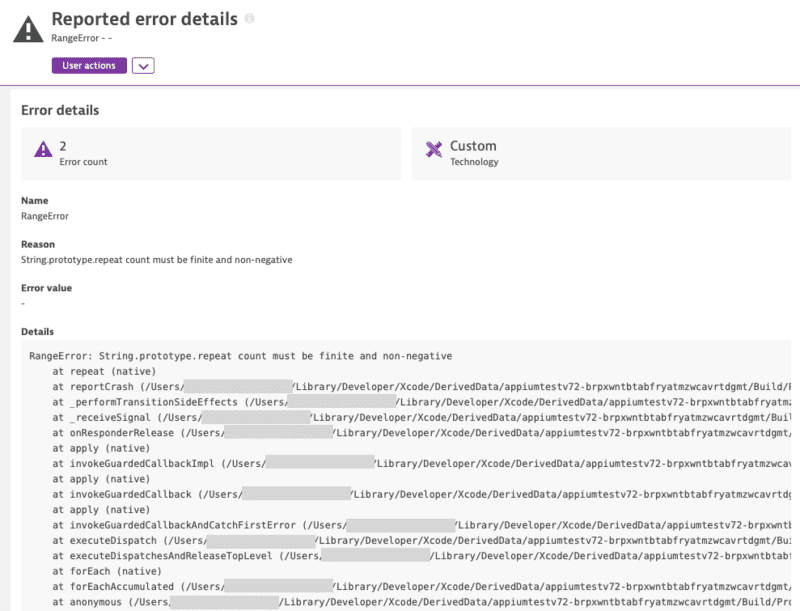
To manually report an error stacktrace, use the following API call:
import { Dynatrace } from '@dynatrace/react-native-plugin';

try {
  throw new Error('Database connection failed');
} catch (error) {
  if (error instanceof Error) {
    Dynatrace.reportErrorStacktrace(
      'DatabaseError',
      error.message,
      'Failed to connect to remote database',
      error.stack || 'No stack trace available'
    );
  }
}
Note: The previous API without errorValue is deprecated and will be removed in the future. Please use the new API with errorValue if possible.
Identify a user
You can identify a user and tag the current session with a name by making the following call:
Important: The user identifier is limited to 250 characters and will be truncated if it exceeds this limit.
import { Dynatrace } from '@dynatrace/react-native-plugin';

Dynatrace.identifyUser("User XY");
End the current user session
To end the current user session, use the following API call:
import { Dynatrace } from '@dynatrace/react-native-plugin';

Dynatrace.endSession();
Note: The user tagging will not carry over to the new user session that is started after using this API. If user tagging is desired in the new user session, please ensure that you call the user tagging API.
Manually report a crash
You can manually report a crash via the following API calls:
import { Dynatrace } from '@dynatrace/react-native-plugin';

try {
  throw new Error('Fatal memory allocation failure');
} catch (error) {
  if (error instanceof Error) {
    Dynatrace.reportCrash(
      'MemoryError',
      error.message,
      error.stack || 'No stack trace available'
    );

    // or directly via the full error
    Dynatrace.reportCrashWithException('MemoryError', error);
  }
}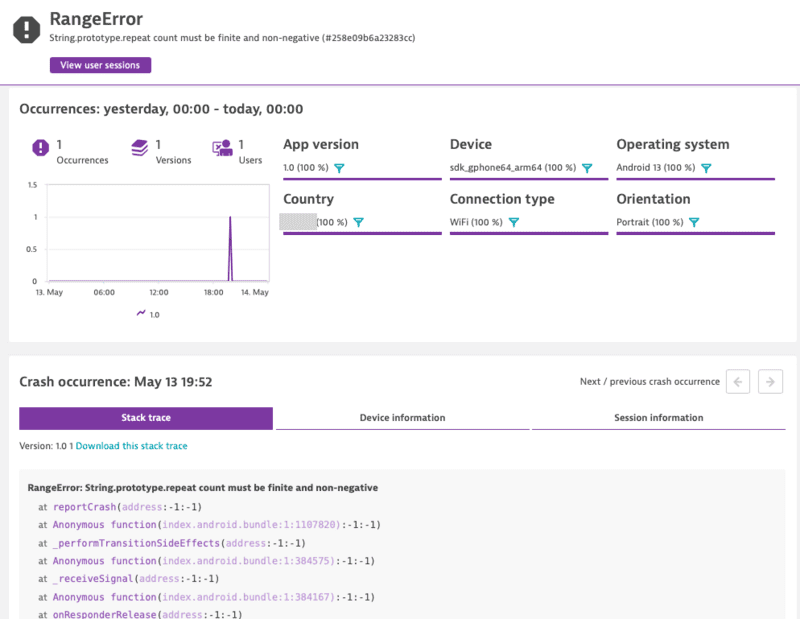
Note: If you use this API call to report a crash manually, it will force the session to be completed. Any new actions that are captured afterwards will be added into a new session.
reportCrashWithException will use the crashName as name for the crash. It will only report the crash if there is also a stacktrace available.
User Privacy Options
The privacy API methods allow you to dynamically change the data-collection level based on the individual preferences of your end users. Each end user can select from three data-privacy levels:
export enum DataCollectionLevel {
    Off, Performance, UserBehavior
}- Off: Native Agent doesn't capture any monitoring data.
- Performance: Native Agent captures only anonymous performance data. Monitoring data that can be used to identify individual users, such as user tags and custom values, aren't captured.
- UserBehavior: Native Agent captures both performance and user data. In this mode, Native Agent recognizes and reports users who re-visit in future sessions.
Crash reporting is enabled by default. The Mobile agent captures all unhandled exceptions/errors and immediately sends the crash report to the server. With this API you can activate or deactivate crash reporting. To change this behaviour via the API, enable/activate userOptIn and set the User Privacy Options.
The API to get and set the current privacy level looks like this:
import { Platform, UserPrivacyOptions } from '@dynatrace/react-native-plugin';

interface IDynatrace {
  getUserPrivacyOptions(platform?: Platform): Promise<UserPrivacyOptions>;
  applyUserPrivacyOptions(userPrivacyOptions: UserPrivacyOptions, platform?: Platform): void;
}
To check the current privacy options that are set:
import { Dynatrace } from '@dynatrace/react-native-plugin';

const privacyOptions = await Dynatrace.getUserPrivacyOptions();
If you want to create a new UserPrivacyOptions object and pass it to Dynatrace:
import { Dynatrace, DataCollectionLevel, UserPrivacyOptions } from '@dynatrace/react-native-plugin';

const privacyConfig = new UserPrivacyOptions(DataCollectionLevel.UserBehavior, true);

// Getter and setter available for UserPrivacyOptions
privacyConfig.crashReportingOptedIn = false;
privacyConfig.dataCollectionLevel = DataCollectionLevel.Performance;

const level = privacyConfig.dataCollectionLevel;
const crashReporting = privacyConfig.crashReportingOptedIn;

Dynatrace.applyUserPrivacyOptions(privacyConfig);
Report GPS Location
You can report latitude and longitude and specify an optional platform.
import { Dynatrace } from '@dynatrace/react-native-plugin';

Dynatrace.setGPSLocation(48.31518732698596, 14.305245274594471);
Platform independent reporting
You probably noticed that each method has an additional optional parameter named platform of type Platform. You can use this to only trigger manual instrumentation for a specific OS. The available values are: Platform.Ios and Platform.Android. Default is that it will work on any platform. Otherwise it is passed only to the relevant OS. For example:
- Passing to iOS only:
import { Dynatrace, Platform } from '@dynatrace/react-native-plugin';

const myAction = Dynatrace.enterAutoAction("MyButton tapped", Platform.Ios);
//Perform the action and whatever else is needed.
myAction.leaveAction(Platform.Ios); - Passing to Android only:
import { Dynatrace, Platform } from '@dynatrace/react-native-plugin';

const myAction = Dynatrace.enterAutoAction("MyButton tapped", Platform.Android);
//Perform the action and whatever else is needed.
myAction.leaveAction(Platform.Android); - Passing to both:
import { Dynatrace } from '@dynatrace/react-native-plugin';

const myAction = Dynatrace.enterAutoAction("MyButton tapped");
//Perform the action and whatever else is needed.
myAction.leaveAction();
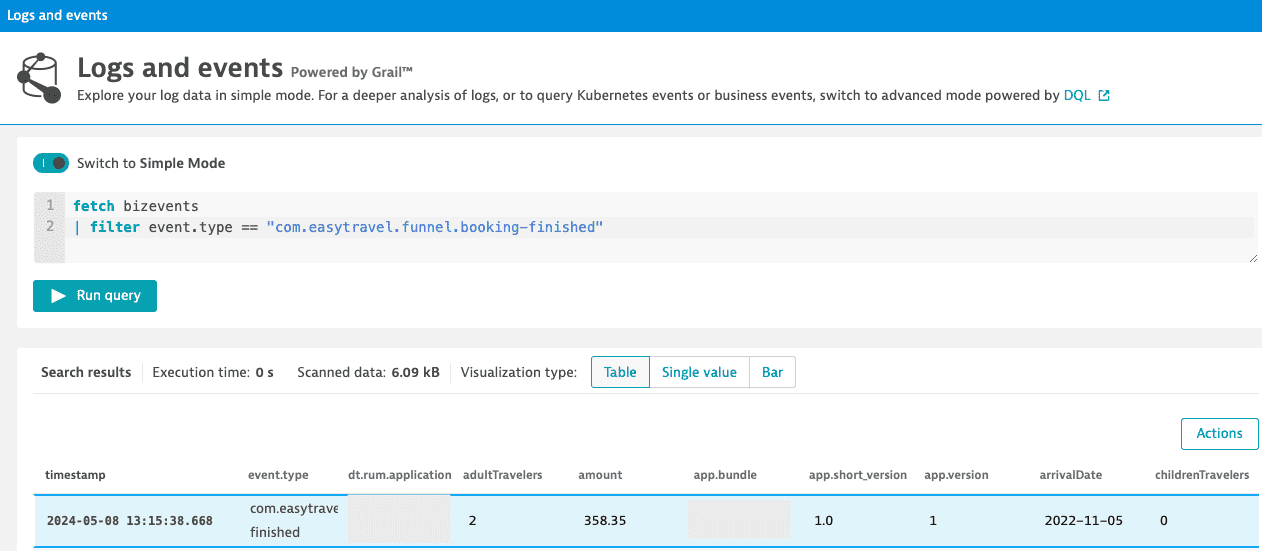
Business event capturing
With sendBizEvent, you can report business events. These events are standalone events, as OneAgent sends them detached from user actions or user sessions.
For more information on business events, see dynatrace documentation.
import { Dynatrace } from '@dynatrace/react-native-plugin';

Dynatrace.sendBizEvent("com.easytravel.funnel.booking-finished", {
  "event.name" : "Confirmed Booking",
  "screen": "booking-confirmation",
  "product": "Danube Anna Hotel",
  "amount": 358.35,
  "currency": "USD",
  "reviewScore": 4.8,
  "arrivalDate": "2022-11-05",
  "departureDate": "2022-11-15",
  "journeyDuration": 10,
  "adultTravelers": 2,
  "childrenTravelers": 0
});
Setting beacon headers
This allows you to put a set of http headers on every agent http request (i.e. Authorization header etc.). It will also triggers the agent to reconnect to the beacon endpoint with the new headers.
Note: To clear the previously set headers, call the method without the headers parameter or with a null value for the headers parameter.
import { Dynatrace } from '@dynatrace/react-native-plugin';

const beaconHeaders = new Map<string, string>();
beaconHeaders.set('headerName', 'headerValue');
Dynatrace.setBeaconHeaders(beaconHeaders);
Exclude Individual JSX Elements
If you want to instrument a functional component or class component but want to exclude a certain button or element, you can do this via the dtActionIgnore property. Example:
import React from 'react';
import { TouchableHighlight, Text, View } from 'react-native';

const TouchableHighlightScreen = () => {
    return (
        <View>
            <TouchableHighlight onPress={onPress}>
                <Text>TouchableHighlight that will be monitored</Text>
            </TouchableHighlight>
            <TouchableHighlight onPress={onPress} dtActionIgnore="true">
                <Text>TouchableHighlight that will be ignored</Text>
            </TouchableHighlight>
        </View>
    );
};

const onPress = () => {
    console.log("TouchableHighlight Pressed!");
};

export default TouchableHighlightScreen;
This example shows two TouchableHighlight, which will fire the onPress() function when pressed. The property dtActionIgnore="true" will prevent the monitoring of one of them. This means that the onPress will still be executed but we will no longer create a user action which is wrapping the button click.
Attention: If you are using Typescript and want to set this property with type-safety, look here.
New RUM experience
The New RUM Experience introduces a set of advanced APIs that allow you to send custom events, modify event data, track exceptions, monitor HTTP requests, and manage view contexts in your React Native application. These APIs provide more granular control over the data captured by Dynatrace and are designed for the next generation RUM capabilities.
For more detailed information about the New RUM Experience, see the official Dynatrace documentation.
Send Event
The sendEvent() method allows you to send custom events with arbitrary properties using the EventData class. This is useful for tracking specific user interactions or application state changes.
import { Dynatrace, EventData } from '@dynatrace/react-native-plugin';

// Send a custom event with properties
Dynatrace.sendEvent(new EventData()
  .addEventProperty("event_properties.button_clicked", "login_button")
  .addEventProperty("event_properties.user_type", "premium")
  .addEventProperty("event_properties.attempt_count", 3)
  .withDuration(250)
);
Property Requirements:
- Only properties prefixed with
event_properties.*are allowed - Additionally, the
durationproperty is allowed - Maximum of 50 custom properties per event
- If the limit is exceeded, properties are sorted alphabetically by key and excess properties are dropped deterministically
- String properties are limited to 5000 characters (exceeding characters are truncated)
- Field names must contain only alphabetic characters, numbers, underscores, and dots
- Each dot must be followed by an alphabetic character
- Each underscore must be followed by an alphabetic character or number
- Values must be primitive types (string, number, boolean)
- Cannot contain functions, undefined, Infinity, or NaN as values (they will be replaced with null)
Send Session Property Event
Session properties apply to all events within the current session. Use sendSessionPropertyEvent() to set properties that should be available across the entire user session.
import { Dynatrace, SessionPropertyEventData } from '@dynatrace/react-native-plugin';

// Set session-wide properties
Dynatrace.sendSessionPropertyEvent(new SessionPropertyEventData()
  .addSessionProperty("session_properties.user_tier", "premium")
  .addSessionProperty("session_properties.app_version", "2.1.0")
  .addSessionProperty("session_properties.feature_flag_enabled", true)
);
Important Notes:
- Session properties persist throughout the entire session
- If you send the same property multiple times, only one value will be kept (first or last)
- Use session properties for data that applies to the entire user session
- Field naming follows the same rules as events, but with
session_properties.prefix - Maximum of 50 custom properties per event
- If the limit is exceeded, properties are sorted alphabetically by key and excess properties are dropped deterministically
Event Modifier
Event modifiers allow you to intercept and modify events before they are sent to Dynatrace. This is useful for adding common properties, filtering sensitive data, or enriching events with additional context. Event modifiers apply to all event types, including custom events, session properties, exceptions, and HTTP events.
If multiple event modifiers are added, they are executed in the order they were added.
Most fields and namespaces can't be modified in any way (added, removed or overridden), while others are open for modification.
Open for modification and can be added:
event_properties.*session_properties.*
session_properties.* are only allowed to be on a session property event.
Open for modification only:
url.fullexception.stack_trace
Example
import { Dynatrace, IEventModifier } from '@dynatrace/react-native-plugin';

// Create an event modifier
const myModifier: IEventModifier = {
  modifyEvent(event) {
    // Add common properties to all events
    event["event_properties.app_build"] = "1.2.3";
    event["event_properties.environment"] = "production";

    // Return null to discard the event entirely
    if (event["event_properties.ignore"] === true) {
      return null;
    }

    return event;
  }
};

// Add the modifier
Dynatrace.addEventModifier(myModifier);

// Remove the modifier when no longer needed
Dynatrace.removeEventModifier(myModifier);
Important Considerations
- Execution order: If multiple event modifiers are added, they are executed in the order they were added
- Returning null: Returning
nulldiscards the event and prevents future modifier functions from being executed - Performance: Event modifiers should be efficient as they are called for every event
- Field naming: Custom properties must follow the
event_properties.*orsession_properties.*prefix naming convention - Reserved fields: Certain reserved fields and namespaces cannot be modified. Attempts to modify them will be ignored
- Error handling: If a modifier throws an exception, it will be logged but won't prevent other modifiers from executing
- Primitive values: Event fields can only contain primitive values (String, int, double, bool)
- Invalid argument: In case you pass an invalid argument to
addEventModifier, we return a no-op placeholder modifier.
Send Exception Event
The sendExceptionEvent() method provides a structured way to report exceptions with additional context and custom properties using the ExceptionEventData class.
import { Dynatrace, ExceptionEventData } from '@dynatrace/react-native-plugin';

try {
  // Code that may throw an error
  throw new Error('Something went wrong');
} catch (error) {
  if (error instanceof Error) {
    Dynatrace.sendExceptionEvent(new ExceptionEventData(error)
      .addEventProperty('event_properties.custom_key', 'custom_value')
      .addEventProperty('event_properties.error_context', 'user_action')
    );
  }
}
Parameters:
error: The Error object containing exception information (required)
Send HTTP Request Event
The sendHttpRequestEvent() method allows you to manually report HTTP request events with detailed information about the request and response.
import { Dynatrace, HttpRequestEventData } from '@dynatrace/react-native-plugin';

// Basic HTTP request event
const requestEventData = new HttpRequestEventData('https://api.example.com/users', 'GET');
Dynatrace.sendHttpRequestEvent(requestEventData);

// HTTP request with additional details
const detailedRequestEventData = new HttpRequestEventData('https://api.example.com/data', 'POST')
  .withStatusCode(200)
  .addEventProperty('event_properties.headers.content_type', 'application/json');
Dynatrace.sendHttpRequestEvent(detailedRequestEventData);
Parameters:
url: The URL of the HTTP request (required)method: The HTTP method (e.g., 'GET', 'POST', 'PUT', 'DELETE') (required)
View Monitoring
The view monitoring APIs allow you to track different screens or views in your application, providing context for all events happening within those views.
There are two ways to monitor views:
- Automatic view monitoring - Enable navigation tracking in your configuration to automatically capture view changes through supported navigation libraries (enabled by default)
- Manual view monitoring - Use the
startView()API to manually control when view contexts are created and updated
Important: These approaches should not be mixed, as the outcome is unpredictable. Choose either automatic or manual view monitoring for your application.
Automatic Navigation tracking
Note: This feature only works with
@react-navigationversions 5.x through 7.x.
The following is an example of how this feature can be configured in your dynatrace.config.js file. Note that this feature is enabled by default.
react: {
  navigation: {
    enabled: true
  }
}
When this feature is enabled, the view context will represent the current state of the @react-navigation NavigationContainer. The state gets represented as a URL-style route. All subsequent events get associated with the view context and thus with the current route.
For instance, assume the following setup:
const Drawer = createDrawerNavigator();

function App() {
  return (
    <NavigationContainer>
      <Drawer.Navigator initialRouteName="Home">
        <Drawer.Screen name="Home" component={HomeScreen} />
        <Drawer.Screen name="Feature" component={FeatureScreen}/>
      </Drawer.Navigator>
    </NavigationContainer>
  );
}

const Stack = createStackNavigator();

function FeatureScreen() {
  return (
    <Stack.Navigator initialRouteName="ScreenOne">
      <Stack.Screen name="ScreenOne" component={NestedScreenOne} />
      <Stack.Screen name="ScreenTwo" component={NestedScreenTwo} />
    </Stack.Navigator>
  );
}
When navigating to Home, the view context will be set to /Home. When navigating to Feature and being redirected to the nested ScreenOne, the view context will be set to /Home/ScreenOne. When navigating to ScreenTwo within Feature, the view context will be set to /Feature/ScreenTwo.
Start View
Use startView() to begin monitoring a specific view or screen. When a view is started, all subsequent events will be associated with that view context.
import { Dynatrace } from '@dynatrace/react-native-plugin';

// Start monitoring a view
Dynatrace.startView("HomeScreen");
Important Considerations:
- Only one view can be active at a time
- Starting a new view will automatically stop the previous one
- View names should be meaningful and consistent across your application
- All events captured after starting a view will include the view context
Complete Example:
import { Dynatrace, EventData } from '@dynatrace/react-native-plugin';

// User navigates to profile screen
Dynatrace.startView("UserProfile");

// Send custom event within the view
Dynatrace.sendEvent(new EventData()
  .addEventProperty("event_properties.profile_action", "edit_profile")
  .addEventProperty("event_properties.changes_made", true)
);

// User navigates away
Dynatrace.startView("UserProfileDetailed");
User Interaction
User Interaction is an automatic instrumentation feature that captures touch and press events in your React Native application without requiring any manual API calls. When enabled, the plugin instruments your UI components at build time and sends structured interaction events to Dynatrace at runtime.
The following is an example of how this feature can be configured in your dynatrace.config.js file. Note that this feature is enabled by default.
react: {
  userInteraction: true
}
When enabled, UI Interaction can be controlled by two layers:
- Build/config layer (
dynatrace.config.js)
react.userInteraction: true|falsecontrols whether the UI Interaction instrumentation feature is applied.
- Runtime remote layer (
RuntimeConfigurationObserver)
- Runtime emission checks the remote flag
touch_interaction_enabled. - If remote flag is present, it is used as the source of truth.
- If remote flag is temporarily unavailable, the plugin falls back to the last known good remote value.
- If no remote value was received yet, runtime defaults to enabled behavior.
Masking sensitive UI labels
UI Interaction also supports masking sensitive labels before events are sent.
Masking is applied when:
- the touched element or one of its parents is marked with
dtMask - the runtime masking rules classify the detected text as sensitive
- the runtime masking rules classify the element
testIDas sensitive
When masking is active:
- the interaction path and component information are still reported
- the detected UI label is replaced with the configured replacement string (default:
***) ui_element.name_originis reported asmasked
Example using dtMask:
<View dtMask>
  <Pressable onPress={onPress}>
    <Text>john.doe@example.com</Text>
  </Pressable>
</View>
This allows you to preserve interaction analytics while avoiding exposure of sensitive text in the emitted UI Interaction event.
Produced data
Each captured interaction produces an event describing what the user touched and where. The event includes:
- Detected name — the resolved label of the touched element, derived from its visible text, accessibility label, component name, or test ID.
- Component — the type of the UI component that was touched (e.g.
Pressable). - Component Path — a stable path through the component tree that uniquely identifies the element (e.g.
App/View[1]/Pressable[1]). - Interaction type — how the user interacted (e.g.
touch). - Position — the screen coordinates where the touch occurred.
In some cases, a responder is also included. The responder is the component that ultimately handled the user's touch — for example, a Pressable that received the press event. It carries the same name, component type, and path information as the touched element, and can differ when a touch is visually on a child element but handled by a parent.
If masking is active for an interaction, the event still contains the same structural information, but the detected name is replaced and the name origin changes to masked.
Example event
{
  "characteristics.has_user_interaction": true,
  "ui_element.detected_name": "LoginButton",
  "ui_element.components": ["Pressable"],
  "ui_element.id": "App/View/Pressable",
  "ui_element.name_origin": "component",
  "interaction.type": "touch",
  "positions": [{ "x": 120, "y": 460 }],
  "ui_element.responder.detected_name": "Pressable",
  "ui_element.responder.components": ["Pressable"],
  "ui_element.responder.id": "App/View[/Pressable",
  "ui_element.responder.name_origin": "component"
}
Custom Names for Components
You can assign custom names to your components. A custom name affects both the Component and the Component Path described above. There are two ways to do this, depending on how the component is used.
1. As a JSX prop (dtActionName)
Use this when you render the component as JSX. Pass dtActionName as a prop, and it overrides the auto-detected name for that specific usage:
<TouchableOpacity dtActionName="Checkout Button" onPress={onCheckout}>
    <Text dtActionName="Checkout Text">Buy now</Text>
</TouchableOpacity>
Touching it produces:
"ui_element.components": ["Checkout Text"],
"ui_element.id": ".../Checkout Button/Checkout Text"
2. As a static property (Component.dtActionName)
Use this when the component is not rendered as JSX, so the prop approach above is not available — for example, a screen component you define once and hand to a navigator by reference. Set dtActionName directly on the component. This affects every place the component is used at once:
import { NavigationContainer } from '@react-navigation/native';
import { createDrawerNavigator } from '@react-navigation/drawer';

const Drawer = createDrawerNavigator();

function ProfileScreen() {
    return (/* ... */);
}

// Applies to all usages of ProfileScreen below
ProfileScreen.dtActionName = 'User Profile';

function App() {
    return (
        <NavigationContainer>
            <Drawer.Navigator>
                {/* Both screens reference the same component,
                    so both pick up the 'User Profile' name */}
                <Drawer.Screen name="Me" component={ProfileScreen} />
                <Drawer.Screen name="Account" component={ProfileScreen} />
            </Drawer.Navigator>
        </NavigationContainer>
    );
}
Touches inside one of the 2 screens now produce:
"ui_element.id": ".../User Profile/..."Note: The static property applies to all uses of the component. If you need a different name per usage, render the component as JSX and use the
dtActionNameprop (option 1) instead.Note: The static property has no effect when a component is rendered as JSX. In that case the name is taken from either the
dtActionNameprop passed to it (option 1) or the name of the JSX component.
React Native Symbolication
Dynatrace can automatically symbolicate JavaScript stack traces captured by the plugin using sourcemaps. This allows you to view human-readable file names, line numbers, and column information in your crash reports.
Generating Sourcemaps
Sourcemaps are generated during release builds and map bytecode offsets (Hermes) and locations in the minified JavaScript bundle (JavaScriptCore) back to your original source code. We support sourcemaps for both Hermes and JavaScriptCore. For detailed instructions on generating sourcemaps, see the React Native debugging release builds guide.
To generate a sourcemap:
Android:
- Run
npx react-native run-android --mode releasein your project root, or - Run
gradlew assembleReleasein the/androiddirectory
iOS:
- First, enable sourcemaps according to the React Native debugging release builds guide
- Then run
npx react-native run-ios --mode Release, or - Build for release in Xcode
Uploading Sourcemaps
Once generated and patched, upload your sourcemaps to Dynatrace. For detailed instructions, see the symbol file management documentation.
NPX Commands
The following npx commands are available for the plugin:
- npx instrumentDynatrace - Is triggering the configuration process and will insert the configuration into the Android and iOS application. This is mandatory and should usually happen automatically when doing
react-native run-androidorreact-native run-ioscommand. - npx configDynatrace - Is checking the current configuration and is creating a default configuration if there is none.
- npx lineOffsetDynatrace - ...
npx instrumentDynatrace
npx instrumentDynatrace [optional: config=... gradle=... plist=...]gradle=C:\MyReactAndroidProject\build.gradle: The location of the root build.gradle file. We will assume that the other gradle file resides in/app/build.gradle. This will add the whole agent dependencies automatically for you and will update the configuration.plist=C:\MyReactIOSProject\projectName\info.plist: Tell the script where your info.plist file is. The plist file is used for updating the configuration for the agent.config=C:\SpecialFolderForDynatrace\dynatrace.config.js: If you have not got your config file in the root folder of the React Native project but somewhere else.--reset: Clear any previously-persisted custom config path and revert the Metro/Babel transformer to the defaultdynatrace.config.jslookup. Useful after switching between build flavors.
If plist=... is not provided, the plugin tries to resolve Info.plist automatically in this order:
- Resolve app name from Expo config files in the app root (
app.json,app.config.js,app.config.ts) and check common iOS plist locations. - Fallback to scanning the
ios/folder forInfo.plist.
For monorepos or multi-target iOS setups, automatic discovery can be ambiguous. In those cases, pass plist=... explicitly to select the exact file.
npx configDynatrace
npx configDynatrace [optional: config=...]config=C:\SpecialFolderForDynatrace\dynatrace.config.js: If you have not got your config file in the root folder of the React Native project but somewhere else.
Customizing paths for configuration
Note: This feature works directly on run-android, run-ios or start command only for React Native v0.60.1 or newer until v0.69.x.
MacOS Users: This feature is not working correctly on MacOS. Arguments are not passed between run-ios and starting the webserver. If you still want to use custom arguments you need to start the webserver first with custom arguments and later on executing run-ios, which will then no longer create a webserver as it is already running in background.
Our scripts assumes that the usual React Native project structure is given. The following arguments can be specified for our instrumentation script if the project structure is different.
gradle=C:\MyReactAndroidProject\build.gradle: The location of the root build.gradle file. We will assume that the other gradle file resides in/app/build.gradle. This will add the whole agent dependencies automatically for you and will update the configuration.plist=C:\MyReactIOSProject\projectName\info.plist: Tell the script where your info.plist file is. The plist file is used for updating the configuration for the agent.config=C:\SpecialFolderForDynatrace\dynatrace.config.js: If you have not got your config file in the root folder of the React Native project but somewhere else.
DYNATRACE_CONFIG environment variable
As an alternative to config=, you can set the DYNATRACE_CONFIG environment variable to specify the config file path. This is particularly useful in CI pipelines and Xcode schemes where multiple build flavors each need their own config file, because it does not require changing the instrumentation script — only the environment of the build step.
DYNATRACE_CONFIG=dynatrace.config.prod.js npx instrumentDynatracePrecedence (highest to lowest):
config=CLI argument — always winsDYNATRACE_CONFIGenvironment variable- Default
dynatrace.config.jsin the project root
Note:
DYNATRACE_CONFIGapplies to the Metro/Babel transformer as well asnpx instrumentDynatrace. This means you can set it in your Xcode scheme's environment variables to ensure the correct config is used during iOS archive/bundling, independently of what was passed to the instrumentation step.
Examples:
- React Native v0.60.1 or newer:
npx react-native run-android config=C:\SpecialFolderForDynatrace\dynatrace.config.js --port=2000- React Native v0.70.0 or newer:
npx instrumentDynatrace config=C:\SpecialFolderForDynatrace\dynatrace.config.js
npx react-native run-android --port=2000
Note: that custom arguments must not be prefixed with -- !
pnpm Monorepo Setup
In a pnpm monorepo where React Native apps share a single native project (e.g. packages/shared/android and packages/shared/ios), the native platform folders are not located inside each app directory. To use shared native projects, you must provide the paths explicitly via config=, gradle=, and plist= arguments.
Add a dedicated instrument script for each app in the root package.json of your monorepo:
"scripts": {
  "instrument:my-app": "pnpm --filter my-app exec instrumentDynatrace config=$PWD/apps/my-app/dynatrace.config.js gradle=$PWD/packages/shared/android/build.gradle plist=$PWD/packages/shared/ios/MyApp/Info.plist",
  "instrument:another-app": "pnpm --filter another-app exec instrumentDynatrace config=$PWD/apps/another-app/dynatrace.config.js gradle=$PWD/packages/shared/android/build.gradle plist=$PWD/packages/shared/ios/AnotherApp/Info.plist"
}
Then run the instrumentation for each app from the monorepo root:
pnpm instrument:my-app
pnpm instrument:another-app
Key points:
$PWDexpands to the monorepo root at the time the script runs, so all paths are absolute and unambiguous regardless of the calling directory.--filter <app-name>scopespnpm execto the correct app workspace soinstrumentDynatraceis resolved from that app'snode_modules.- The
gradle=argument accepts either abuild.gradle/build.gradle.ktsfile path or a folder path. When a file is given, the plugin derives theapp/build.gradle(.kts)path from the same directory automatically. - If your project uses Kotlin DSL, point
gradle=tobuild.gradle.ktsinstead.
Manually adding iOS OneAgent to a project
Adding the iOS agent manually depends on the availability of support for CocoaPods.
With CocoaPods support
Insert the following in your Podfile:
pod 'react-native-dynatrace', :path => '../node_modules/@dynatrace/react-native-plugin'Without CocoaPods support
- Open your project in Xcode.
- Run open
node_modules/@dynatrace/react-native-plugin/ios. - Drag
DynatraceRNBridge.xcodeprojinto your Libraries group. - Select your main project in the navigator to bring up settings.
- Under Build Phases expand the Link Binary With Libraries header.
- Scroll down and click + to add a library.
- Find and add
libRNDynatrace.aunder the Workspace group. - ⌘+B
Setup for tvOS
Note: Testing has only been done using the react-native-tvos package and currently is the only package supported with our plugin.
To allow our plugin to work with tvOS, please follow the below steps:
Before installing the plugin, add the following to your package.json:
"overrides": {
	"@dynatrace/react-native-plugin": {
		"react-native": "<insert-version-here>"
	}
},
If you are using the following "react-native": "npm:react-native-tvos@0.69.8-2", use the below snippet:
"overrides": {
	"@dynatrace/react-native-plugin": {
		"react-native": "0.69.8-2"
	}
},
Once the above is completed, follow the steps from the install plugin section.
When you are ready to build, make sure that you use the plist= parameter when running the npx instrumentDynatrace or npx react-native run-ios commands for the tvOS scheme.
Examples:
Using React Native v0.69.x or lower and @react-native-community/cli v8.x or lower:
npx react-native run-ios --simulator "Apple TV" --scheme "ApplicationName-tvOS" plist=/path/to/application/ios/ApplicationName-tvOS/Info.plistUsing React Native v0.70 or higher or @react-native-community/cli v9.x or higher:
// Update the Info.plist with the properties from the dynatrace.config.js file
npx instrumentDynatrace plist=/path/to/application/ios/ApplicationName-tvOS/Info.plist

// Build your tvOS application
npx react-native run-ios --simulator "Apple TV" --scheme "ApplicationName-tvOS"
For more information regarding the differences in the react native versions, please see the Note from the quick setup section.
Structure of the dynatrace.js file
The configuration is structured in the following way:
/** @type {import('@dynatrace/react-native-plugin').DynatraceUserConfiguration} */
const config = {
    react : {
      // Configuration for React Native instrumentation
    },
    android : {
      // Configuration for Android auto instrumentation
    },
    ios : {
      // Configuration for iOS auto instrumentation
    }
};
module.exports = config;
Thanks to the @type annotation above, your editor can provide autocomplete and type checking for the configuration. To ensure this works, enable checkJs in your tsconfig.json:
{
  "compilerOptions": {
    "checkJs": true
  }
}
If your tsconfig.json uses an include array, make sure dynatrace.config.js is listed — TypeScript ignores files not matched by include, even when checkJs is enabled:
{
  "include": ["**/*.ts", "**/*.tsx", "dynatrace.config.js"]
}
Manual Startup Counterparts
Here is a list of all the counterparts for the options that can be used with a manual startup. Below in the counterparts table you will find an example configuration block for both Android and iOS.
| Property Name | Default | Android | iOS | React |
|---|---|---|---|---|
| beaconUrl | undefined | autoStart.beaconUrl | DTXBeaconURL | - |
| applicationId | undefined | autoStart.applicationId | DTXApplicationId | - |
| reportCrash | true | crashReporting | DTXCrashReportingEnabled | - |
| errorHandler | true | - | - | errorHandler.enabled |
| reportFatalErrorAsCrash | true | - | - | errorHandler.reportFatalErrorAsCrash |
| logLevel | LogLevel.Info | debug.agentLogging | DTXLogLevel | debug |
| lifecycleUpdate | false | - | - | lifecycle.includeUpdate |
| userOptIn | false | userOptIn | DTXUserOptIn | - |
| actionNamePrivacy | false | - | - | input.actionNamePrivacy |
| actionNamePreference | 'any' | - | - | input.actionNamePreference |
| actionNameAlgorithm | 'depth-first' | - | - | input.actionNameAlgorithm |
| bundleName | undefined | - | - | bundleName |
React block
The react configuration block contains all settings regarding the react instrumentation. The following options are available:
Input
react : {
  input : {
    instrument(filename) => {
      return true;
    },

    actionNamePrivacy: false,
    actionNamePreference: 'any',
    actionNameAlgorithm: 'depth-first',
  }
}
This instrument function expects you to return true or false. In this case, all files are instrumented to capture user input.
Lifecycle
react : {
  lifecycle : {
    includeUpdate : false,
    instrument(filename) => {
      // This will only capture inputs in files in the path src/screens/
      return filename.startsWith(require('path').join('src', 'screens'));
    }
  }
}
The instrument function expects you to return true or false. In this case, all files in the src/screens/ folder are instrumented to capture lifecycle changes.
Note: it is important that you input all files here where you wish lifecycle instrumentation. Probably this should contain all your "real" screens. If you return true for this function, all lifecycle events will be reported, which can be a lot in React Native.
Debug mode
react: {
  debug: true
}
This activates the debug mode. You will get more console output during instrumentation and at runtime.
User Interaction Configuration
react: {
  userInteraction: true // set it to true here if you want to enable UI interaction, default value is false
}
Enables or disables the UI interaction (user interaction) feature. Set to false to disable capturing of user interactions (for example, touch/click actions) produced by the React Native UI interaction instrumentation. See the User Interaction section for behavior, produced data, and runtime control details.
Error Handler
react: {
  errorHandler: {
    enabled: true,
    reportFatalErrorAsCrash: true,
  },
}
The enabled property activates our Error/Crash handler which will insert our handler into your React Native application. This is true per default.
The reportFatalErrorAsCrash property should be set to false if you are wanting to report a fatal/unhandled error as an error and NOT a crash. Setting this value to false will keep the current session open.
Note:
if enabled is set to false, the value of reportFatalErrorAsCrash is not be considered/used as our error handler will not be started.
Autostart
react: {
  autoStart: true
}
This activates the AutoStart mode which will insert an auto start call in your React Native application. This is true per default. If you want to use a manual startup call, please have a look into the manual startup section.
Bundle Name and Version
By default, the plugin automatically reads the name and version fields from your package.json file and uses them as bundleName and bundleVersion. These values are included with New RUM on Grail Events and are critical for crash symbolication.
Important for Crash Symbolication:
When uploading sourcemap files to Dynatrace, you must specify the same bundleName and bundleVersion values. The sourcemap desymbolication feature requires an exact match between:
- The
bundleNameandbundleVersionsent with the crash report - The
bundleNameandbundleVersionspecified when uploading the sourcemap file
If these values don't match, the Error Inspector will not be able to use the sourcemap file to symbolicate the crash.
Custom Configuration:
You can override the default values from package.json by explicitly setting them in dynatrace.config.js:
react: {
  bundleName: "MyCustomBundle",
  bundleVersion: "1.0.0",
}
Multiple Bundle Setup:
If you have a multiple bundle setup where you load several .bundle files within your React Native application, ensure each bundle has a unique name. This prevents actions from different bundles from interfering with each other.
Navigation
This feature is for the New RUM on Grail experience only and is described in the Automatic Navigation tracking section.
react: {
  navigation: {
    enabled: true
  }
}
Debugging our auto-instrumentation
You can see the changes our auto-instrumentation is making to your code with this flag:
react: {
  debugBabelPlugin: true
}
The changes our auto-instrumentation is making now get dumped into the node_modules/@dynatrace/react-native-plugin/build folder when building the Javascript bundle. The *.dtx files show what your code looks like after only our auto-instrumentation was applied to your code. The *.dtx.downstream files show what your code looks like after both our auto-instrumentation and all other babel plugins were applied to your code.
Note: This feature increases the time it takes to build the Javascript bundle. Only use it for debugging purposes. Deactivate it otherwise, especially when fast build times are important.
Using our legacy jscodeshift auto-instrumentation
We recently moved our auto-instrumentation to a babel plugin. In case you need to, you can still switch to the old jscodeshift auto-instrumentation with this flag:
react: {
  useLegacyJscodeshift: true
}
Note: When we moved our auto-instrumentation to a babel plugin, we removed documentation that was only relevant for the jscodeshift auto-instrumentation. Most notably, we removed documentation concerning registering a custom metro transformer and patching sourcemaps. If you use the
useLegacyJscodeshiftflag, please refer to the legacy documentation (v2.333.1) for details on custom metro transformers and sourcemap patching.
Android block
The Android block is a wrapper for the Android configuration you find in the WebUI (in the Mobile Application Settings). Copy the content into the following block:
android : {
  config : `CONTENT_OF_ANDROID_CONFIG`
}
The content of the config block is directly copied to the Gradle file. To know more about the possible configuration options, see the DSL documentation of our Gradle plugin.
iOS block
The iOS block is a wrapper for the iOS configuration you find in the WebUI (in the Mobile Application Settings). Copy the content into the following block:
ios : {
  config : `CONTENT_OF_IOS_CONFIG`
}
The content of the config block is directly copied to the plist file. Therefore, you can use every setting that is possible and you find in the official Mobile Agent documentation.
Define build stages in dynatrace.config.js
If you have several stages such as debug, QA, and production, you probably want to separate them and let them report in different applications. This can be done with two different approaches:
- Create several dynatrace.config.js (e.g. dynatrace.config.prod.js) and pass those configuration files via arguments in the CLI.
- Use the configuration options which are available through Gradle and XCode. (Described below)
Note: Option 1 has the drawback that you always need to perform the configuration step before a build as you are basically replacing the configuration all the time. So if you made a debug build and want to do a production build, which is reporting to a different environment or has different options, you need to perform
npx instrumentDynatrace(Or if you use RN 0.60+ this happens automatically withreact-native run-androidorreact-native run-ios).
Android
In Android, you can enter all the information in the config file. The following dynatrace {} block must be inserted into the android config variable in your dynatrace.config.js file.
android : {
  config : `
    dynatrace {
      configurations {
        dev {
            variantFilter "Debug" // build type name is upper case because a product flavor is used
            // other variant-specific properties
        }
        demo {
            variantFilter "demo" // the first product flavor name is always lower case
            // other variant-specific properties
        }
        prod {
            variantFilter "Release" // build type name is upper case because a product flavor is used
            // other variant-specific properties
        }
      }
    }
  `
}
This will result in the following:
> Task :app:printVariantAffiliation
Variant 'demoDebug' will use configuration 'dev'
Variant 'demoRelease' will use configuration 'demo'
Variant 'paidDebug' will use configuration 'dev'
Variant 'paidRelease' will use configuration 'prod'
In all these blocks, you can define different application IDs and even use a different environment.
iOS
In iOS, you can define some variables in the dynatrace.config.js file. These variables must then be inserted in a prebuild script. The following properties must be inserted into the iOS config variable in your dynatrace.config.js file.
ios: {
  config: `
  <key>DTXApplicationID</key>
  <string>\${APPLICATION_ID}</string>
  <key>DTXBeaconURL</key>
  <string>Your Beacon URL</string>
  `
}
The variable ${APPLICATION_ID} must then be inserted with a prebuild script. Make sure to use \ in front of the ${...}, because if not JavaScript thinks you are trying to insert a variable into the String. For more information, see https://medium.com/@andersongusmao/xcode-targets-with-multiples-build-configuration-90a575ddc687.
User opt-in mode
Specifies if the user has to opt-in for being monitored. When enabled, you must specify the privacy setting. For more information, see the API section.
Android
android: {
  config: `
    dynatrace {
      configurations {
        defaultConfig {
          autoStart{
            ...
          }
          userOptIn true
        }
      }
    }
  `
}
iOS
ios: {
  config: `
  <key>DTXUserOptIn</key>
  </true>
  `
}
Native OneAgent debug logs
If the instrumentation runs through and your application starts but you see no data, you probably need to dig deeper to find out why the OneAgents aren't sending any data. Opening up a support ticket is a great idea, but gathering logs first is even better.
Android
Add the following configuration snippet to your other configuration in dynatrace.config.js right under the autoStart block (the whole structure is visible, so you know where the config belongs) and run npx instrumentDynatrace:
android: {
  config: `
    dynatrace {
      configurations {
        defaultConfig {
          autoStart{
            ...
          }
          debug.agentLogging true
        }
      }
    }
  `
}
iOS
Add the following configuration snippet to your other configuration in dynatrace.config.js (the whole structure is visible, so you know where the config belongs) and run npx instrumentDynatrace:
ios: {
  config: `
  <key>DTXLogLevel</key>
  <string>ALL</string>
  `
}
How does Dynatrace determine the user action name?
- React views
- dtActionName: Use a custom property called dtActionName
- displayName: Use the displayName property to check if React views have a display name set
- instrumentation string: Auto instrumentation or manual instrumentation is passing a string. This will be used if available.
- class name: If the display name is not available, the class name is used by taking the property name from the constructor
- Touchables, Buttons, Pressable
- dtActionName: Use a custom property called dtActionName
- If actionNamePrivacy is activated anything below will not be detected
- title property
- accessibilityLabel property
- If none of the above exist, we recursively traverse
childrento find a name. We consider text, the source property of anyReactNative.Imageand the name property of any functional component calledIcon. - You can use
actionNamePreferenceto specify which of these 3 you prefer. Consider the following example:<TouchableOpacity onPress={onPress}> <View> <Image source={{ uri: 'https://reactnative.dev/img/tiny_logo.png' }} /> <Text>Some Text</Text> </View> </TouchableOpacity>'text': Resulting name:Some Text. Prefers text and falls back to any match.'icon': Resulting name:Image Button: https://reactnative.dev/img/tiny_logo.png. PrefersReactNative.Imageand custom Icons and falls back to any match.'any': Resulting name:Image Button: https://reactnative.dev/img/tiny_logo.png. Accepts the first match regardless of type (text, image, or custom icon).
- You can use
actionNameAlgorithmto specify with what algorithmchildrenare traversed recursively, which in turn decides which name will be found first and used. Consider the following example:<TouchableOpacity onPress={onPress}> <View> <View> <Text>Deep Text</Text> </View> <Text>Shallow Text</Text> </View> </TouchableOpacity>'depth-first': Resulting name:Deep Text. Follows the first child branch fully before trying siblings.'breadth-first': Resulting name:Shallow Text. Visits all siblings at a level before going deeper, returning the shallowest match first.
- Switch, RefreshControl, Picker
- dtActionName: Use a custom property called dtActionName
- accessibilityLabel property
Attention: Minification can cause a loss of information.
Using dtActionName to change the name of the action
We check for a property named dtActionName when creating an action. If dtActionName exists, this will be used for the action name above every other option listed in the previous section. Example:
import { TouchableHighlight } from '@dynatrace/react-native-plugin';
import { Text } from 'react-native';

<TouchableHighlight dtActionName="CustomActionName">
  <Text>Custom Action Name</Text>
</TouchableHighlight>
Note: actionNamePrivacy has no impact on using dtActionName. dtActionName will always be used.
Attention: If you are using Typescript and want to set this property with type-safety, look here.
How does Dynatrace automatically report crashes?
In general, Dynatrace always closes the session when a crash occurs. Usually a crash is when the application gets fully terminated. In React Native, we also see fatal errors in the JavaScript part as a full crash even though the native application is still alive. When this happens we will end the session. This is due to visibility reasons and may change in the future. The automated crash reporting will be (automatically) put in place by the transformer at the very beginning of the application. Using a custom error handler afterwards will not interfere with our crash handler.
Note: The behavior mentioned below occurs if an error contains a stacktrace or if the stacktrace is empty/missing.
- Non fatal error: If the internal React Native crash handler shows the error is not fatal, we will report it as error.
- Fatal error: If the error is considered as fatal by the React Native crash handler, it will be treated as crash.
- Native crashes: If a crash appears solely on the native side and is not noticed by the internal React Native crash handler, it will be reported directly by the Android or iOS agent.
- Exception: Some JavaScript crashes will result in Native crashes. Therefore, they are filtered on the native side as normally the crash would be reported twice. On the JavaScript side, these crashes are already reported by us before they hit the native side resulting in no lost information. Additionally, you can use our crash and error reporting APIs which are available with manual instrumentation.
React Automatic Runtime
React introduced with React v17.x, React v16.14.0, React v15.7.0, and React v14.10 the automatic runtime which changes the JSX transformation (https://reactjs.org/blog/2020/09/22/introducing-the-new-jsx-transform.html).
This impacts our instrumentation as well. To keep the instrumentation in place you need to change your babel configuration.
For our instrumentation to work properly, you will need to add the importSource property:
Attention: In case you are using NativeWind, use 'nativewind' as the importSource for the JSX runtime in babel.config.js, as specified in the NativeWind documentation. Since you cannot stack two JSX runtimes using Babel, we internally make the NativeWind JSX runtime then call our @dynatrace/react-native-plugin JSX runtime.
module.exports = {
  plugins: [
    [
      "@babel/plugin-transform-react-jsx",
      {
        runtime: "automatic",
        importSource: "@dynatrace/react-native-plugin"
      }
    ]
  ]
}
Using babel-preset-expo:
module.exports = function (api) {
  api.cache(true);
  return {
    presets: [
      ['babel-preset-expo',
        {
          jsxRuntime: 'automatic',
          jsxImportSource: '@dynatrace/react-native-plugin',
        },
      ],
    ],
  };
};
Using @react-native/babel-preset:
module.exports = {
  presets: [
    ['module:@react-native/babel-preset'],
  ],
  plugins: [
      [
          '@babel/plugin-transform-react-jsx',
          {
              runtime: 'automatic',
              importSource: "@dynatrace/react-native-plugin"
          },
      ],
  ],
};
Using metro-react-native-babel-preset:
module.exports = {
  presets: [
    ['module:metro-react-native-babel-preset'],
  ],
  plugins: [
      [
          '@babel/plugin-transform-react-jsx',
          {
              runtime: 'automatic',
              importSource: "@dynatrace/react-native-plugin"
          },
      ],
  ],
};
Maven Central in top-level gradle file
Because the Dynatrace Android agent now requires the MavenCentral repository, if either jcenter() or mavenCentral() is not added inside of ALL the repositories blocks via the top-level build.gradle, the build will fail.
Below is an example of what a basic top-level build.gradle file should look like after adding mavenCentral() to all repository blocks:
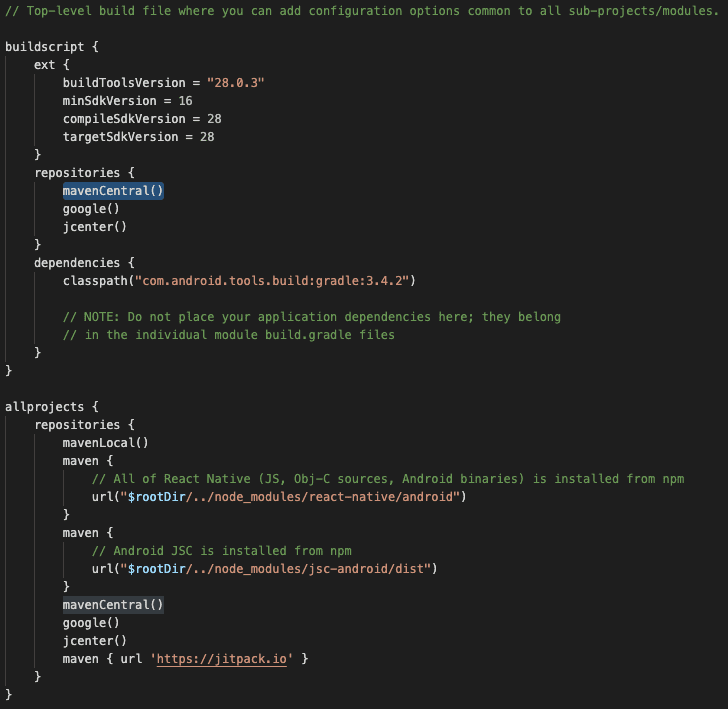
The location of the top-level build.gradle should be:
<rootOfProject>\android\build.gradle
Note:
JCenter has noted its sunset on May 1st. Though, JCenter is still syncing with Maven Central so havingjcenter() in your build.gradle file without the use of mavenCentral() will retrieve the Dynatrace Android Gradle Plugin no problem.
Updating to Gradle 7
Updating Gradle only affects your Android build. To update your project to Gradle 7, modify the following 3 files in your Android folder.
ProjectFolder\android\gradle\wrapper\gradle-wrapper.propertiesUpdate the distributionUrl to get a newer gradle version.
distributionUrl=https\://services.gradle.org/distributions/gradle-7.6.4-all.zipProjectFolder\android\build.gradleUpdate the version of your Android gradle plugin (minimum 7.x) as Gradle 7 needs a newer one. To get the newer versions, addgoogle()in your repositories. Example of a build.gradle file:
buildscript {
    repositories {
        google()
    }
    dependencies {
        classpath 'com.android.tools.build:gradle:x.x.x'
    }
}

allprojects {
    repositories {
        google()
        mavenLocal()
        jcenter()
        maven {
            url "$rootDir/../node_modules/react-native/android"
        }
    }
}ProjectFolder\android\app\build.gradleThis depends on how old your React Native project really is. You must change your used buildTools, compileSdkVersion, targetSdkVersion and support libaries. Older build.gradle files might look similar to this with unimportant parts removed to make the snippet smaller:
...

apply from: "../../node_modules/react-native/react.gradle"

...

android {
    compileSdkVersion 28
    buildToolsVersion "28.0.3"

    defaultConfig {
        minSdkVersion 16
        targetSdkVersion 28

        ...
    }

    ...
}

dependencies {
    compile "com.android.support:appcompat-v7:28.0.0"
    compile "com.facebook.react:react-native:+"
}

...
Kotlin Compatibility Note
Our Android Agent currently requires Kotlin 2.0.21. However, it should be noted that using this version may cause compatibility issues with older versions of React Native and the corresponding react-native-gradle-plugin due to, for instance, differences in Kotlin metadata:
Kotlin embeds language-specific features that Java doesn't natively support (like nullability and extension functions) into bytecode using @Metadata annotations. These annotations include a metadataVersion.
- React Native 0.66, for instance, works with Kotlin 2.0.21 because its
react-native-gradle-plugindoes not use Kotlin, avoiding metadata conflicts. - React Native 0.71, for instance, uses a
react-native-gradle-plugincompiled with Kotlin 1.7.22, which expectsmetadataVersion 1.6.0. Using Kotlin 2.0.21 (which producesmetadataVersion 1.9.0) can lead to build failures. - React Native 0.72, for instance, again is compatible with Kotlin 2.0.21, as its
react-native-gradle-pluginexpects a metadata version that is compatible with1.9.0.
In summary, ensure your build fulfills our Kotlin 2.0.21 requirement while simultaneously fulfilling the requirements of your React Native version and its react-native-gradle-plugin.
Compose Compatibility Note
Our Android Agent currently supports Jetpack Compose 1.4 - 1.10. If you are using an incompatible version of Jetpack Compose, you may encounter the following error message during build:
Could not resolve all dependencies for configuration ':app:debugCompileClasspath'.
Version '1.0.0' of artifact 'androidx.compose.material:material' is not supported.
Please use the latest version of the Dynatrace Android Gradle plugin.
If you encounter compatibility issues or want to disable Jetpack Compose instrumentation, you can configure this in your dynatrace.config.js file. Note: Disabling Jetpack Compose instrumentation will skip the compatibility check, allowing you to build with any version of Jetpack Compose without triggering version validation errors.
Important: The configuration example below shows only the Compose-specific setting. You must ensure that your complete dynatrace.config.js file includes all other required configuration settings (such as beaconUrl, applicationId, etc.) as described in the Android block section of this documentation.
module.exports = {
  // ...
  android: {
        config: `
        dynatrace {
            configurations {
                defaultConfig {
                    userActions {
                        composeEnabled false
                    }
                }
            }
        }
        `,
  }
};
For more information about Jetpack Compose instrumentation and monitoring capabilities, please refer to the official Dynatrace documentation for Android OneAgent.
Configuration of standalone React Native project
This section explains the configuration of a standalone React Native project. This means you have a React Native project, but don't use the typical iOS and android folders. Instead you have a separate native iOS or android project which is embedding your React Native project.
To get the same experience as somebody who has a combined project, you roughly need to do the following things:
- Apply Auto Instrumentation to your Native Project
- Add this plugin to your React Native project
Auto Instrumentation of your Native Project
The mobile application in the web UI offers you a configuration wizard (see settings page) for your native project (Android/iOS). Use it and apply it to your separated native project according to this documentation:
- Android: https://www.dynatrace.com/support/help/technology-support/operating-systems/android/instrumentation-via-plugin/instrumentation-via-plugin/
- iOS: https://www.dynatrace.com/support/help/technology-support/operating-systems/ios/instrumentation/dynatrace-auto-instrumentation-for-ios/
Add this plugin to your React Native project
After you have added the auto instrumentation to your native project, you need to add this plugin to your standalone react native project.
You can simply follow the setup shown in the beginning of this documentation. There is no special handling needed, except skipping step 4, as it is of course not needed as you usually create a bundle when building a standalone project.
- Optional: You can remove the android and ios block from your dynatrace.config.js. It has no impact on the plugin as the configuration of the native platforms is skipped because of the missing iOS and android folder.
Dynatrace documentation
The OneAgent for Android and iOS documentation is available at the following locations:
- Android: https://www.dynatrace.com/support/help/setup-and-configuration/oneagent/android/
- iOS: https://www.dynatrace.com/support/help/setup-and-configuration/oneagent/ios/
Note: The Dynatrace Android Gradle plugin is hosted on Maven Central. JCenter has noted it's sunset on May 1st so Maven Central is the primary source of the Dynatrace Android Gradle plugin.
Instrumentation Overhead
When using auto-instrumenation through our plugin, here are some examples of the size differences before and after instrumentation for release builds:
| Operating System | App template | Version | Size Before | Size After | Difference |
|---|---|---|---|---|---|
| Android | Default new app | 0.74.3 | 50.7 MB | 50.9 MB | 0.2 MB |
| iOS | Default new app | 0.74.3 | 28.1 MB | 36.5 MB | 8.4 MB |
Typescript Setup for dtActionIgnore and dtActionName
We are using module augmentation to augment the IntrinsicAttributes Interface in the JSX namespace in the React module with dtActionName and dtActionIgnore. The IntrinsicAttributes Interface in the JSX namespace contains properties that you can pass to every JSX element, thus, in short, you can use dtActionName and dtActionIgnore with full type-safety on every JSX element if you follow the setup below.
In general, ambient/global type declarations in packages like @dynatrace/react-native-plugin in your node_modules are visible and thus available to you for type checking in at least these cases:
You import any type from a .ts or .d.ts file located in our package anywhere in your project. For instance, if you do
import { Dynatrace } from '@dynatrace/react-native-plugin'anywhere in your project, Typescript will consider our Types and the module augmentation will work.You update your
tsconfig.jsonto include our types, which will also make the module augmentation work:
  "compilerOptions": {
    "types": [
      "@dynatrace/react-native-plugin"
    ]
  }
We recommend the second option, since it works independent of whether you import anything from @dynatrace/react-native-plugin. We simply show the first option in case you wonder why dtActionName and dtActionIgnore are available on JSX elements despite not having added any configuration.
Troubleshooting and applicable restrictions
Attention: If you think something is not working the way it should, ALWAYS try to reset the cache of metro first before starting a support case. You can do this via the CLI react-native start --reset-cache. If it still does not work feel free to open a support case.
To resolve problems with the plugin, first look at creating logs and identify what went wrong. The logs can be found in the plugins folder of your React Native project (usually node_modules/@dynatrace/react-native-plugin/logs).
- An error such as
DynatraceNative.PLATFORM_ANDROID is nullindicates that the linking of the native library didn't work correctly. Often, React Native is unable to link correctly. Simply unlink (react-native unlink) and link (react-native link) again and the error should be gone. Missing property DTXApplicationIDindicates that there is no configuration available. Ensure that you've callednpm run updateConfigurationat least once.- If you change your project to pods when you have already installed the plugin, duplicate symbols are generated because of the already linked library. Remove the module reference manually from your project.
- Build failes with the error of "No configuration for the Dynatrace Android Gradle plugin found! Please copy the configuration block from the instrumentation wizard to the proper location." ** The android configuration was not added to your project. Please refer to the install the plugin section.
- For Android, if you see an error like "Gradle sync failed: Could not find com.dynatrace.tools.android8.223.1.1003.", please see the MavenCentral section for an example and more information.
- When using NodeJS version
15+and version2.231.1of our plugin you could encounter the following error:npm ERR! Could not resolve dependency: npm ERR! peer react@"^16.0" from @react-native-community/picker@1.8.1. Using the old deprecrated Picker dependency was causing peer dependency issues so we updated the auto-instrumentation to use the new Picker dependency. If you are still using this@react-native-community/picker, you can manually instrument the picker without issue (create custom actions). - To disable the error handler when using manual startup, you will need to use/migrate to the
ConfigurationBuilderinstead of the deprecatedManualStartupConfiguration. There is no option to disable the crash handler usingManualStartupConfiguration.
Supported and Unsupported libraries
Important note: If the library you are using is not on either the support or unsupported list, that does not mean that this plugin is not compatible with the library.
Supported:
- @react-native-picker/picker
- axios
- react-native-gesture-handler
- react-native-webview
- Custom libraries that directly use the default React Native components (i.e. Button)
- NativeWind
Attention: In case you are using NativeWind, use 'nativewind' as the importSource for the JSX runtime in babel.config.js, as specified in the NativeWind documentation. Since you cannot stack two JSX runtimes using Babel, we internally make the NativeWind JSX runtime then call our @dynatrace/react-native-plugin JSX runtime.
Report a bug or open a support case
Attention: If you think something is not working the way it should, ALWAYS try to reset the cache of metro first before starting a support case. You can do this via the CLI react-native start --reset-cache. If it still does not work feel free to open a support case.
If you are struggling with a problem, submit a support ticket to Dynatrace (support.dynatrace.com) and provide the following details:
Files to gather:
Native agent logs - Enable native agent debug logs and collect logs from:
- iOS: Xcode console output
- Android: Android Studio Logcat
Metro logs - Enable React debug mode in your
dynatrace.config.jsand collect Metro bundler logs:- Build logs showing instrumentation output
- Runtime logs from Metro terminal/console
- These logs show React Native side instrumentation and runtime behavior
Plugin logs - Located in
node_modules/@dynatrace/react-native-plugin/logsConfiguration - Your
dynatrace.config.jsfile
Tip: Enable both native agent debug logs and React debug mode before reproducing the issue to capture comprehensive diagnostics from both native (iOS/Android) and JavaScript (React Native) layers.
Changelog
2.343.1
- Updated Android (8.343.1.1038) & iOS Agent (8.343.1.1007)
- Added User Actions feature
- Raised minimum platform requirements for Android and iOS
- Android API level: 21 → 23
- Java: 11 → 17
- AGP: 7.0+ → 8.1.1+
- iOS SDK: 12 → 15
- Fixed iOS archive/bundle crash (
ENOENT: no such file or directory) in projects that use app-specific config files (e.g.dynatrace.config.prod.js) instead of the defaultdynatrace.config.jsat the repo root. The config resolution code was unconditionally reading the config file beforerequire(), causing a hard crash in the Metro/Babel transformer instead of a graceful "config not found" fallback. Discovered via external report from a monorepo setup with multiple build flavors. - Fixed custom config path (
config=argument tonpx instrumentDynatrace) being lost between build steps: previously, runningnpx instrumentDynatracewithout arguments in a subsequent build step (e.g. a generic iOS build phase) would silently delete the persisted custom path, causing Metro bundler to fall back to the hardcodeddynatrace.config.jsand crash. The custom path is now preserved until explicitly overridden. - Added
DYNATRACE_CONFIGenvironment variable as an alternative way to specify the config file path for the Metro/Babel transformer. - Added
npx instrumentDynatrace --resetflag to clear a previously-persisted custom config path and revert the Metro/Babel transformer to the defaultdynatrace.config.jslookup. Useful after switching between build flavors that each use a different config file. - Fixed incorrect
start_timeon Android app start events when3rd_gen_enabledis false. TheEventPipelinewas suppressing theforwardAppStartEventtiming-correction call along with all other 3rd-gen events, causing the native Dynatrace SDK to report its own stale process-creation timestamp instead of the actual JS bundle load time.
2.341.1
- Updated Android (8.341.1.1004) & iOS Agent (8.341.1.1010)
- Added support for using
dtActionNameprop to customize User Interaction component names - Fixed Babel instrumentation not recording start time and duration for User Interaction actions
- Fixed
React.FragmentandFragmentcomponents being incorrectly instrumented as User Interactions - Fixed
config=build argument being silently ignored when the path contains=characters (e.g.config=$PWD/dynatrace.config.js) or is an absolute path expanded from$PWD - Added TypeScript typechecking and autocomplete support in
dynatrace.config.js - Decoupled Session Replay automation from the core React Native SDK on Android; renamed automation components to
ReplayEventTrigger - Updated
@babel/runtimeto latest major version - Fixed security vulnerabilities in
wsandbrace-expansiondependencies
2.339.1
- Updated Android (8.339.1.1004) & iOS Agent (8.339.1.1011)
- Enabled User Interaction Feature by default
2.337.3
- Fixed issue causing fractional timestamps
2.337.2
- Updated Android Agent (8.337.3.1013)
- Fixed crash in
Dynatrace.getUserPrivacyOptions()on Android
2.337.1
- Updated Android (8.337.2.1010) & iOS Agent (8.337.1.1003)
- Fixed gradle path derivation for custom
--gradlearguments: the plugin now correctly probes the filesystem to auto-detectapp/build.gradle(.kts)with proper Kotlin DSL support, and validates that onlybuild.gradleorbuild.gradle.ktsfiles are accepted (notsettings.gradle). - Enables pnpm monorepo instrumentation by allowing explicit
config=,gradle=, andplist=arguments in rootpackage.jsonscripts, supporting shared native project layouts whereandroid/andios/are not co-located with each app. - Added actionNamePreference and actionNameAlgorithm configuration flags.
2.335.1
- Updated Android (8.335.1.1001) & iOS Agent (8.335.1.1009)
- Dynatrace Android configuration (
dynatrace.gradle) is now written directly next to thebuild.gradlefile instead of insidenode_modules. Existing projects with the old path are migrated automatically. - Updated Android Gradle plugin configuration for Gradle 9 compatibility in
plugin-runtime.gradle. - Moved auto-instrumentation from jscodeshift to a Babel plugin, improvements include:
- Significantly faster JS bundle builds
- Sourcemaps now natively account for our auto-instrumentation - no patching needed
- Added instrumentation for
BorderlessButtonandBaseButtonfromreact-native-gesture-handler. - Improved iOS
Info.plistauto-discovery fornpx instrumentDynatraceby resolving names fromapp.json,app.config.js, andapp.config.ts, plusINFOPLIST_FILEvalues from Xcode project settings. - Added safer fallback scanning for
Info.plistinios/, with explicit ambiguity errors for multi-target/monorepo layouts and guidance to passplist=...when needed.
2.333.1
- Jetpack Compose support range extended to 1.4 - 1.10 see Compose Compatibility Note
- Updated Android (8.333.1.1006) & iOS Agent (8.333.1.1005)
- Added configuration flag to enable/disable the User Interaction feature.
- Added User Interaction feature to collect UI interaction data such as touches, providing insights into user behavior
2.331.1
- Updated Android (8.331.1.1004) & iOS Agent (8.331.1.1008)
2.329.1
- Updated Android (8.329.1.1014) & iOS Agent (8.329.1.1017)
- New RUM experience Removed Dynatrace.stopView() API
- New RUM experience Enforcing length limitation of 5000 characters for user input values
- New RUM experience React Native Deobfuscation service via sourcemaps
- Adding
npx lineOffsetDynatracecommand - New RUM experience Added automated view tracking via navigation
- New RUM experience Event and session properties are now sorted alphabetically when the limit of 50 is exceeded, ensuring deterministic property dropping
2.327.2
- Fixed iOS startup time calculation issues for React Native 0.72 and lower
- Fixed static properties during auto instrumentation of Touchables
- Updated Android (8.327.3.1006) & iOS Agent (8.327.2.1022)
2.327.1
- Added Compose Compatibility Note
- Added New RUM experience preview documentation
- Fixed iOS crash reporting by delaying the crash by 200ms on iOS to give the Agent enough time to report it
- Updated Android (8.327.2.1004) & iOS Agent (8.327.1.1020)
2.325.2
- Fixed incombatability with Metro 0.83.2 and newer
2.325.1
- Updated Android (8.325.1.1007) & iOS Agent (8.325.1.1012)
- New RUM experience preview ReactNative version now added to RUM on Grail event base data
- New RUM experience preview Added API documentation for RUM on Grail API
2.323.2
- Fixed error "Execution failed for task 'mergeReleaseAssets'. A problem occured starting process 'command 'npx''" when building for release on Windows.
- Downgraded required NodeJS version to 16.0.0+
- Fixing Switch instrumentation for React Native 0.81+
2.323.1
- Updated Android (8.323.1.1002) & iOS Agent (8.323.1.1009)
- Fixing Touchable/Text instrumentation for React Native 0.81+
- Added module augmentation of React to allow using dtActionName and dtActionIgnore type-safely on every JSX Element
2.321.1
- Updated Android (8.321.1.1009) & iOS Agent (8.321.1.1007)
- Auto startup fixed for React Native v0.80 and higher
- Fixed Dynatrace Reporter with newer versions of Metro
- Added NativeWind support
2.319.1
- Updated Android (8.319.2.1011) & iOS Agent (8.319.1.1005)
2.317.2
- Updated Android (8.317.1.1007) & iOS Agent (8.317.1.1003)
- Webrequest correlation with user action fixed for iOS
2.313.1
- Updated Android (8.313.1.1004) & iOS Agent (8.313.1.1016)
- Expo transformer is now automatically used, if available.
- LogLevel was broken for manual startup
2.311.2
- Updated Android (8.311.1.1007) & iOS Agent (8.311.1.1013)
- Configuration copied to android folder which supports cloud builds
- Removed dynamic import for jsx runtime as it was causing issue
2.309.1
- Updated Android (8.309.2.1011) & iOS Agent (8.309.1.1009)
- Fixed issue with metro when internal require was not resolved correctly
2.307.1
- Updated Android (8.307.1.1005) & iOS Agent (8.307.1.1014)
- Now require the use of NodeJS 18+
2.305.1
- Updated Android (8.305.1.1005) & iOS Agent (8.305.3.1016)
2.303.2
- Updated Android (8.303.2.1014) & iOS Agent (8.303.1.1004)
- Android Gradle Plugin version requirement raised to 7.0+
- Gradle Plugin version requirement raised to 7.0+
- Fixed warnings for jsx runtime when using expo
2.301.2
- Updated Android (8.301.1.1004) & iOS Agent (8.301.1.1008)
- Fix iOS crashes to not report on session after crash
- RectButton check/logic updated
- Improved startup log line
- Updated crash type for manually reported iOS crashes using
reportCrashWithException
2.299.1
- Updated Android (8.299.1.1004) & iOS Agent (8.299.1.1003)
2.297.2
- Updated Android (8.297.1.1003) & iOS Agent (8.297.1.1004)
- Added information about Instrumentation Overhead to README
- Fixed manual webrequest timing missing stopWebRequestTimingWithSize in iOS
2.295.1
- Updated Android (8.295.1.1006) & iOS Agent (8.295.1.1020)
- Add list of supported/unsupported libraries to README
2.293.2
- Updated Android (8.293.1.1003) & iOS Agent (8.293.1.1003)
- Preventing double instrumentation of touchables
- Fixed instrumentation of Text component because of missing static access
2.291.2
- Updated Android (8.291.1.1002) & iOS Agent (8.291.1.1004)
- Updated the way we report unhandled errors without a stacktrace
- Touchable instrumentation was partly broken for static access
2.289.1
- Updated Android (8.289.2.1007) & iOS Agent (8.289.1.1015)
- Added option to disable error handler for auto and manual start
- Updated touchable instrumentation for React Native v74
2.287.3
- Updated Android (8.287.1.1006) & iOS Agent (8.287.2.1009)
- Added request and response size to manual web request tagging
- Improved logging of configuration at startup
- Fixed dtActionName when using ActionNamePrivacy
2.285.2
- Fixed bridge module issue for older React Native versions (< 0.65.0)
- Introduced support for @react-native/metro-babel-transformer
- Updated Android (8.287.1.1006) & iOS Agent (8.285.1.1004)
2.283.3
- Added Auto-Instrumentation for React Native Switch
- Updated instrumentation of RefreshControl (dtActionIgnore & dtActionName)
- Updated instrumentation of Picker (dtActionIgnore & dtActionName)
- Minimum Support iOS version raised to 12
- Updated Android (8.283.1.1004) & iOS Agent (8.283.1.1004)
2.279.4
- Updated iOS crash report sending strategy
- Configuration printed on startup fixed
- Updated Android (8.279.1.1002) & iOS Agent (8.279.1.1008)
- Improved event handling for touchable instrumentation
- Added logic for nested arrays when traversing touch event name
- Fixed Auto Startup issue for RN v73
- Fixed Android build as execution order of plugins was wrong
2.277.1
- Updated Android (8.277.1.1003) & iOS Agent (8.277.1.1004)
- Introduced
ConfigurationBuilderfor Manual Startup - Deprecating
ManualStartupConfigurationfor Manual Startup
2.275.1
- Updated iOS Agent (8.275.1.1006)
- Add documentation for manually tagging web requests
2.273.1
- Updated Android (8.273.1.1003) & iOS Agent (8.273.1.1006)
- Crash handler initialization happens earlier in the application
- Ignoring duplicated crashes through native crash handler
2.271.3
- Updated Android (8.271.1.1003) & iOS Agent (8.271.2.1007)
- Fixed createElement logic for older React Native versions
- Fixed asynchronous handler for Touchables
- Updated instrumentation of RefreshControl
2.269.1
- Updated Android (8.269.1.1009) & iOS Agent (8.269.1.1007)
- Updated instrumentation for iOS Picker to match Android
2.267.1
- Updated Android (8.267.1.1005) & iOS Agent (8.267.1.1006)
- Added support for tvOS
2.265.2
- Updated Android (8.265.1.1002) & iOS Agent (8.265.1.1003)
- Fixed Metro problem because of dynamic require
- Fixed enterManualAction/enterAutoAction API
2.263.2
- Updated Android (8.263.1.1002) & iOS Agent (8.263.2.1005)
- Fixed execution of tests via Jest 28.x
2.261.1
- RectButton of react-native-gesture-handler instrumented
- Updated Android (8.261.2.1013) & iOS Agent (8.261.1.1006)
- Minimum Java Version was raised to 11
2.259.2
- Updated Android (8.259.1.1008) & iOS Agent (8.259.1.1009)
- Fixed issue with jsx-runtime and changed importSource
- Fixed wrong naming for components via jsx-runtime
2.257.1
- Added API for creating a manual custom action
- Removed option to disable certificate validation
- Updated Android (8.257.1.1007) & iOS Agent (8.257.1.1007)
- Minimum Support iOS version raised to 11
2.255.1
- Enhanced debug logging
- Adding instrumentation for touchables of react-native-gesture-handler
- Fixed Auto instrumentation in case of missing start of plugin
- Fixed JSX Runtime
- Updated Android (8.255.1.1005) & iOS Agent (8.255.1.1006)
2.253.2
- Added Business events capturing API
- Updated Android (8.253.1.1003) & iOS Agent (8.253.1.1006)
- Fixed plist configuration/handling for iOS DTXAutoStart
2.249.1
- Configuration commands fixed for React Native 0.70.0+
- Updated Android Agent (8.249.1.1004) & iOS Agent (8.249.1.1007)
- Added Business events capturing API
2.247.1
- Updated Android Agent (8.247.1.1003) & iOS Agent (8.247.1.1007)
- Minimum supported Android SDK version raised to 21
- Added actionNamePrivacy configuration flag
- Removed
instrumentDynatracefrom package.json - Adding
npx instrumentDynatraceandnpx configDynatracecommand
2.243.0
- Removed deprecated Picker
- Added auto-instrumentation for the new Picker
- Updated Android Agent (8.241.1.1003) & iOS Agent (8.241.1.1013)
2.231.1
- Added cancel API for actions
- Updated Android Agent (8.231.2.1007) & iOS Agent (8.231.1.1009)
- React Native 0.66.0 compatibility
2.227.0
- Fixed auto start in React Native 0.65.x
- Updated Android Agent (8.225.1.1004)
2.225.0
- Custom config argument fixed for transformer
- Fixed infite loop of HOC with React Redux & Functional component
- Added Manual API for Class & Function component instrumentation
- Internally changed way of class component instrumentation
- Updated Android Agent (8.223.1.1003) & iOS Agent (8.223.1.1006)
2.217.0
- Added option to exclude single elements from monitoring
- Added reportCrash(name, crash) API
- Updated iOS Agent to 8.217.1.1003 (Min iOS version changed to 9)
2.214.0
- Fixed runtime exchange of functional component
2.207.1
- Added option to change action name with dtActionName property
- Added instrumentation for functional components
- Preserving names even if minification happened
- Support for JSX Automatic runtime
- Support for Pressable Component
1.205.0
- Fixed transformation problems with TSImportType and JSX
- Updated error handler to report crashes instead of error stacktraces
- Added setBeaconHeaders API
- Added UserPrivacyOptions API
- Updated DataCollection level enum members to match native agents
1.202.0
- Startup configuration now only written once
- Fixed usage of displayName for component action creation
1.201.0
- Improved exception handling
1.200.0
- .TSX transformation fixed
1.198.0
- Podspec Update
1.192.2
- Fix for Installation Script not executed
- RN >= 0.62 Touchables support
- Multi-Transformer support
- Updated & fixed .d.ts file
- Fixed NPE in text identification of Touchables
- Crashes are now reported in the overview
- iOS Webrequests are now linked with actions
- Fix for custom arguments on run-ios and run-android
0.186.0
- Fixed instrumentation (files were skipped)
- Changed Configuration format
- Android: Switched to JCenter repository
- Applying configuration automatically (>= RN 0.60)
- Updated documenation for manual instrumentation
- Fixed problem with default config and beaconUrl
- Improved text identification of Touchables
- ImageButtons and Icons will now be reported
- Improved logic for plist file insertion
0.182.2
- MacOS: Fixed directory creation issue
0.182.1
- Fixed Typescript Parsing
- Fixed Decorator Parsing
- Fixed directory issue with older node version
0.181.1
- Picker & Swipe to Refresh instrumented
- Dynamic Imports/Requires now supported
- Fixed iOS Bug with reportErrorWithStacktrace
0.179.1
- Made Plugin compatible with RN AutoLinking
- Improved instrumentation of require & imports
- Fixed Button instrumentation
- Improved Text identification of Touchable
- Webrequest linking (Android only)
- Auto User action creation (Android only)
- Report Stacktrace via Error API (Android & iOS)
- Uninstall process now removes everything
- Modifying SourceMap, Debugging now possible
- Fixed configuration issue with npm install
0.174.0
- Switching to new Android instrumentation
- Added options to filter instrumentation
0.172.0
- Error reporting through auto instrumentation
- Debug message output in console
0.171.0
- Added auto instrumentation for React classes
0.168.0
- Initial Beta Release