nemo v4.13.1
nemo
Node.js solution for running mocha-based selenium-webdriver tests.
Getting started
Install nemo
npm install --save-dev git+ssh://git@github.com/krakenjs/nemo#masterUse the scaffold feature
$ ./node_modules/bin/nemo -X test/functional

  DONE!

  Next steps:
  1. Add a script to package.json. E.g. "nemo": "nemo -B test/functional -P pay,search,form"
  2. Make sure you have latest chrome/chromedriver installed (https://sites.google.com/a/chromium.org/chromedriver/getting-started)
     - The binary should be in your PATH
  3. Run nemo! "npm run nemo"
  4. Explore the files under test/functional
  5. Learn more: http://nemo.js.org

$
CLI arguments
$ ./bin/nemo --help

  Usage: _nemo [options]

  Options:

    -V, --version                output the version number
    -B, --base-directory <path>  parent directory for config/ and spec/ (or other test file) directories. relative to cwd
    -P, --profile [profile]      which profile(s) to run, out of the configuration
    -G, --grep <pattern>         only run tests matching <pattern>
    -F, --file                   run parallel by file
    -D, --data                   run parallel by data
    -S, --server                 run the nemo web server
    -L, --logging <level>        log level [info|error]
    -X, --scaffold <path>        inject an example nemo suite under <path>
    --debug-brk                  enable node's debugger breaking on the first line
    --inspect                    activate devtools in chrome
    --no-timeouts                remove timeouts in debug/inspect use case
    -h, --help                   output usage information
Profile options
output
output.reports
Recommended to set this as path:report, which will create a report directory beneath your base directory. See Reporting below.
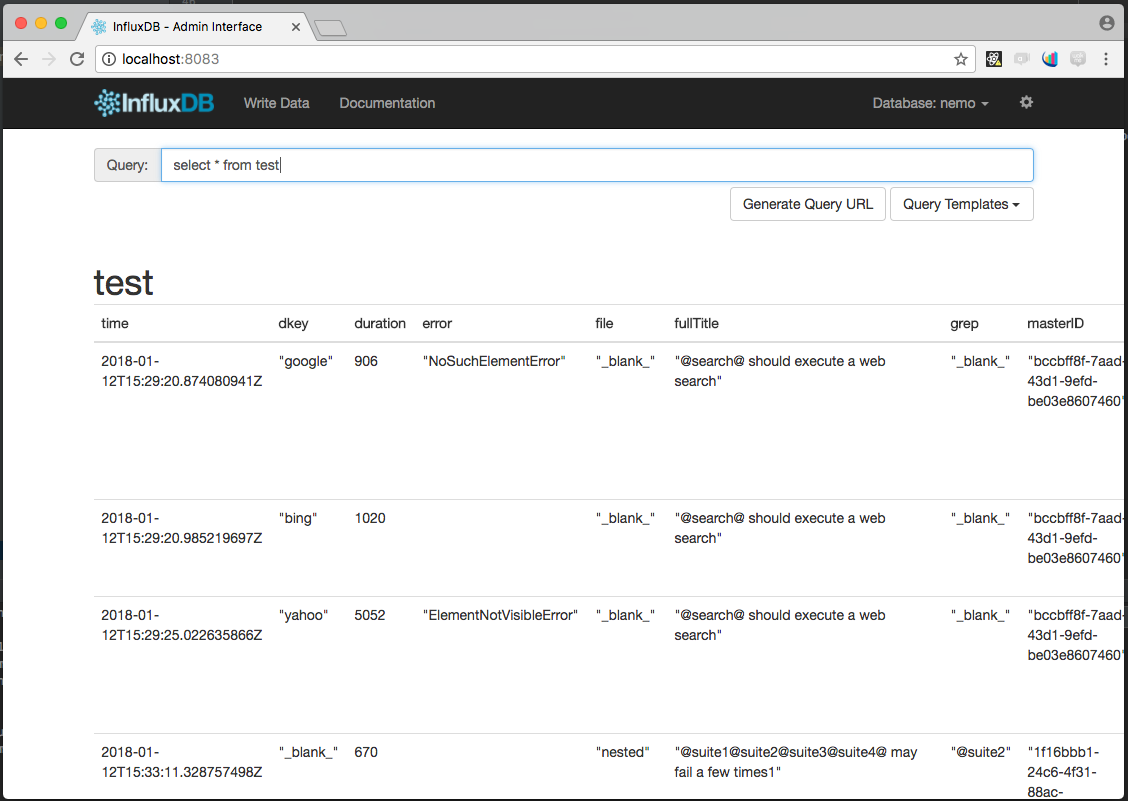
output.storage <optional but cool>
You can provide an influxdb endpoint and store test results in it. E.g.
"storage": {
    "server": "localhost",
    "database": "nemo"
}
Currently, you will get two measurements from running tests, test and lifecycle:
schema: [{
  measurement: 'test',
  fields: {
    result: Influx.FieldType.STRING,
    error: Influx.FieldType.STRING,
    stack: Influx.FieldType.STRING,
    fullTitle: Influx.FieldType.STRING,
    duration: Influx.FieldType.INTEGER,
    threadID: Influx.FieldType.STRING,
    masterID: Influx.FieldType.STRING
  },
  tags: [
    'title',
    'profile',
    'dkey',
    'file',
    'grep'
  ]
},
{
  measurement: 'lifecycle',
  fields: {
    event: Influx.FieldType.STRING,
    threadID: Influx.FieldType.STRING,
    masterID: Influx.FieldType.STRING,
    duration: Influx.FieldType.INTEGER
  },
  tags: [
    'profile',
    'dkey',
    'grep'
  ]
}]
base
is the main profile configuration that others will merge into
base.tests
is an absolute path based glob pattern. (e.g. "tests": "path:spec/!(wdb)*.js",)
base.parallel
only valid for 'base'.
- if set to 'file' it will create a child process for each mocha file (alternative to
-FCLI arg) - if set to 'data' it will create a child process for each object key under
base.data(alternative to the-DCLI arg)
base.mocha
mocha options. described elsewhere
base.env
any environment variables you want in the test process.
NOTES:
- currently
base.envis only honored if nemo is launching parallel nemo instances (each as its own process). If nemo launches a single nemo instance in the main process, these are ignored. - any env variables in your nemo process will be merged into the env for the parallel processes
(along with whatever is set under
base.env)
base.maxConcurrent
a number which represents the max limit of concurrent suites nemo will execute in parallel - if not provided there is no limit
Reporting
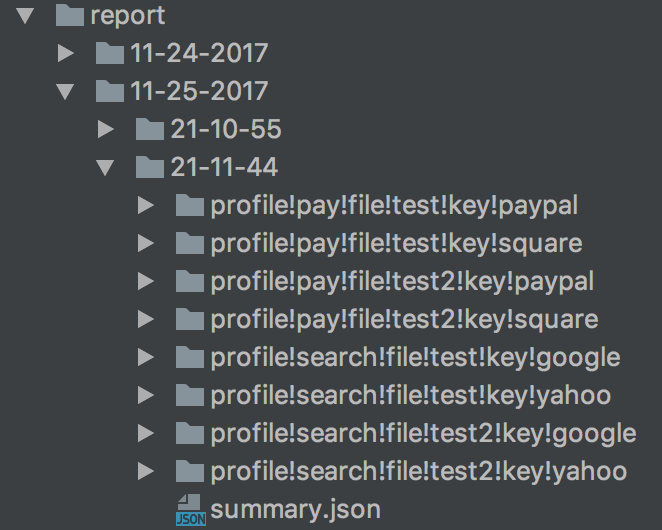
Recommended reporters are mochawesome or xunit. If you use either of these, nemo will generate timestamped directories for each run.
The reports will be further separated based on the parallel options. E.g.

In the above example, parallel options were "profile", "file", and "data".
A summary for all parallel instances can be found at summary.json
Screenshots
nemo will take a screenshot automatically after each test execution (pass or fail). The screenshots will be
named based on the respective test name. E.g. my awesome test.after.png.
You can use nemo.runner.snap() at any point in a test, to grab a screenshot. These screenshots will be named based on
the respective test name, and number of screenshots taken using nemo.runner.snap(). E.g.
my awesome test.1.pngmy awesome test.2.pngmy awesome test.3.png
If you use the mochawesome reporter, you will see these screeshots in the Additional Context section of the html report.
Adding Nemo into the mocha context and vice versa
nemo injects a nemo instance into the Mocha context (for it, before, after, etc functions) which can be accessed by
this.nemo within the test suites.
nemo also adds the current test's context to nemo.mocha. That can be useful if you want to access or modify the test's context from within a nemo plugin.
Parallel functionality
nemo will execute in parallel -P (profile) x -G (grep) mocha instances. The example above uses "browser" as the
profile dimension and suite name as the "grep" dimension. Giving 2x2=4 parallel executions.
In addition to profile and grep, are the dimensions file and data.
Parallel by file
file will multiply the existing # of instances by the # of files selected by your configuration.
Parallel by data
data will multiply the existing # of instances by the # of keys found under profiles.base.data. It can also be overriden per-profile. It will also replace
nemo.data with the value of each keyed object. In other words, you can use this to do parallel, data-driven testing.
If you have the following base profile configuration:
  "profiles": {
    "base": {
      "data": {
        "US": {"url": "http://www.paypal.com"},
        "FR": {"url": "http://www.paypal.fr"}
      },
      "parallel": "data",
      "tests": "path:spec/test-spec.js",
      "mocha": {
        //...
      }
    }
  }
Then the following test will run twice (in parallel) with corresponding values of nemo.data.url:
it('@loadHome@', function () {
    var nemo = this.nemo;
    return nemo.driver.get(nemo.data.url);//runs once with paypal.com, once with paypal.fr
});
Parallel reporting
Using a reporter which gives file output will be the most beneficial. nemo comes out of the box, ready to use mochawesome or xunit for outputting a report per parallel instance.
Mocha options
The properties passed in to the "mocha" property of config.json will be applied to the mocha instances that are created. In general, these properties correlate with the mocha command line arguments. E.g. if you want this:
mocha --timeout 180000You should add this to the "mocha" property within "profiles" of config.json:
"profile": {
	...other stuff,
	"mocha": {
		"timeout": 180000
	}
}
nemo creates mocha instances programmatically. Unfortunately, not all mocha command line options are available when instantiating it this way. One of the arguments that is not supported is the --require flag, which useful if you want to require a module, e.g. babel-register for transpilation. Thus, we added a "require" property in config.json, which takes a string of a single npm module name, or an array of npm module names. If it is an array, nemo will require each one before instantiating the mocha instances.
5 years ago
5 years ago
5 years ago
6 years ago
6 years ago
6 years ago
6 years ago
6 years ago
7 years ago
7 years ago
7 years ago
7 years ago
7 years ago
7 years ago
7 years ago
7 years ago
7 years ago
7 years ago
8 years ago
8 years ago
8 years ago
8 years ago
8 years ago
8 years ago
8 years ago
8 years ago
8 years ago
8 years ago
8 years ago
8 years ago
8 years ago
8 years ago
8 years ago
8 years ago
8 years ago
8 years ago
8 years ago
8 years ago
8 years ago
8 years ago
8 years ago
8 years ago
8 years ago
9 years ago
9 years ago
9 years ago
9 years ago
9 years ago
9 years ago
9 years ago
9 years ago
9 years ago
9 years ago
10 years ago
10 years ago
10 years ago
10 years ago
10 years ago
10 years ago
10 years ago
10 years ago
10 years ago
10 years ago
10 years ago
10 years ago
10 years ago
10 years ago
10 years ago
10 years ago
10 years ago
11 years ago
11 years ago
11 years ago
11 years ago
11 years ago
11 years ago
11 years ago
11 years ago
11 years ago
11 years ago
11 years ago
11 years ago
11 years ago
11 years ago
11 years ago
11 years ago
11 years ago
11 years ago
11 years ago
11 years ago
11 years ago
11 years ago
11 years ago
11 years ago
11 years ago
11 years ago
11 years ago
12 years ago
12 years ago
12 years ago
12 years ago
12 years ago
12 years ago
12 years ago