seethru v4.0.0
seeThru - HTML5 video with alpha channel transparencies

This package adds "support" for the lacking alpha channel in HTML5
<video>elements. Formerly known as "jquery-seeThru"
Your HTML5 video source is re-rendered into a canvas-element, adding the possibility to use transparencies in your video. Alpha information is either included in the video's source file (moving) or in a seperate <img>-element (static).
The package also ships with a simple CLI tool for automatically converting your RGBA video sources into the correct format.
Before you start
Native Support for VP8/WebM-video with Alpha Transparencies has landed in Chrome quite a while ago, so ideally other browser vendors will catch up soon and this script becomes obsolete at some point. You can see the article at HTML5 Rocks and read the discussion about how to use seeThru as a "polyfill" for more information.
Download / Installation
npm:
$ npm install seethrubower:
$ bower install seethruCDN:
<script src="https://unpkg.com/seethru@4/dist/seeThru.min.js"></script>
<!-- or -->
<script src="https://cdn.jsdelivr.net/npm/seethru@3/dist/seeThru.min.js"></script>
Alternatively, use the version(s) in /dist.
Word of warning
This approach is a cheap hack! Due to the lack of alpha support in HTML5 video it is one of the few ways to use video with alpha, so it might be the only viable option in some cases, but please don't expect it to work like a charm when processing 30fps 1080p video (or multiple videos) on an old machine with 39 browser tabs opened. Test your usage thoroughly on old machines as well and if you're not satisfied with the speed, maybe think about using a purely native solution. Also: the mobile support of this approach is very limited.
Table of contents
- Video Setup
- Basic Script Usage
- Options
- Additional methods
- Usage as a jQuery-plugin
- Examples
- Preparing video sources using
seethru-convert - Preparing video sources in Adobe After Effects
- CrossDomain issues with canvas elements
- Binding mouse events to your video
- Chrome and
m4vissues - Mobile devices & tablets
- Browser support
- License
Video setup
In default configuration the script assumes that the alpha information is added underneath the original video track (in the exact same dimensions: a video of 400x300 target dimensions will have a 400x600 source file). The alpha information should be a black and white image, with white being interpreted as fully opaque and black being fully transparent (colored input will be averaged).
For optimal results the color channel should be un-premultiplied. (see the Wikipedia article on Alpha Compositing for more info on what that is all about). If you need a tool to un-premultiply your imagery you can use Knoll Unmult which is available for quite a lot of packages. If there is no way for you to supply unmultiplied sources, you can use the unmult option, that comes with a severe performance penalty due to un-premultiplying at runtime.
For a basic introduction of how to encode and embed video for HTML5 pages see the great Dive into HTML5
Example image:
Note the jagged edges in the color channel(s) due to un-premultiplying:
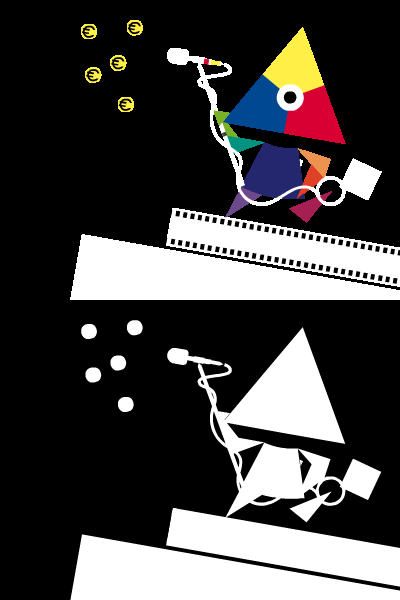 put over a greenish/blueish background results in
 Live Demo
Static Mask
It is also possible to source the alpha information from an <img>-element. The script lets you use either the luminance information of the RGB channels (i.e. the image) or the image's alpha channel (see options for how to choose). In case the image does not fit your video's dimensions it will be stretched to fit those.
Basic script usage
To use the script include the source:
<script type="text/javascript" src="seeThru.min.js"></script>and then pass your video element (either a selector or an actual DOMElement) and your options to seeThru.create(el[, options]):
var transparentVideo = seeThru.create('#my-video');If you specify dimension-attributes for your video, they will be considered, in case they are left unspecified, the dimensions of the source file will be used (video with alpha included will of course turn out to be halved in height).
For testing you can download and use the example videos in the repo's media folder.
Options
There are a few options you can pass when building an instance:
startdefines the video's behavior on load. It defaults toexternalwhich will just display the first frame of the video and wait for the caller to initiate video playback. Other options areclicktoplaywhich will display the first frame of the video until it is clicked.enddefines the video's behavior when it has reached its end. It defaults tostop. Other possibilities arerewindwhich will jump back to the first frame and stop. If you usestart: 'clicktoplay'along withrewindorendthe video will be clickable again when finished.staticMasklets you use the content of an<img>node as alpha information (also black and white). The parameter expects a CSS selector (preferrably ID) that refers directly to an image tag, like#fancy-mask. In case the selector matches nothing or a non-image node the option is ignored.alphaMaskspecifies if the script uses either the black and white information (i.e.false) or the alpha information (i.e.true) of the element specified in themaskparameter. Defaults tofalse.heightcan be used to control the height of the rendered canvas. Overrides the attributes of the<video>-elementwidthcan be used to control the width of the rendered canvas. Overrides the attributes of the<video>-elementpostercan be set totrueif you want the video to be replaced by the image specified in the<video>sposter-attribute when in a paused stateunmultcan be used if your source material's RGB channels are premultiplied (with black) and you want the script to un-premultiply the imagery. Note that this might have really bad effects on performance, so it is recommended to work with unpremultiplied video sourcesvideoStylesis the CSS (in object notation) that is used to hide the original video - can be updated in order to work around autoplay restrictions. It defaults to{ display: 'none' }namespaceis the prefix that will be used for the CSS classnames applied to the created DOM elements (buffer, display, posterframe), defaults toseeThru
This might look like this:
seeThru.create('#my-video');or
seeThru.create('#my-video', { staticMask: '#image-with-alpha', alphaMask: true });Additional methods
On the returned seeThru-Object these methods are available:
.ready(fn)lets you safely access the instance's methods as it will make sure the video's metadata has been fully loaded and the script was able to initialize. It will be passed theseeThruinstance as 1st argument, the used video as 2nd argument, and the canvas representation as the 3rd one. To ensure consistent behavior this will always be executed asynchronously, even if the video is ready when called..updateMask(selectorOrElement)lets you swap the alpha source for a video that uses static alpha information. The value for thealphaMaskoption will be kept from initialisation..revert()will revert the<video>element back to its original state, remove the<canvas>elements, all attached data and event listeners/handlers.play()and.pause()are convenience methods to control the playback of the video.getCanvas()lets you get the visible canvas element so you can interact with it
Example:
seeThru
    .create('#my-video', { width: 400, height: 300 })
    .ready(function (instance, video, canvas) {
        canvas.addEventListener('click', function () {
            instance.revert();
        });
        video.addEventListener('ended', function () {
            instance.revert();
        });
    });
Usage as a jQuery-plugin
If window.jQuery is present the script will automatically attach itself to jQuery as a plugin, meaning you can also do something like:
$('#my-video').seeThru().seeThru('play');If your jQuery is not global (AMD/browserify) but you still want to attach the script as a plugin you can use the attach method exisiting on seeThru.
var $ = require('jquery');
seeThru.attach($);
Examples
- Moving alpha
- Static alpha
- Swapping alpha sources
- Video listening to external JS calls
- Video playing on hover
Preparing video sources using seethru-convert
The package ships with a CLI tool (seethru-convert) that can prepare your video sources for you. Pass a video with alpha information (Animation-compressed .movs should work best here - also make sure the video actually contains information on the alpha channel) and it will automatically separate alpha and RGB information and render them side by side into the target file.
To install the CLI tool globally:
$ npm install seethru -gTo use the script you need to have ffmpeg and ffprobe installed. The executables needs to be in your $PATH (%PATH for Windows). Alternatively you can pass overrides for the executables used using the --ffmpeg-path and --ffprobe-path options.
Now you are ready to go:
$ seethru-convert --in myvideo.mov --out myvideo-converted.movIdeally you should be doing this conversion on your uncompressed / high-quality video source once, and then convert the output into whatever files you need (mp4, ogg et. al.) afterwards.
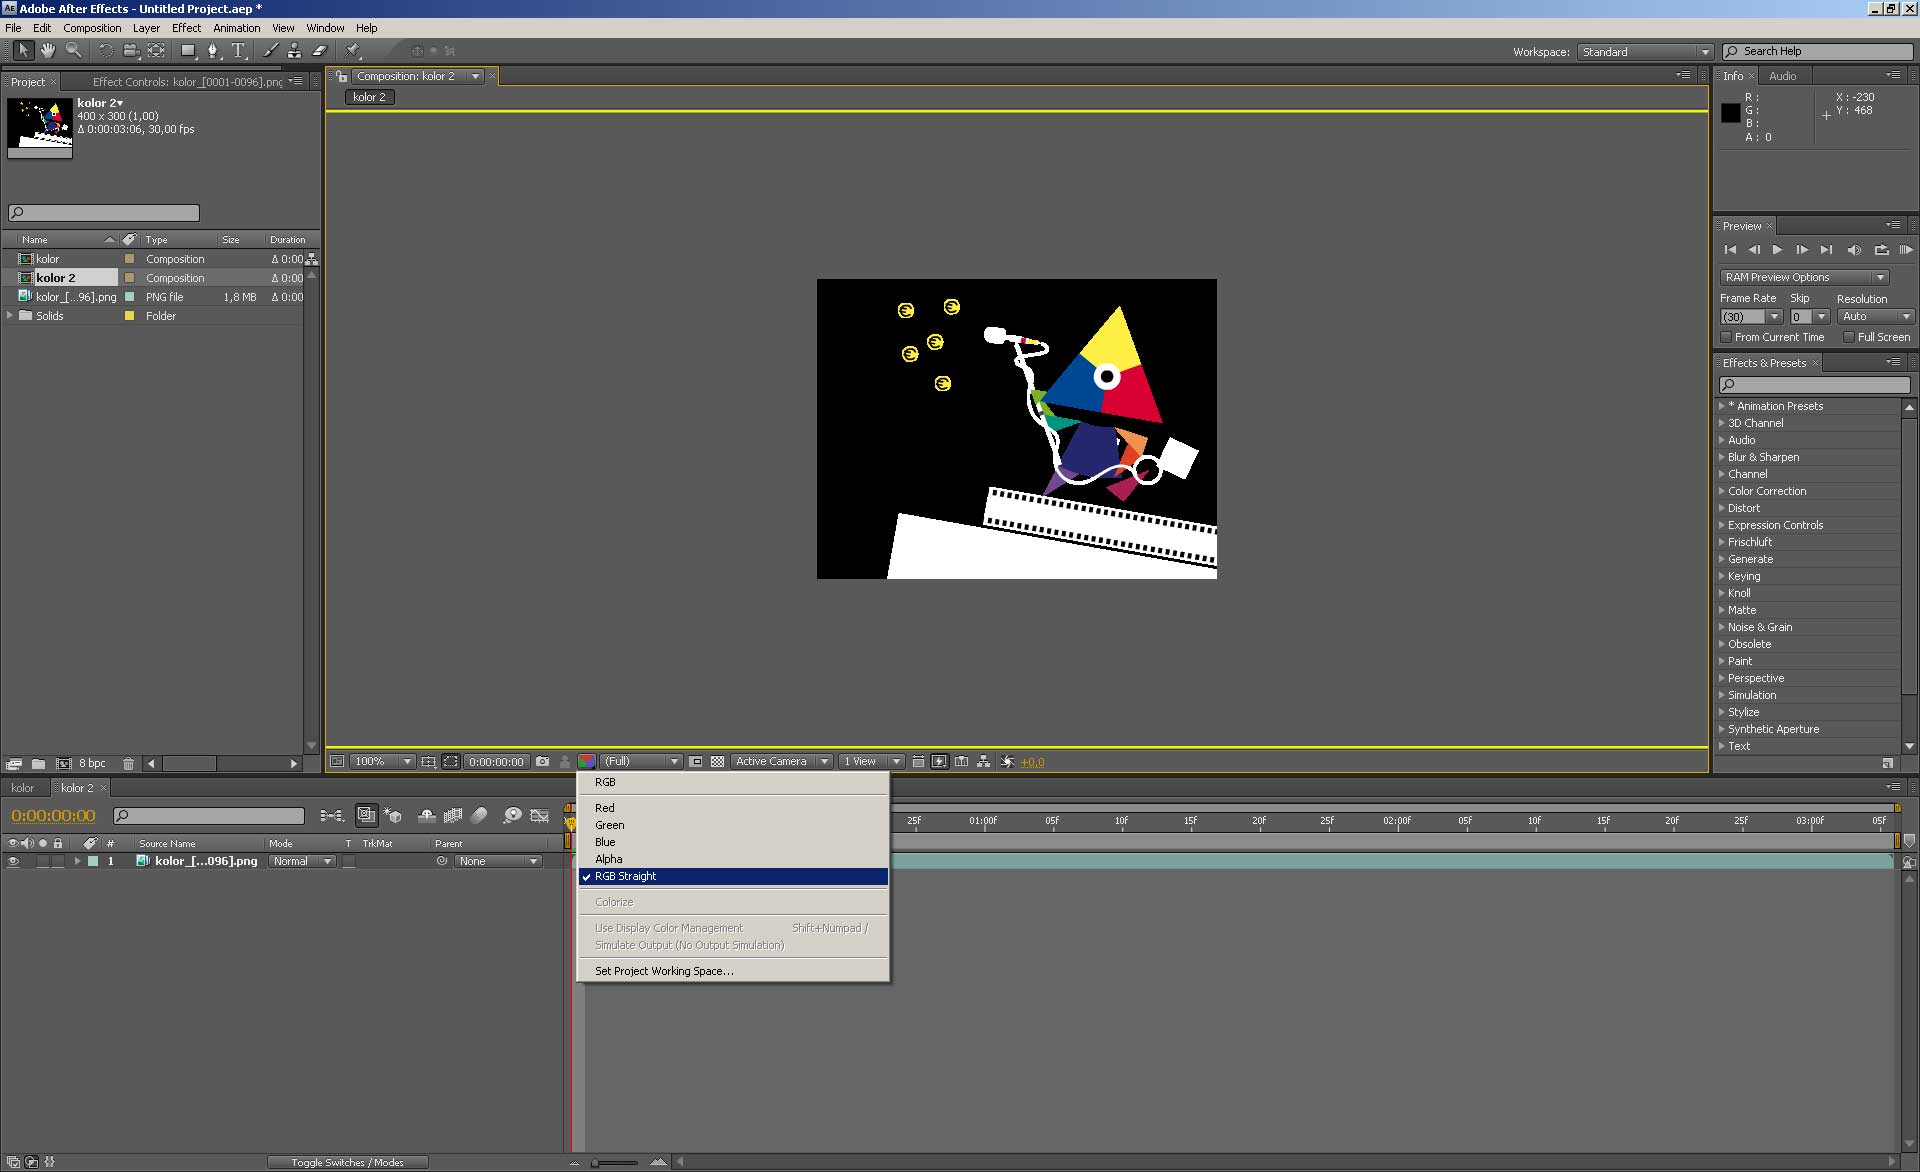
Preparing video sources in Adobe After Effects
You can also use standard video editing software to prepare the sources. This walkthrough shows how to do it using Adobe After Effects.
Put your animation with alpha in a composition:
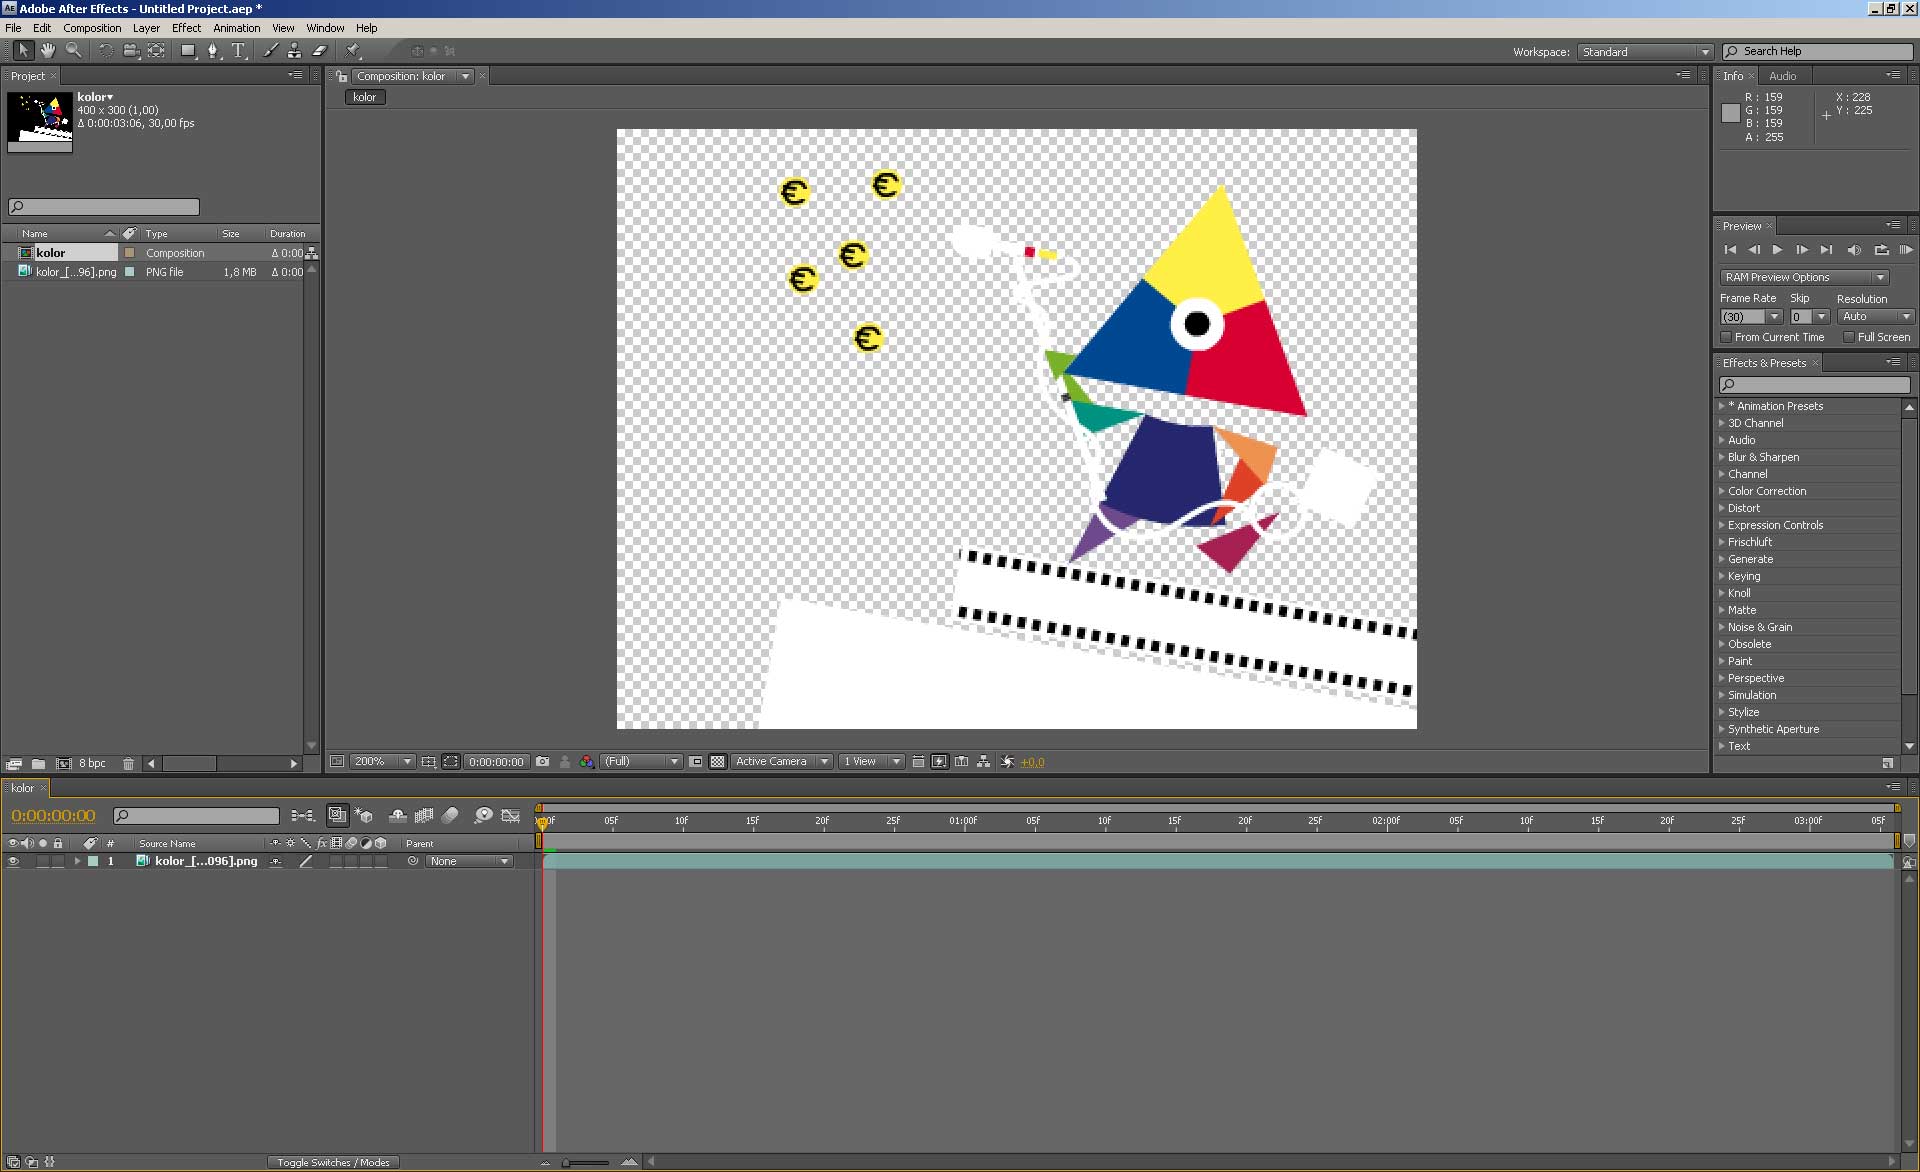 Double the composition's height:
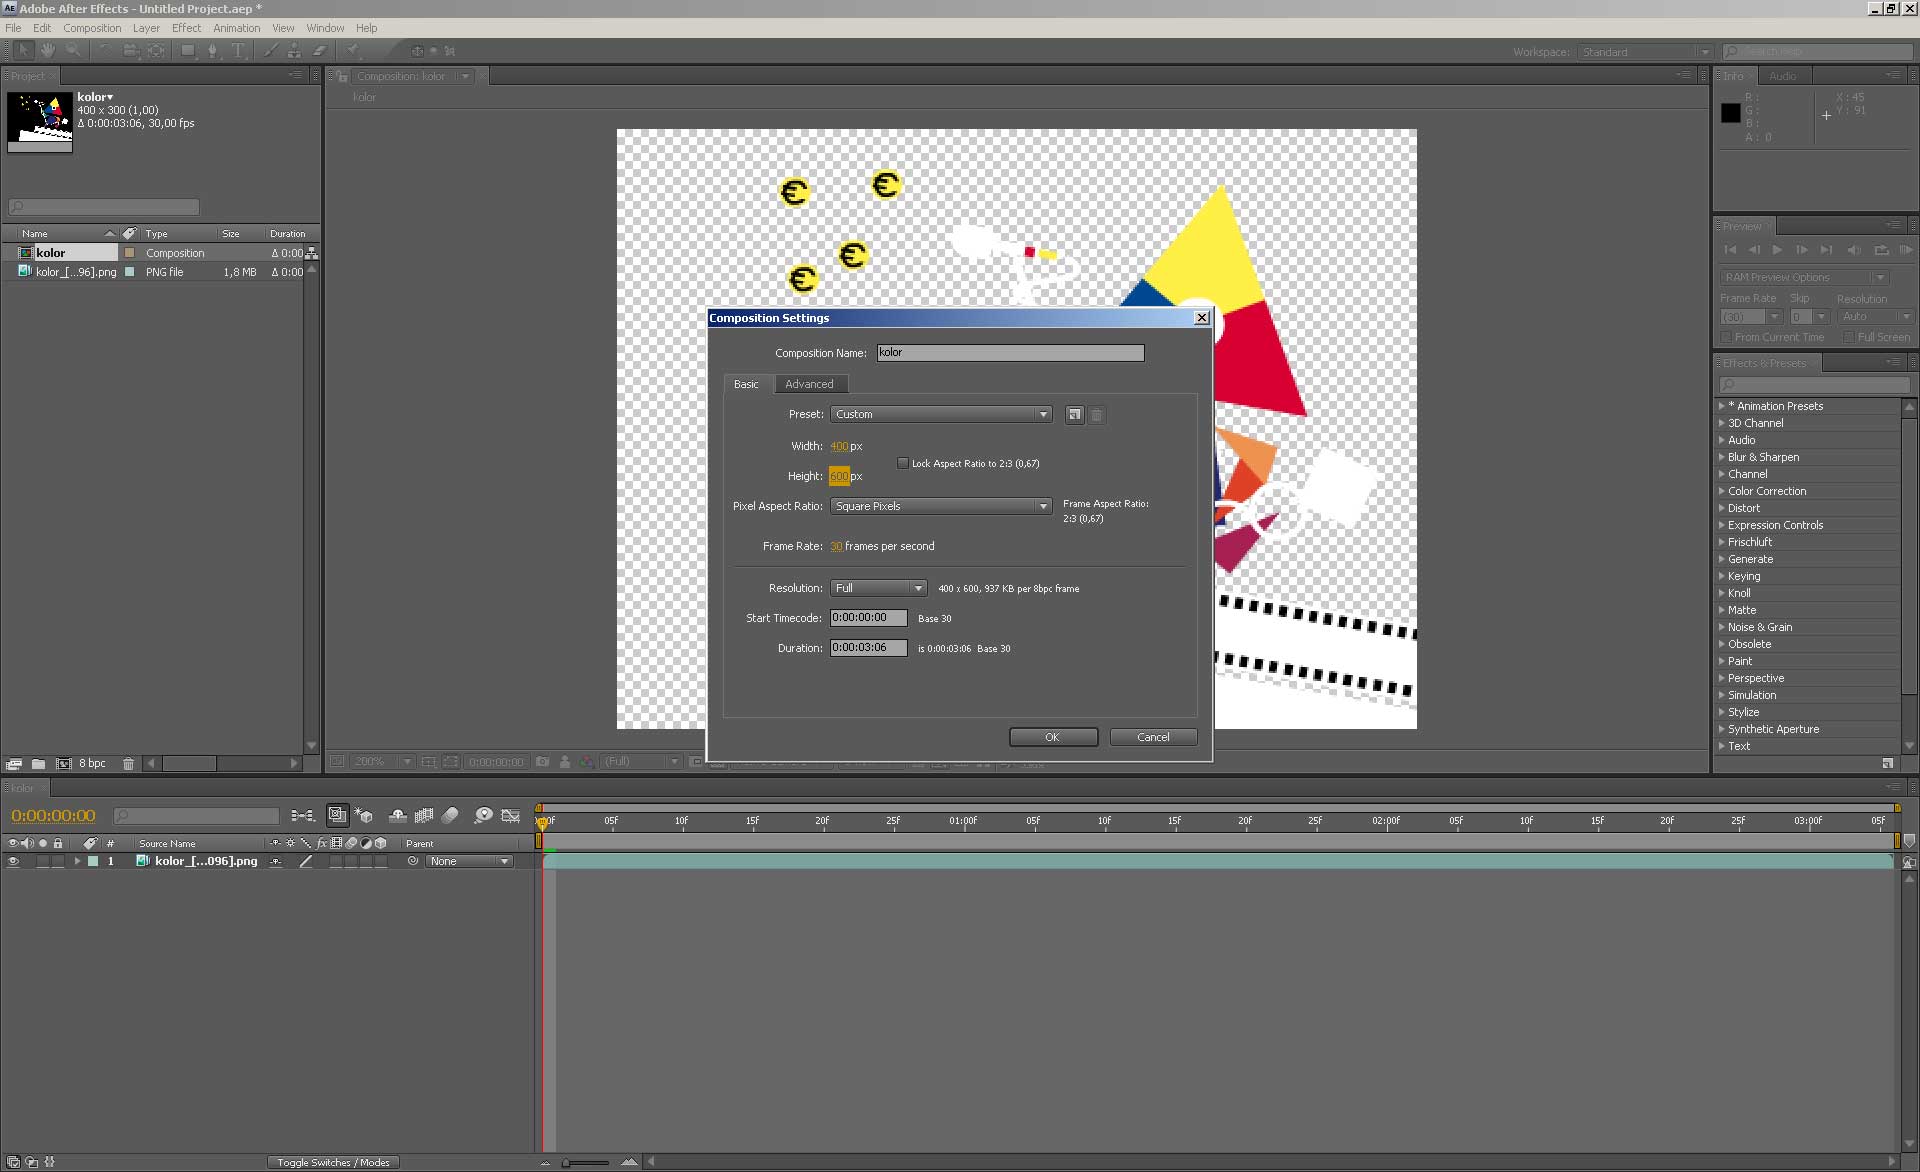 Duplicate your footage layer, align them, and use the second instance as Alpha Track Matte for a white solid:
 Make sure you are using an unmultiplied (straight) version of your color source:
Cross Domain issues with canvas-elements
Note that the canvas API is subject to cross domain security restrictions, so be aware that the video source files have to be served from the same domain (i.e. if the document that is calling seeThru is on www.example.net the video files have to be requested from www.example.net as well), otherwise you will see a DOM Security Exception. Also note that this also applies to subdomains, therefore you cannot mix www and non-www-URLs.
This can be worked around when using CORS or by using Blob URLs:
function loadAsObjectURL(video, url) {
    var xhr = new XMLHttpRequest();
    xhr.responseType = 'blob';
    xhr.onload = function (response) {
        return video.src = URL.createObjectURL(xhr.response);
    };
    xhr.onerror = function () { /* Houston we have a problem! */ };
    xhr.open('GET', url, true);
    xhr.send();
    video.onload = function () { return URL.revokeObjectURL(video.src); };
}

var video = document.querySelector('video');
video.addEventListener('loadedmetadata', function () {
    seeThru.create(video);
});
loadAsObjectURL(video, 'https://www.example.net/video.mp4');
Binding mouse events to your video
To mimic a behavior as if the original video was still visible it will echo all mouse events fired by the canvas representation.
The events that are echoed are: mouseenter mouseleave click mousedown mouseup mousemove mouseover hover dblclick contextmenu focus blur
Mobile devices & tablets
Support for mobile browsers is patchy due to some forcing any video to open in an external player or requiring user interaction. As of iOS 10, a video will work with seeThru if:
- the video has a
playsinlineattribute - the video has no audio track or a
mutedattribute
<video id="video" autoplay loop playsinline muted></video>In any case you will need to add the playsinline attribute to the <video> tag. If a video has audio, adding the muted attribute will enable playsinline.
Browser support
The script is tested on Chrome, Firefox, Safari, Opera and IE 9.0+.
See caniuse.com for browsers that support <canvas> and <video>
License
All source code is licensed under the MIT License, demo content, video and imagery is available under CC-BY-SA 3.0
Thank you
Thanks to Jake Archibald, who had the original idea for this approach, Kathi Käppel who designed the lovely Mr. Kolor from the demo and Sebastian Lechenbauer for making fun of my git dyslexia.

8 years ago
8 years ago
9 years ago
9 years ago
9 years ago
9 years ago
9 years ago
10 years ago
11 years ago
11 years ago
11 years ago
11 years ago
11 years ago
11 years ago
11 years ago
12 years ago
12 years ago
12 years ago
12 years ago
12 years ago